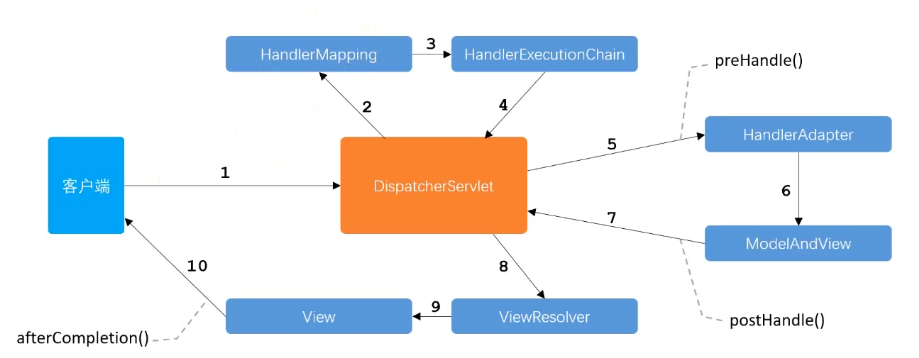
外观
牛客社区
看本项目的初衷,是了解社区模块中是如何高效地实现的,然后整合到自我管理系统的交流模块中
共分为 8 大章节
1.社区首页
1.1 首先进行环境配置
pom.xml 如下:
<?xml version="1.0" encoding="UTF-8"?>
<project xmlns="http://maven.apache.org/POM/4.0.0"
         xmlns:xsi="http://www.w3.org/2001/XMLSchema-instance"
         xsi:schemaLocation="http://maven.apache.org/POM/4.0.0 http://maven.apache.org/xsd/maven-4.0.0.xsd">
    <modelVersion>4.0.0</modelVersion>

    <groupId>com.scu</groupId>
    <artifactId>NowderCommunity</artifactId>
    <version>1.0-SNAPSHOT</version>
    <name>nowdercommunity</name>
    <description>nowcoder community</description>


    <parent>
        <groupId>org.springframework.boot</groupId>
        <artifactId>spring-boot-starter-parent</artifactId>
        <version>2.6.1</version>
        <relativePath/> <!-- lookup parent from repository -->
    </parent>


    <properties>
        <java.version>1.8</java.version>
    </properties>


    <dependencies>
        <dependency>
            <groupId>org.springframework.boot</groupId>
            <artifactId>spring-boot-starter-aop</artifactId>
        </dependency>
        <dependency>
            <groupId>org.springframework.boot</groupId>
            <artifactId>spring-boot-starter-thymeleaf</artifactId>
        </dependency>
        <dependency>
            <groupId>org.springframework.boot</groupId>
            <artifactId>spring-boot-starter-web</artifactId>
        </dependency>

        <dependency>
            <groupId>org.springframework.boot</groupId>
            <artifactId>spring-boot-devtools</artifactId>
            <scope>runtime</scope>
        </dependency>
        <dependency>
            <groupId>org.springframework.boot</groupId>
            <artifactId>spring-boot-starter-test</artifactId>
            <scope>test</scope>
        </dependency>

        <dependency>
            <groupId>mysql</groupId>
            <artifactId>mysql-connector-java</artifactId>
            <version>8.0.16</version>
        </dependency>
        <dependency>
            <groupId>org.mybatis.spring.boot</groupId>
            <artifactId>mybatis-spring-boot-starter</artifactId>
            <version>2.0.1</version>
        </dependency>
        <dependency>
            <groupId>junit</groupId>
            <artifactId>junit</artifactId>
            <scope>test</scope>
        </dependency>

    </dependencies>

    <build>
        <plugins>
            <plugin>
                <groupId>org.springframework.boot</groupId>
                <artifactId>spring-boot-maven-plugin</artifactId>
            </plugin>
        </plugins>
    </build>
</project>
1.2 实现分页
entity/Page.java : 封装分页相关的信息
public class Page {

    // 当前页码
    private int current = 1;
    // 显示上限
    private int limit = 10;
    // 数据总数(用于计算总页数)
    private int rows;
    // 查询路径(用于复用分页链接)
    private String path;

    public int getCurrent() {
        return current;
    }

    public void setCurrent(int current) {
        if (current >= 1) {
            this.current = current;
        }
    }

    public int getLimit() {
        return limit;
    }

    public void setLimit(int limit) {
        if (limit >= 1 && limit <= 100) {
            this.limit = limit;
        }
    }

    public int getRows() {
        return rows;
    }

    public void setRows(int rows) {
        if (rows >= 0) {
            this.rows = rows;
        }
    }

    public String getPath() {
        return path;
    }

    public void setPath(String path) {
        this.path = path;
    }

    _/**_
_     * 获取当前页的起始行_
_     *_
_     * @return_
_     */_
_    _public int getOffset() {
        // current * limit - limit
        return (current - 1) * limit;
    }

    _/**_
_     * 获取总页数_
_     *_
_     * @return_
_     */_
_    _public int getTotal() {
        // rows / limit [+1]
        if (rows % limit == 0) {
            return rows / limit;
        } else {
            return rows / limit + 1;
        }
    }

    /**_
_     * 获取起始页码_
_     *_
_     * @return_
_     */_
    public int getFrom() {
        int from = current - 2;
        return from < 1 ? 1 : from;
    }

    /**_
_     * 获取结束页码_
_     *_
_     * @return_
_     */_
    public int getTo() {
        int to = current + 2;
        int total = getTotal();
        return to > total ? total : to;
    }

}
controller/HomeController.java
@RequestMapping(path = "/index", method = RequestMethod._GET_)
public String getIndexPage(Model model, Page page) {
    // 方法调用钱,SpringMVC会自动实例化Model和Page,并将Page注入Model.
    // 所以,在thymeleaf中可以直接访问Page对象中的数据.
    page.setRows(discussPostService.findDiscussPostRows(0));
    // 在分页中复用链接
    page.setPath("/index");

    List<DiscussPost> list = discussPostService.findDiscussPosts(0, page.getOffset(), page.getLimit());
    System._out_.println("len: "+ list.size());

    List<Map<String, Object>> discussPosts = new ArrayList<>();

    if (list != null) {
        for (DiscussPost post : list) {
            Map<String, Object> map = new HashMap<>();
            map.put("post", post);
            User user = userService.findUserById(post.getUserId());
            map.put("user", user);
            discussPosts.add(map);
        }
    }
    model.addAttribute("discussPosts", discussPosts);
    return "/index";
}
thymeleaf/index.html
<!-- 内容 -->
<div class="main">
<div class="container">
<div class="position-relative">
<!-- 筛选条件 -->
<ul class="nav nav-tabs mb-3">
<li class="nav-item">
<a class="nav-link active" href="#">最新</a>
</li>
<li class="nav-item">
<a class="nav-link" href="#">最热</a>
</li>
</ul>
<button type="button" class="btn btn-primary btn-sm position-absolute rt-0" data-toggle="modal" data-target="#publishModal">我要发布</button>
</div>
<!-- 弹出框 -->
<div class="modal fade" id="publishModal" tabindex="-1" role="dialog" aria-labelledby="publishModalLabel" aria-hidden="true">
<div class="modal-dialog modal-lg" role="document">
<div class="modal-content">
<div class="modal-header">
<h5 class="modal-title" id="publishModalLabel">新帖发布</h5>
<button type="button" class="close" data-dismiss="modal" aria-label="Close">
<span aria-hidden="true">×</span>
</button>
</div>
<div class="modal-body">
<form>
<div class="form-group">
<label for="recipient-name" class="col-form-label">标题:</label>
<input type="text" class="form-control" id="recipient-name">
</div>
<div class="form-group">
<label for="message-text" class="col-form-label">正文:</label>
<textarea class="form-control" id="message-text" rows="15"></textarea>
</div>
</form>
</div>
<div class="modal-footer">
<button type="button" class="btn btn-secondary" data-dismiss="modal">取消</button>
<button type="button" class="btn btn-primary" id="publishBtn">发布</button>
</div>
</div>
</div>
</div>
<!-- 提示框 -->
<div class="modal fade" id="hintModal" tabindex="-1" role="dialog" aria-labelledby="hintModalLabel" aria-hidden="true">
<div class="modal-dialog modal-lg" role="document">
<div class="modal-content">
<div class="modal-header">
<h5 class="modal-title" id="hintModalLabel">提示</h5>
</div>
<div class="modal-body" id="hintBody">
发布完毕!
</div>
</div>
</div>
</div>
<!-- 帖子列表 -->
<ul class="list-unstyled">
<li class="media pb-3 pt-3 mb-3 border-bottom" th:each="map:${discussPosts}">
<a href="site/profile.html">
<img th:src="${map.user.headerUrl}" class="mr-4 rounded-circle" alt="用户头像" style="width:50px;height:50px;">
</a>
<div class="media-body">
<h6 class="mt-0 mb-3">
<a href="#" th:utext="${map.post.title}">备战春招,面试刷题跟他复习,一个月全搞定!</a>
<span class="badge badge-secondary bg-primary" th:if="${map.post.type==1}">置顶</span>
<span class="badge badge-secondary bg-danger" th:if="${map.post.status==1}">精华</span>
</h6>
<div class="text-muted font-size-12">
<u class="mr-3" th:utext="${map.user.username}">寒江雪</u> 发布于 <b th:text="${#dates.format(map.post.createTime,'yyyy-MM-dd HH:mm:ss')}">2019-04-15 15:32:18</b>
<ul class="d-inline float-right">
<li class="d-inline ml-2">赞 11</li>
<li class="d-inline ml-2">|</li>
<li class="d-inline ml-2">回帖 7</li>
</ul>
</div>
</div>
</li>
</ul>
<!-- 分页 -->
<nav class="mt-5" th:if="${page.rows>0}">
<ul class="pagination justify-content-center">
<li class="page-item">
<a class="page-link" th:href="@{${page.path}(current=1)}">首页</a>
</li>
<li th:class="|page-item ${page.current==1?'disabled':''}|">
<a class="page-link" th:href="@{${page.path}(current=${(page.current)-1})}">上一页</a></li>
<li th:class="|page-item ${i==page.current?'active':''}|" th:each="i:${#numbers.sequence(page.from,page.to)}">
<a class="page-link" th:href="@{${page.path}(current=${i})}" th:text="${i}">1</a>
</li>
<li th:class="|page-item ${page.current==page.total?'disabled':''}|">
<a class="page-link" th:href="@{${page.path}(current=${(page.current)+1})}">下一页</a>
</li>
<li class="page-item">
<a class="page-link" th:href="@{${page.path}(current=${page.total})}">末页</a>
</li>
</ul>
</nav>
</div>
</div>1.3 日志统一管理
日志相关配置文件 resources/logback-spring,xml
<?xml version="1.0" encoding="UTF-8"?>
<configuration>
    <contextName>community</contextName>
    <!--日志存储的路径-->
    <property name="LOG_PATH" value="D:/work/data"/>
    <!--该项目的名称-->
    <property name="APPDIR" value="community"/>

    <!-- error file -->
    <appender name="FILE_ERROR" class="ch.qos.logback.core.rolling.RollingFileAppender">
        <!--error 级别的日志存储的文件地址-->
        <file>${LOG_PATH}/${APPDIR}/log_error.log</file>
        <rollingPolicy class="ch.qos.logback.core.rolling.TimeBasedRollingPolicy">
            <fileNamePattern>${LOG_PATH}/${APPDIR}/error/log-error-%d{yyyy-MM-dd}.%i.log</fileNamePattern>
            <timeBasedFileNamingAndTriggeringPolicy class="ch.qos.logback.core.rolling.SizeAndTimeBasedFNATP">
                <maxFileSize>5MB</maxFileSize>
            </timeBasedFileNamingAndTriggeringPolicy>
            <maxHistory>30</maxHistory>
        </rollingPolicy>
        <append>true</append>
        <encoder class="ch.qos.logback.classic.encoder.PatternLayoutEncoder">
            <pattern>%d %level [%thread] %logger{10} [%file:%line] %msg%n</pattern>
            <charset>utf-8</charset>
        </encoder>
        <filter class="ch.qos.logback.classic.filter.LevelFilter">
            <level>error</level>
            <onMatch>ACCEPT</onMatch>
            <onMismatch>DENY</onMismatch>
        </filter>
    </appender>

    <!-- warn file -->
    <appender name="FILE_WARN" class="ch.qos.logback.core.rolling.RollingFileAppender">
        <file>${LOG_PATH}/${APPDIR}/log_warn.log</file>
        <rollingPolicy class="ch.qos.logback.core.rolling.TimeBasedRollingPolicy">
            <fileNamePattern>${LOG_PATH}/${APPDIR}/warn/log-warn-%d{yyyy-MM-dd}.%i.log</fileNamePattern>
            <timeBasedFileNamingAndTriggeringPolicy class="ch.qos.logback.core.rolling.SizeAndTimeBasedFNATP">
                <maxFileSize>5MB</maxFileSize>
            </timeBasedFileNamingAndTriggeringPolicy>
            <maxHistory>30</maxHistory>
        </rollingPolicy>
        <append>true</append>
        <encoder class="ch.qos.logback.classic.encoder.PatternLayoutEncoder">
            <pattern>%d %level [%thread] %logger{10} [%file:%line] %msg%n</pattern>
            <charset>utf-8</charset>
        </encoder>
        <filter class="ch.qos.logback.classic.filter.LevelFilter">
            <level>warn</level>
            <onMatch>ACCEPT</onMatch>
            <onMismatch>DENY</onMismatch>
        </filter>
    </appender>

    <!-- info file -->
    <appender name="FILE_INFO" class="ch.qos.logback.core.rolling.RollingFileAppender">
        <file>${LOG_PATH}/${APPDIR}/log_info.log</file>
        <rollingPolicy class="ch.qos.logback.core.rolling.TimeBasedRollingPolicy">
            <fileNamePattern>${LOG_PATH}/${APPDIR}/info/log-info-%d{yyyy-MM-dd}.%i.log</fileNamePattern>
            <timeBasedFileNamingAndTriggeringPolicy class="ch.qos.logback.core.rolling.SizeAndTimeBasedFNATP">
                <maxFileSize>5MB</maxFileSize>
            </timeBasedFileNamingAndTriggeringPolicy>
            <maxHistory>30</maxHistory>
        </rollingPolicy>
        <append>true</append>
        <encoder class="ch.qos.logback.classic.encoder.PatternLayoutEncoder">
            <pattern>%d %level [%thread] %logger{10} [%file:%line] %msg%n</pattern>
            <charset>utf-8</charset>
        </encoder>
        <filter class="ch.qos.logback.classic.filter.LevelFilter">
            <level>info</level>
            <onMatch>ACCEPT</onMatch>
            <onMismatch>DENY</onMismatch>
        </filter>
    </appender>

    <!-- console -->
    <appender name="STDOUT" class="ch.qos.logback.core.ConsoleAppender">
        <encoder>
            <pattern>%d %level [%thread] %logger{10} [%file:%line] %msg%n</pattern>
            <charset>utf-8</charset>
        </encoder>
        <filter class="ch.qos.logback.classic.filter.ThresholdFilter">
            <level>debug</level>
        </filter>
    </appender>

    <logger name="com.nowcoder.community" level="debug"/>

    <root level="info">
        <appender-ref ref="FILE_ERROR"/>
        <appender-ref ref="FILE_WARN"/>
        <appender-ref ref="FILE_INFO"/>
        <appender-ref ref="STDOUT"/>
    </root>

</configuration>
在测试类类中进行测试:
LogerTests.java
@RunWith(SpringRunner.class)
@SpringBootTest
@ContextConfiguration(classes = CommunityApplication.class)
public class LoggerTests {

    private static final Logger _logger _= LoggerFactory._getLogger_(LoggerTests.class);

    @Test
    public void testLogger() {
        System._out_.println(_logger_.getName());

        _logger_.debug("debug log");
        _logger_.info("info log");
        _logger_.warn("warn log");
        _logger_.error("error log");
    }

}
登录模块
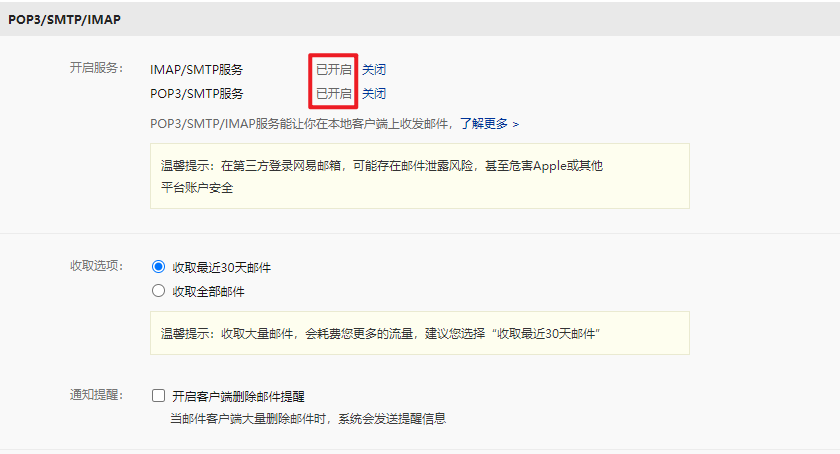
2.1 发送邮件
- 客户端设置
- jar 包导入
pom.xml
<dependency>
    <groupId>org.springframework.boot</groupId>
    <artifactId>spring-boot-starter-mail</artifactId>
    <version>2.1.5.RELEASE</version>
</dependency>- 邮箱参数设置
application.properties
# 邮件相关配置
spring.mail.host=smtp.163.com
spring.mail.port=465
spring.mail.username=cloudinwind4132@163.com
spring.mail.password=QEBOQMQFRPNNTKKY
spring.mail.protocol=smtps
spring.mail.properties.mail.smtp.ssl.enable=true- 邮件发送工具类
utils/MailClient.java
package com.nowcoder.community.util;


import org.slf4j.Logger;
import org.slf4j.LoggerFactory;
import org.springframework.beans.factory.annotation.Autowired;
import org.springframework.beans.factory.annotation.Value;
import org.springframework.mail.javamail.JavaMailSender;
import org.springframework.mail.javamail.MimeMessageHelper;
import org.springframework.stereotype.Component;

import javax.mail.MessagingException;
import javax.mail.internet.MimeMessage;

@Component
public class MailClient {

    private static final Logger _logger _= LoggerFactory._getLogger_(MailClient.class);

    @Autowired
    private JavaMailSender mailSender;

    @Value("${spring.mail.username}")
    private String from;

    public void sendMail(String to, String subject, String content) {
        try {
            MimeMessage message = mailSender.createMimeMessage();
            MimeMessageHelper helper = new MimeMessageHelper(message);
            helper.setFrom(from);
            helper.setTo(to);
            helper.setSubject(subject);
            helper.setText(content, true);
            mailSender.send(helper.getMimeMessage());
        } catch (MessagingException e) {
            _logger_.error("发送邮件失败:" + e.getMessage());
        }
    }

}- 发送邮件测试
MailTests.java
package com.nowcoder.community;

import com.nowcoder.community.util.MailClient;
import org.junit.Test;
import org.junit.runner.RunWith;
import org.springframework.beans.factory.annotation.Autowired;
import org.springframework.boot.test.context.SpringBootTest;
import org.springframework.test.context.ContextConfiguration;
import org.springframework.test.context.junit4.SpringRunner;
import org.thymeleaf.TemplateEngine;
import org.thymeleaf.context.Context;

@RunWith(SpringRunner.class)
@SpringBootTest
@ContextConfiguration(classes = CommunityApplication.class)
public class MailTests {

    @Autowired
    private MailClient mailClient;

    @Autowired
    private TemplateEngine templateEngine;

    @Test
    public void testTextMail() {
        mailClient.sendMail("cloudinwind4132@163.com", "TEST", "Welcome.");
    }

    // 使用 thymeleaf设置邮件格式
    @Test
    public void testHtmlMail() {
        Context context = new Context();
        context.setVariable("username", "hello");

        // activation.html
        String content = templateEngine.process("activation", context);
        System._out_.println(content);

        mailClient.sendMail("cloudinwind4132@163.com", "HTML", content);
    }

}
2.2 注册功能实现
注册功能分析图示:
注册成功后 operate-result.html 自动跳转 到 /index 页面
<p>
    系统会在 <span id="seconds" class="text-danger">8</span> 秒后自动跳转,
    您也可以点此 <a id="target" th:href="@{${target}}" class="text-primary">链接</a>, 手动跳转!
</p>

<script>
    _<!--自动跳转-->_
_    _$(function(){
       _setInterval_(function(){
          var seconds = $("#seconds").text();
          $("#seconds").text(--seconds);
          if(seconds == 0) {
             location.href = $("#target").attr("href");
          }
       }, 1000);
    });
</script>
2.3 会话管理
cookie:
- 服务器发送到浏览器,并保存到浏览器端的一小块数据
- 浏览器再次访问该服务器的时候,会自动携带该数据,并将其发送到服务器
代码实现:AlphaController.java
浏览器向服务器发送请求, 服务器的返回头中会有相关的 cookie 内容,浏览器将 cookie 存储到本地
_// cookie示例_
@RequestMapping(path = "/cookie/set", method = RequestMethod._GET_)
@ResponseBody
public String setCookie(HttpServletResponse response) {
    _// 创建cookie_
_    _Cookie cookie = new Cookie("code", CommunityUtil._generateUUID_());
    _// 设置cookie生效的范围_
_    _cookie.setPath("/community/alpha");
    _// 设置cookie的生存时间_
_    _cookie.setMaxAge(60 * 10);
    _// 发送cookie_
_    _response.addCookie(cookie);

    return "set cookie";
}

@RequestMapping(path = "/cookie/get", method = RequestMethod._GET_)
@ResponseBody
public String getCookie(@CookieValue("code") String code) {
    System._out_.println(code);
    return "get cookie";
}
session:
- 服务器端记录客户端的信息,保存在服务器端
代码实现:AlphaController.java
浏览器发送请求, 服务器会使用 session 存储客户端信息,并将 sessionId 封装到 cookie 中 返回给浏览器
_// session示例_
@RequestMapping(path = "/session/set", method = RequestMethod._GET_)
@ResponseBody
public String setSession(HttpSession session) {
    session.setAttribute("id", 1);
    session.setAttribute("name", "Test");
    return "set session";
}

@RequestMapping(path = "/session/get", method = RequestMethod._GET_)
@ResponseBody
public String getSession(HttpSession session) {
    System._out_.println(session.getAttribute("id"));
    System._out_.println(session.getAttribute("name"));
    return "get session";
}
2.4 生成验证码
1.jar 包导入
pom.xml
<dependency>
    <groupId>com.github.penggle</groupId>
    <artifactId>kaptcha</artifactId>
    <version>2.3.2</version>
</dependency>
2.配置类设置
config/KaptchaConfig.java
@Configuration
public class KaptchaConfig {

    @Bean
    public Producer kaptchaProducer() {
        Properties properties = new Properties();
        properties.setProperty("kaptcha.image.width", "100");
        properties.setProperty("kaptcha.image.height", "40");
        properties.setProperty("kaptcha.textproducer.font.size", "32");
        properties.setProperty("kaptcha.textproducer.font.color", "0,0,0");
        properties.setProperty("kaptcha.textproducer.char.string", "0123456789ABCDEFGHIJKLMNOPQRSTUVWXYAZ");
        properties.setProperty("kaptcha.textproducer.char.length", "4");
        properties.setProperty("kaptcha.noise.impl", "com.google.code.kaptcha.impl.NoNoise");

        Config config = new Config(properties);
        DefaultKaptcha kaptcha = new DefaultKaptcha();
        kaptcha.setConfig(config);
        return kaptcha;
    }

}
3.随机字符生成
controller/LoginController.java
_// 设置验证码图片 前端发送请求后, 返回一个验证码图片_
@RequestMapping(path = "/kaptcha", method = RequestMethod._GET_)
public void getKaptcha(HttpServletResponse response, HttpSession session) {
    _// 生成字符串(4位的数字)_
_    _String text = kaptchaProducer.createText();
    _// 生成图片_
_    _BufferedImage image = kaptchaProducer.createImage(text);

    _// 将验证码存入session, 方便后期使用_
_    _session.setAttribute("kaptcha", text);

    _// 将图片输出给浏览器_
_    _response.setContentType("image/png");
    try {
        OutputStream os = response.getOutputStream();
        ImageIO._write_(image, "png", os);
    } catch (IOException e) {
        _logger_.error("响应验证码失败:" + e.getMessage());
    }
}
页面中内嵌显示:
在 global.js 中设置全局变量, 供 js 调用
var CONTEXT_PATH = "/community";site/login.html
<div class="col-sm-4">
    <img th:src="@{/kaptcha}" id="kaptcha" style="width:100px;height:40px;" class="mr-2"/>
    <a href="javascript:_refresh_kaptcha_();" class="font-size-12 align-bottom">刷新验证码</a>
</div>
<script>
    function _refresh_kaptcha_() {
       var path = CONTEXT_PATH + "/kaptcha?p=" + Math.random();
       $("#kaptcha").attr("src", path);
    }
</script>
2.5 登录功能
登录凭证设置
关于登录凭证,是服务器识别登录用户的标识,存放在数据库中,一般是 存储在 Redis 中,现在先存储在 MySQL 中
login_ticket 表:

持久层相关操作
dao/LoginTicketMapper.java
@Mapper
public interface LoginTicketMapper {

    @Insert({
            "insert into login_ticket(user_id,ticket,status,expired) ",
            "values(#{userId},#{ticket},#{status},#{expired})"
    })
    @Options(useGeneratedKeys = true, keyProperty = "id")
    int insertLoginTicket(LoginTicket loginTicket);

    @Select({
            "select id,user_id,ticket,status,expired ",
            "from login_ticket where ticket=#{ticket}"
    })
    LoginTicket selectByTicket(String ticket);

    @Update({
            "<script>",
            "update login_ticket set status=#{status} where ticket=#{ticket} ",
            "<if test=\"ticket!=null\"> ",
            "and 1=1 ",
            "</if>",
            "</script>"
    })
    int updateStatus(String ticket, int status);

}
业务层实现
service/UserService.java
public Map<String, Object> login(String username, String password, int expiredSeconds) {
    Map<String, Object> map = new HashMap<>();

    _// 空值处理_
_    _if (StringUtils._isBlank_(username)) {
        map.put("usernameMsg", "账号不能为空!");
        return map;
    }
    if (StringUtils._isBlank_(password)) {
        map.put("passwordMsg", "密码不能为空!");
        return map;
    }

    _// 验证账号_
_    _User user = userMapper.selectByName(username);
    if (user == null) {
        map.put("usernameMsg", "该账号不存在!");
        return map;
    }

    _// 验证状态_
_    _if (user.getStatus() == 0) {
        map.put("usernameMsg", "该账号未激活!");
        return map;
    }

    _// 验证密码_
_    _password = CommunityUtil._md5_(password + user.getSalt());
    if (!user.getPassword().equals(password)) {
        map.put("passwordMsg", "密码不正确!");
        return map;
    }

    _// 生成登录凭证_
_    _LoginTicket loginTicket = new LoginTicket();
    loginTicket.setUserId(user.getId());
    loginTicket.setTicket(CommunityUtil._generateUUID_());
    loginTicket.setStatus(0);
    loginTicket.setExpired(new Date(System._currentTimeMillis_() + expiredSeconds * 1000));
    loginTicketMapper.insertLoginTicket(loginTicket);

    map.put("ticket", loginTicket.getTicket());
    return map;
}
视图层实现
controller/LoginController.java
_// 处理登录页面提交的form表单,POST请求_
@RequestMapping(path = "/login", method = RequestMethod._POST_)
public String login(String username, String password, String code, boolean rememberme,
                    Model model, HttpSession session, HttpServletResponse response) {
    _// 检查验证码_
_    // 在获取验证码的方法 getKaptcha 中 已经将获取到的验证码存储到了session中,因此这里可以直接通过session获取_
_    _String kaptcha = (String) session.getAttribute("kaptcha");
    if (StringUtils._isBlank_(kaptcha) || StringUtils._isBlank_(code) || !kaptcha.equalsIgnoreCase(code)) {
        model.addAttribute("codeMsg", "验证码不正确!");
        return "/site/login";
    }

    _// 检查账号,密码_
_    // 根据前端是否勾选 记住我, 确定设置的cookie的失效时间_
_    _int expiredSeconds = rememberme ? _REMEMBER_EXPIRED_SECONDS _: _DEFAULT_EXPIRED_SECONDS_;
    Map<String, Object> map = userService.login(username, password, expiredSeconds);
    if (map.containsKey("ticket")) {
        _// 表明登录成功_
_        _Cookie cookie = new Cookie("ticket", map.get("ticket").toString());
        _// 设置cookie的生效路径_
_        _cookie.setPath(contextPath);
        _// 设置生效的时间_
_        _cookie.setMaxAge(expiredSeconds);
        _// 添加到返回头中_
_        _response.addCookie(cookie);
        return "redirect:/index";
    } else {
        model.addAttribute("usernameMsg", map.get("usernameMsg"));
        model.addAttribute("passwordMsg", map.get("passwordMsg"));
        return "/site/login";
    }
}
退出功能实现
controller/LoginController.java
_// 退出登录_
@RequestMapping(path = "/logout", method = RequestMethod._GET_)
public String logout(@CookieValue("ticket") String ticket) {
    userService.logout(ticket);
    return "redirect:/login";
}
2.6 显示登录信息
即:登录的话现实 头像和个人首页
没有登录现实 登录跳转
使用拦截器实现
- 在请求开始的 时候查询登录用户(根据携带的 cookie 信息查询)
因为是实现的接口方法,因此不能在方法的参数中加上 @CookieValue 注解 因此重新定义一个 CookieUtil 类,实现对 Cookie 内容的获取
- 如果查询到,在本次请求中持有用户数据 (将用户数据保存起来)
因为可能同时有多个用户同时访问服务器,服务器对于每一个用户请求都会创建一个线程处理
因此为了让多线程并发访问服务器的时候不出现问题,用户信息就不能单纯存在变量 or 容器中,要考虑线程的隔离, 即每一个线程单独存一份,他们之间不互相干扰
因此使用到 java 多线程中的 ThreadLocal
- 在前端显示用户信息(头像、用户名)
- 请求结束的时候清理用户数据
1.创建登录拦截器
controller.interceptor.LoginTicketInterceptor.java
@Component
public class LoginTicketInterceptor implements HandlerInterceptor {

    @Autowired
    private UserService userService;

    @Autowired
    private HostHolder hostHolder;

    @Override
    public boolean preHandle(HttpServletRequest request, HttpServletResponse response, Object handler) throws Exception {
        _// 第一步,需要通过cookie获得ticket_
_        // 因为是实现的接口方法,因此不能在方法的参数中加上 @CookieValue 注解_
_        // 因此重新定义一个CookieUtil类,实现对Cookie内容的获取_
_        _String ticket = CookieUtil._getValue_(request, "ticket");

        if (ticket != null) {
            _// 查询凭证_
_            _LoginTicket loginTicket = userService.findLoginTicket(ticket);
            _// 检查凭证是否有效_
_            _if (loginTicket != null && loginTicket.getStatus() == 0 && loginTicket.getExpired().after(new Date())) {
                _// 根据凭证查询用户_
_                _User user = userService.findUserById(loginTicket.getUserId());
                _// 第二步, 在本次请求中持有用户_
_                // 因为可能同时有多个用户同时访问服务器,服务器对于每一个用户请求都会创建一个线程处理_
_                // 因此为了让多线程并发访问服务器的时候不出现问题,用户信息就不能单纯存在变量or容器中,要考虑线程的隔离即每一个线程单独存一份,他们之间不互相干扰_
_                // 因此使用到java多线程中的 ThreadLocal_
_                // 创建一个工具类, 实现线程隔离_
_                _hostHolder.setUser(user);
            }
        }

        return true;
    }

    @Override
    public void postHandle(HttpServletRequest request, HttpServletResponse response, Object handler, ModelAndView modelAndView) throws Exception {
        _// 第三步,将持有的用户信息放入到modelAndView中_
_        _User user = hostHolder.getUser();
        if (user != null && modelAndView != null) {
            modelAndView.addObject("loginUser", user);
        }
    }

    @Override
    public void afterCompletion(HttpServletRequest request, HttpServletResponse response, Object handler, Exception ex) throws Exception {
        _// 第四步,请求结束后清理用户信息_
_        _hostHolder.clear();
    }
}
2.创建配置类,进行拦截器的注册
config.WebMvcConfig
@Configuration
public class WebMvcConfig implements WebMvcConfigurer {

    @Autowired
    private AlphaInterceptor alphaInterceptor;

    @Autowired
    private LoginTicketInterceptor loginTicketInterceptor;

    @Autowired
    private LoginRequiredInterceptor loginRequiredInterceptor;

    @Override
    public void addInterceptors(InterceptorRegistry registry) {

        registry.addInterceptor(loginTicketInterceptor)
                .excludePathPatterns("/**/*.css", "/**/*.js", "/**/*.png", "/**/*.jpg", "/**/*.jpeg");

        registry.addInterceptor(loginRequiredInterceptor)
                .excludePathPatterns("/**/*.css", "/**/*.js", "/**/*.png", "/**/*.jpg", "/**/*.jpeg");
    }

}
2.7 账号设置
自定义修改账户信息
图像上传:
注意
getHeader方法,如何根据链接 使用二进制流输出到前端
com.nowcoder.community.controller.UserController
@Controller
@RequestMapping("/user")
public class UserController {

    private static final Logger _logger _= LoggerFactory._getLogger_(UserController.class);

    @Value("${community.path.upload}")
    private String uploadPath;

    @Value("${community.path.domain}")
    private String domain;

    @Value("${server.servlet.context-path}")
    private String contextPath;

    @Autowired
    private UserService userService;

    @Autowired
    private HostHolder hostHolder;

    @LoginRequired
    @RequestMapping(path = "/setting", method = RequestMethod._GET_)
    public String getSettingPage() {
        return "/site/setting";
    }

    @LoginRequired
    @RequestMapping(path = "/upload", method = RequestMethod._POST_)
    public String uploadHeader(MultipartFile headerImage, Model model) {
        if (headerImage == null) {
            model.addAttribute("error", "您还没有选择图片!");
            return "/site/setting";
        }

        String fileName = headerImage.getOriginalFilename();
        String suffix = fileName.substring(fileName.lastIndexOf("."));
        if (StringUtils._isBlank_(suffix)) {
            model.addAttribute("error", "文件的格式不正确!");
            return "/site/setting";
        }

        // 生成随机文件名
        fileName = CommunityUtil._generateUUID_() + suffix;
        // 确定文件存放的路径
        File dest = new File(uploadPath + "/" + fileName);
        try {
            // 存储文件
            headerImage.transferTo(dest);
        } catch (IOException e) {
            _logger_.error("上传文件失败: " + e.getMessage());
            throw new RuntimeException("上传文件失败,服务器发生异常!", e);
        }

        // 更新当前用户的头像的路径(web访问路径)
        // http://localhost:8080/community/user/header/xxx.png
        User user = hostHolder.getUser();
        String headerUrl = domain + contextPath + "/user/header/" + fileName;
        userService.updateHeader(user.getId(), headerUrl);

        return "redirect:/index";
    }

    @RequestMapping(path = "/header/{fileName}", method = RequestMethod._GET_)
    public void getHeader(@PathVariable("fileName") String fileName, HttpServletResponse response) {
        // 服务器存放路径
        fileName = uploadPath + "/" + fileName;
        // 文件后缀
        String suffix = fileName.substring(fileName.lastIndexOf("."));
        // 响应图片
        response.setContentType("image/" + suffix);
        try (
                FileInputStream fis = new FileInputStream(fileName);
                OutputStream os = response.getOutputStream();
        ) {
            byte[] buffer = new byte[1024];
            int b = 0;
            while ((b = fis.read(buffer)) != -1) {
                os.write(buffer, 0, b);
            }
        } catch (IOException e) {
            _logger_.error("读取头像失败: " + e.getMessage());
        }
    }

}
2.8 检查登录状态
避免在没登录的情况下,直接通过 网站地址访问
1.自定义注解
com.nowcoder.community.annotation.LoginRequired
@Target(ElementType._METHOD_)
@Retention(RetentionPolicy._RUNTIME_)
public @interface LoginRequired {

}
2.一些需要登录的 请求方法上添加该注解
com.nowcoder.community.controller.UserController
@LoginRequired
@RequestMapping(path = "/setting", method = RequestMethod._GET_)
public String getSettingPage() {
    return "/site/setting";
}

@LoginRequired
@RequestMapping(path = "/upload", method = RequestMethod._POST_)
public String uploadHeader(MultipartFile headerImage, Model model) {

}
3.使用拦截器拦截该注解
com.nowcoder.community.controller.interceptor.LoginRequiredInterceptor
@Component
public class LoginRequiredInterceptor implements HandlerInterceptor {

    @Autowired
    private HostHolder hostHolder;

    @Override
    public boolean preHandle(HttpServletRequest request, HttpServletResponse response, Object handler) throws Exception {
           // 如果拦截到的是 Method
        if (handler instanceof HandlerMethod) {
            HandlerMethod handlerMethod = (HandlerMethod) handler;
            Method method = handlerMethod.getMethod();
            // 得到登录注解类
            LoginRequired loginRequired = method.getAnnotation(LoginRequired.class);
            if (loginRequired != null && hostHolder.getUser() == null) {
                response.sendRedirect(request.getContextPath() + "/login");
                return false;
            }
        }
        return true;
    }
}
社区核心功能
3.1 过滤敏感词(重点)
使用前缀树过滤敏感词
前缀树
前缀树不是二叉树 可以在前缀树中定义敏感词
前缀树的 特点:
- 根节点为空,子节点存储一个字符
- 从根节点到叶子节点的路径为一个敏感词
前缀树又名:Trie、字典树、查找树 特点:查找效率高,消耗内存大 应用:字符串检索、词频统计、字符串排序
项目中实现
- 定义敏感词
可以在数据库中存储敏感词,也可以在文件中定义
本项目中在 resources/seneitity.txt 文件中定义敏感词
- 实现敏感词过滤器
(1) 定义前缀树
(2) 根据敏感词,初始化前缀树
(3) 编写过滤敏感词的方法
在 components/SensitiveFilter.java 中实现
@Component
public class SensitiveFilter {

    // 1. 定义前缀树
    private class TrieNode {

        _// 关键词结束标识_
    _    _private boolean isKeywordEnd = false;

        _// 子节点(key是下级字符(子节点存储的字符),value是下级节点)_
    _    _private Map<Character, TrieNode> subNodes = new HashMap<>();

        public boolean isKeywordEnd() {
            return isKeywordEnd;
        }

        public void setKeywordEnd(boolean keywordEnd) {
            isKeywordEnd = keywordEnd;
        }

        _// 添加子节点_
    _    _public void addSubNode(Character c, TrieNode node) {
            subNodes.put(c, node);
        }

        _// 获取子节点_
    _    _public TrieNode getSubNode(Character c) {
            return subNodes.get(c);
        }

    }


    // 2. 初始化前缀树
    // @PostConstruct: 在 SensitiveFilter 类创建之后完成前缀树的初始化
    @PostConstruct
    public void init() {
        try (
                InputStream is = this.getClass().getClassLoader().getResourceAsStream("sensitive-words.txt");
                BufferedReader reader = new BufferedReader(new InputStreamReader(is));
        ) {
            String keyword;
            while ((keyword = reader.readLine()) != null) {
                _// 添加到前缀树_
    _            _this.addKeyword(keyword);
            }
        } catch (IOException e) {
            _logger_.error("加载敏感词文件失败: " + e.getMessage());
        }
    }

    _// 将一个敏感词添加到前缀树中(这个词中可能包含多个字符)_
    private void addKeyword(String keyword) {
        TrieNode tempNode = rootNode;
        _// 遍历每一个字符_
    _    _for (int i = 0; i < keyword.length(); i++) {
            char c = keyword.charAt(i);
            _// 根据字符获取子节点_
    _        _TrieNode subNode = tempNode.getSubNode(c);


            _// 如果子节点为空, 说明该字符不在前缀树中_
    _        _if (subNode == null) {
                _// 初始化子节点_
    _            _subNode = new TrieNode();
                _// 添加子节点_
    _            _tempNode.addSubNode(c, subNode);
            }


            _// 指向子节点,进入下一轮循环_
    _        _tempNode = subNode;

            _// 设置结束标识_
    _        _if (i == keyword.length() - 1) {
                tempNode.setKeywordEnd(true);
            }
        }
    }

    // 3. 根据外界传入的文本, 过滤敏感词
    public String filter(String text) {
        if (StringUtils._isBlank_(text)) {
            return null;
        }

        _// 指针1_
    _    _TrieNode tempNode = rootNode;
        _// 指针2_
    _    _int begin = 0;
        _// 指针3_
    _    _int position = 0;
        _// 结果_
    _    _StringBuilder sb = new StringBuilder();

        while (position < text.length()) {
            char c = text.charAt(position);

            _// 跳过符号_
    _        _if (isSymbol(c)) {
                _// 若指针1处于根节点,将此符号计入结果,让指针2向下走一步_
    _            _if (tempNode == rootNode) {
                    sb.append(c);
                    begin++;
                }
                _// 无论符号在开头或中间,指针3都向下走一步_
    _            _position++;
                continue;
            }

            _// 检查下级节点_
    _        _tempNode = tempNode.getSubNode(c);
            if (tempNode == null) {
                _// 以begin开头的字符串不是敏感词_
    _            _sb.append(text.charAt(begin));
                _// 进入下一个位置_
    _            _position = ++begin;
                _// 重新指向根节点_
    _            _tempNode = rootNode;
            } else if (tempNode.isKeywordEnd()) {
                _// 发现敏感词,将begin~position字符串替换掉_
    _            _sb.append(_REPLACEMENT_);
                _// 进入下一个位置_
    _            _begin = ++position;
                _// 重新指向根节点_
    _            _tempNode = rootNode;
            } else {
                _// 检查下一个字符_
    _            _position++;
            }
        }

        _// 将最后一批字符计入结果_
    _    _sb.append(text.substring(begin));

        return sb.toString();
    }

    _// 判断是否为符号_
    private boolean isSymbol(Character c) {
        _// 0x2E80~0x9FFF 是东亚文字范围_
    _    _return !CharUtils._isAsciiAlphanumeric_(c) && (c < 0x2E80 || c > 0x9FFF);
    }
}
进行测试
test.com``.nowcoder.community.SensitiveTests.java
@RunWith(SpringRunner.class)
@SpringBootTest
@ContextConfiguration(classes = CommunityApplication.class)
public class SensitiveTests {

    @Autowired
    private SensitiveFilter sensitiveFilter;

    @Test
    public void testSensitiveFilter() {
        String text = "这里可以赌博,可以嫖娼,可以吸毒,可以开票,哈哈哈!";
        text = sensitiveFilter.filter(text);
        System._out_.println(text);

        text = "这里可以☆赌☆博☆,可以☆嫖☆娼☆,可以☆吸☆毒☆,可以☆开☆票☆,哈哈哈!";
        text = sensitiveFilter.filter(text);
        System._out_.println(text);
    }
补充
进行敏感词过滤的时候其实是用到了三个指针,其中 指针一 指向 前缀树
指针二指向 需要过滤的文本的开头,是 begin
指针三 进行移动,是 end
模拟过程:
temp = root
第一个阶段:
begin -> a
end -> a
temp.get(str(end))=temp.get(a) 不为 null (即有字符为 a 的子节点)
end += 1
temp = temp.get(a)
第二个阶段:
begin->a
end->l
temp.get(str(end)) = tem.get(l) 为 null (即没有字符为 null 的子节点)
end += 1 (end->m)
begin = end (begin->m)
temp = root (第一个节点指向前缀树的 根节点)
第三个阶段:
temp.get(str(end)) = temp.get(m) == null
end += 1 (end -> d)
start = end (start->d)
temp = root
第四个阶段:
......
3.2 发布帖子功能
使用 jQuery 发送 Ajax 请求,实现发布帖子的功能 帖子相关实体类:
DiscussPost
首先在 pom.xml 中 导入依赖
前段发送的数据以及后端返回的 数据都使用 json 格式
<dependency>
    <groupId>com.alibaba</groupId>
    <artifactId>fastjson</artifactId>
    <version>1.2.58</version>
</dependency>
其次 组装 json 对象
com.nowcoder.community.util.CommunityUtil.java
public class CommunityUtil {

    _// 生成随机字符串_
_    _public static String generateUUID() {
        return UUID._randomUUID_().toString().replaceAll("-", "");
    }

    _// MD5加密_
_    // hello -> abc123def456_
_    // hello + 3e4a8 -> abc123def456abc_
_    _public static String md5(String key) {
        if (StringUtils._isBlank_(key)) {
            return null;
        }
        return DigestUtils._md5DigestAsHex_(key.getBytes());
    }

    public static String getJSONString(int code, String msg, Map<String, Object> map) {
        JSONObject json = new JSONObject();
        json.put("code", code);
        json.put("msg", msg);
        if (map != null) {
            for (String key : map.keySet()) {
                json.put(key, map.get(key));
            }
        }
        return json.toJSONString();
    }

    public static String getJSONString(int code, String msg) {
        return _getJSONString_(code, msg, null);
    }

    public static String getJSONString(int code) {
        return _getJSONString_(code, null, null);
    }

    // 进行测试
    public static void main(String[] args) {
        Map<String, Object> map = new HashMap<>();
        map.put("name", "zhangsan");
        map.put("age", 25);
        System._out_.println(_getJSONString_(0, "ok", map));
    }

}
数据库(持久层)操作
src/main/resources/mapper/discusspost-mapper.xml
<sql id="insertFields">
    user_id, title, content, type, status, create_time, comment_count, score
</sql>
<insert id="insertDiscussPost" parameterType="DiscussPost">
    insert into discuss_post(<include refid="insertFields"></include>)
    values(#{userId},#{title},#{content},#{type},#{status},#{createTime},#{commentCount},#{score})
</insert>
业务层操作
src/main/java/com/nowcoder/community/service/DiscussPostService.java
@Service
public class DiscussPostService {

    @Autowired
    private DiscussPostMapper discussPostMapper;

    @Autowired
    private SensitiveFilter sensitiveFilter;

    public List<DiscussPost> findDiscussPosts(int userId, int offset, int limit) {
        return discussPostMapper.selectDiscussPosts(userId, offset, limit);
    }

    public int findDiscussPostRows(int userId) {
        return discussPostMapper.selectDiscussPostRows(userId);
    }

    _// 添加帖子_
_    _public int addDiscussPost(DiscussPost post) {
        if (post == null) {
            throw new IllegalArgumentException("参数不能为空!");
        }

        _// 转义HTML标记  (即将<>符号转义为字符,这样前端浏览器不会将这些字符误认为html的标签)_
_        _post.setTitle(HtmlUtils._htmlEscape_(post.getTitle()));
        post.setContent(HtmlUtils._htmlEscape_(post.getContent()));
        _// 过滤敏感词_
_        _post.setTitle(sensitiveFilter.filter(post.getTitle()));
        post.setContent(sensitiveFilter.filter(post.getContent()));

        return discussPostMapper.insertDiscussPost(post);
    }

    public DiscussPost findDiscussPostById(int id) {
        return discussPostMapper.selectDiscussPostById(id);
    }

    public int updateCommentCount(int id, int commentCount) {
        return discussPostMapper.updateCommentCount(id, commentCount);
    }

}
表现层(视图层)操作
src/main/java/com/nowcoder/community/controller/DiscussPostController.java
@Controller
@RequestMapping("/discuss")
public class DiscussPostController implements CommunityConstant {

        @Autowired
        private DiscussPostService discussPostService;

        @Autowired
        private HostHolder hostHolder;

        @Autowired
        private UserService userService;

        @Autowired
        private CommentService commentService;

        @RequestMapping(path = "/add", method = RequestMethod._POST_)
        @ResponseBody
        public String addDiscussPost(String title, String content) {
            User user = hostHolder.getUser();
            if (user == null) {
                return CommunityUtil._getJSONString_(403, "你还没有登录哦!");
            }

            DiscussPost post = new DiscussPost();
            post.setUserId(user.getId());
            post.setTitle(title);
            post.setContent(content);
            post.setCreateTime(new Date());
            discussPostService.addDiscussPost(post);

            _// 报错的情况,将来统一处理._
    _        _return CommunityUtil._getJSONString_(0, "发布成功!");
         }

    }
前端页面
src/main/resources/templates/index.html
<div class="position-relative">
_<!-- 筛选条件 -->_
_ _<ul class="nav nav-tabs mb-3">
<li class="nav-item">
<a class="nav-link active" href="#">最新</a>
</li>
<li class="nav-item">
<a class="nav-link" href="#">最热</a>
</li>
</ul>
<button type="button" class="btn btn-primary btn-sm position-absolute rt-0" data-toggle="modal" data-target="#publishModal" th:if="${loginUser!=null}">我要发布</button>
</div>
_<!-- 弹出框 -->_
<div class="modal fade" id="publishModal" tabindex="-1" role="dialog" aria-labelledby="publishModalLabel" aria-hidden="true">
<div class="modal-dialog modal-lg" role="document">
<div class="modal-content">
<div class="modal-header">
<h5 class="modal-title" id="publishModalLabel">新帖发布</h5>
<button type="button" class="close" data-dismiss="modal" aria-label="Close">
<span aria-hidden="true">×</span>
</button>
</div>
<div class="modal-body">
<form>
<div class="form-group">
<label for="recipient-name" class="col-form-label">标题:</label>
<input type="text" class="form-control" id="recipient-name">
</div>
<div class="form-group">
<label for="message-text" class="col-form-label">正文:</label>
<textarea class="form-control" id="message-text" rows="15"></textarea>
</div>
</form>
</div>
<div class="modal-footer">
<button type="button" class="btn btn-secondary" data-dismiss="modal">取消</button>
<button type="button" class="btn btn-primary" id="publishBtn">发布</button>
</div>
</div>
</div>
</div>
_<!-- 提示框 -->_
<div class="modal fade" id="hintModal" tabindex="-1" role="dialog" aria-labelledby="hintModalLabel" aria-hidden="true">
<div class="modal-dialog modal-lg" role="document">
<div class="modal-content">
<div class="modal-header">
<h5 class="modal-title" id="hintModalLabel">提示</h5>
</div>
<div class="modal-body" id="hintBody">
发布完毕!
</div>
</div>
</div>
</div>
<script th:src="@{js/index.js}"></script>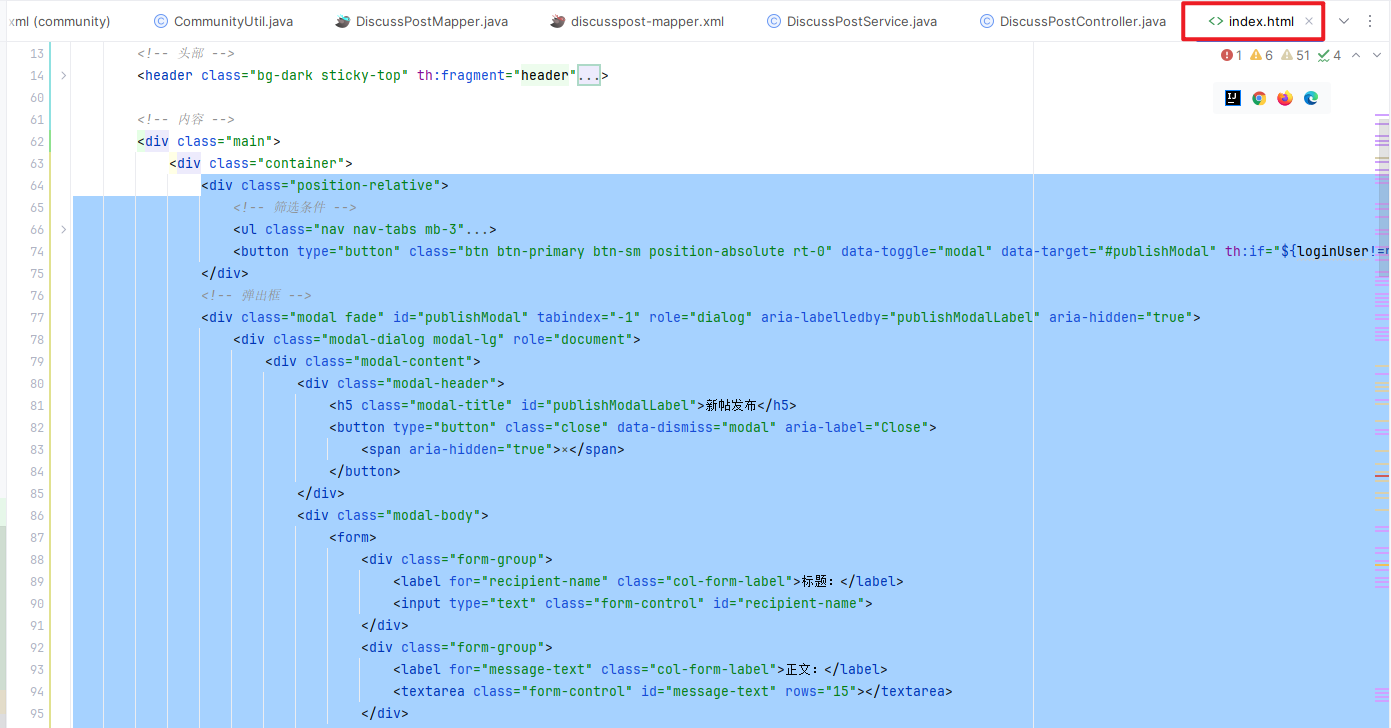
自定义 index.js
src/main/resources//images/nowder/js/index.js
// 点击 发布 帖子后, 调用该方法
$(function(){
    $("#publishBtn").click(_publish_);
});

function _publish_() {
    $("#publishModal").modal("hide");

    _// 获取标题和内容_
_    _var title = $("#recipient-name").val();
    var content = $("#message-text").val();
    _// 发送异步请求(POST)_
_    _$.post(
        CONTEXT_PATH + "/discuss/add",
        {"title":title,"content":content},
        function(data) {
            data = $.parseJSON(data);
            _// 在提示框中显示返回消息_
_            _$("#hintBody").text(data.msg);
            _// 显示提示框_
_            _$("#hintModal").modal("show");
            _// 2秒后,自动隐藏提示框_
_            setTimeout_(function(){
                $("#hintModal").modal("hide");
                _// 刷新页面_
_                _if(data.code == 0) {
                    window.location.reload();
                }
            }, 2000);
        }
    );

}
3.3 帖子详情功能
DiscussPostMapper
DiscussPostService
DiscussPostController
index.html
- 在帖子标题上增加访问详情页面的链接
- discuss-detail.html(帖子详情页面)
- 处理静态资源的访问路径
- 复用 index.html 的 header 区域
- 显示标题、作者、发布时间、帖子正文等内容
3.4 事务管理(重点)
相关概念
什么是事务
- 事务是由 N 步数据库操作序列组成的逻辑执行单元,这系列操作要么全执行,要么全放弃执行。
事务的特性(ACID):
- 原子性(Atomicity):事务是应用中不可再分的最小执行体。
- 一致性(Consistency):事务执行的结果,须使数据从一个一致性状态,变为另一个一致性状态。
- 隔离性(Isolation):各个事务的执行互不干扰,任何事务的内部操作对其他的事务都是隔离的。
- 持久性(Durability):事务一旦提交,对数据所做的任何改变都要记录到永久存储器中。
事务的隔离性
常见的并发异常
- 第一类丢失更新
- 第二类丢失更新。
- 脏读、不可重复读、幻读。
常见的隔离级别
- Read Uncommitted:读取未提交的数据。
- Read Committed:读取已提交的数据。
- Repeatable Read:可重复读。
- Serializable:串行化。
常见的并发异常(重要)
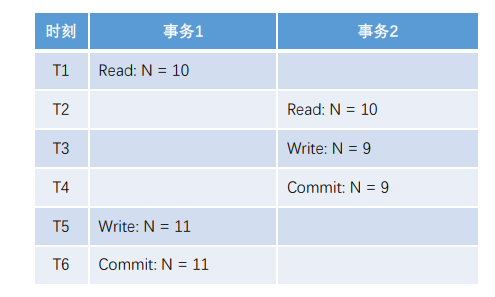
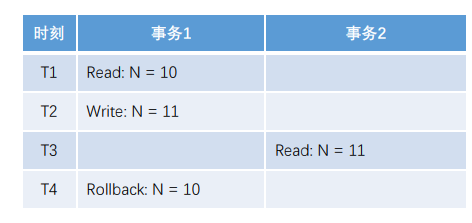
- 第一类丢失更新
某一个事务的回滚,导致另一个事务已经更新的数据丢失了。
如下所示:事务 1 的回滚,导致事务 2 更新的 N=9 丢失,N 仍然等于 10
| 时刻 | 事务1 | 事务2 |
|---|---|---|
| T1 | Read: N=10 | |
| T2 | Read: N=10 | |
| T3 | Write: N=9 | |
| T4 | Commit: N=9 | |
| T5 | Write: N=11 | |
| T6 | Rollback: N=10 |
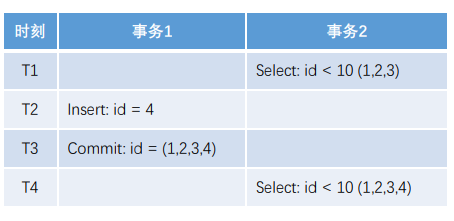
- 第二类丢失更新
某一个事务的提交,导致另一个事务已更新的数据丢失了。
如下所示:事务 1 的更新,导致事务 2 更新的 N=9 丢失,N 最终等于 11。
- 脏读
某一个事务,读取了另一个事务未提交的数据。
- 不可重复读
某一个事务,对同一个数据前后(很短时间内)读取的结果不一致。

- 幻读
某一个事务,对同一个数据表前后查询到的行数不一致。
事务隔离级别
| 隔离级别 | 第一类丢失更新 | 脏读 | 第二类丢失更新 |
|---|---|---|---|
| Read Uncommitted | Y | Y | Y |
| Read Committed | N | N | Y |
| Repeatable Read | N | N | N |
| Serializable | N | N | N |
实现机制
Spring 事务管理
声明式事务
- 通过 XML 配置,生命某方法的事务特征。
- 通过注解,声明某方法的事务特征
编程式事务
- 通过 TransactionTemplate 管理事务,并通过它执行数据库的操作
案例
src/main/java/com/nowcoder/community/service/AlphaService.javasrc/main/java/com/nowcoder/community/service/AlphaService.java
注册一个用户,并发布一个帖子
/** 注解中的参数:
        isolation : 表格隔离级别
        propagation : 表示传播方式
*/

_// REQUIRED: 支持当前事务(外部事务),如果不存在则创建新事务._
_// REQUIRES_NEW: 创建一个新事务,并且暂停当前事务(外部事务)._
_// NESTED: 如果当前存在事务(外部事务),则嵌套在该事务中执行(独立的提交和回滚),否则就会REQUIRED一样._
@Transactional(isolation = Isolation._READ_COMMITTED_, propagation = Propagation._REQUIRED_)
public Object save1() {
    _// 新增用户_
_    _User user = new User();
    user.setUsername("alpha");
    user.setSalt(CommunityUtil._generateUUID_().substring(0, 5));
    user.setPassword(CommunityUtil._md5_("123" + user.getSalt()));
    user.setEmail("alpha@qq.com");
    user.setHeaderUrl("http://image.nowcoder.com/head/99t.png");
    user.setCreateTime(new Date());
    userMapper.insertUser(user);

    _// 新增帖子_
_    _DiscussPost post = new DiscussPost();
    post.setUserId(user.getId());
    post.setTitle("Hello");
    post.setContent("新人报道!");
    post.setCreateTime(new Date());
    discussPostMapper.insertDiscussPost(post);

    Integer._valueOf_("abc");

    return "ok";
}

public Object save2() {
    transactionTemplate.setIsolationLevel(TransactionDefinition._ISOLATION_READ_COMMITTED_);
    transactionTemplate.setPropagationBehavior(TransactionDefinition._PROPAGATION_REQUIRED_);

    return transactionTemplate.execute(new TransactionCallback<Object>() {
        @Override
        public Object doInTransaction(TransactionStatus status) {
            _// 新增用户_
_            _User user = new User();
            user.setUsername("beta");
            user.setSalt(CommunityUtil._generateUUID_().substring(0, 5));
            user.setPassword(CommunityUtil._md5_("123" + user.getSalt()));
            user.setEmail("beta@qq.com");
            user.setHeaderUrl("http://image.nowcoder.com/head/999t.png");
            user.setCreateTime(new Date());
            userMapper.insertUser(user);

            _// 新增帖子_
_            _DiscussPost post = new DiscussPost();
            post.setUserId(user.getId());
            post.setTitle("你好");
            post.setContent("我是新人!");
            post.setCreateTime(new Date());
            discussPostMapper.insertDiscussPost(post);

            Integer._valueOf_("abc");

            return "ok";
        }
    });
}
测试:
src/test/java/com/nowcoder/community/TransactionTests.java
@RunWith(SpringRunner.class)
@SpringBootTest
@ContextConfiguration(classes = CommunityApplication.class)
public class TransactionTests {

    @Autowired
    private AlphaService alphaService;

    @Test
    public void testSave1() {
        Object obj = alphaService.save1();
        System._out_.println(obj);
    }

    @Test
    public void testSave2() {
        Object obj = alphaService.save2();
        System._out_.println(obj);
    }

}
3.5 显示评论功能
持久层(数据库操作):
- 查询实体对应的所有评论
- 查询实体对应的所有评论数量
业务层:
- 对实体对应的 所有评论进行处理
- 对实体对应的 所有评论的数量 进行处理
表现层:
- 在显示帖子详情的时候,同时显示该帖子对应的所有评论
主要对
comment表进行操作
数据表

持久层
1.comment 表对应实体类 src/main/java/com/nowcoder/community/entity/Comment.java
2.操作数据库接口 src/main/java/com/nowcoder/community/dao/CommentMapper.java
@Mapper
public interface CommentMapper {

    List<Comment> selectCommentsByEntity(int entityType, int entityId, int offset, int limit);

    int selectCountByEntity(int entityType, int entityId);

    int insertComment(Comment comment);

}
3.配置文件中 接口方法对应的 sql 操作
src/main/resources/mapper/comment-mapper.xml
_<?_xml version="1.0" encoding="UTF-8" _?>_
<!DOCTYPE mapper
        PUBLIC "-//mybatis.org//DTD Mapper 3.0//EN"
        "http://mybatis.org/dtd/mybatis-3-mapper.dtd"_>_
<mapper namespace="com.nowcoder.community.dao.CommentMapper">

    <sql id="selectFields">
        id, user_id, entity_type, entity_id, target_id, content, status, create_time
    </sql>


    <sql id="insertFields">
        user_id, entity_type, entity_id, target_id, content, status, create_time
    </sql>

    _<!--查询 实体对应的所有评论-->_
_    _<select id="selectCommentsByEntity" resultType="Comment">
        select <include refid="selectFields"></include>
        from comment
        where status = 0
        and entity_type = #{entityType}
        and entity_id = #{entityId}
        order by create_time asc
        limit #{offset}, #{limit}
    </select>
    _<!--查询 实体对应的所有评论的数目-->_
_    _<select id="selectCountByEntity" resultType="int">
        select count(id)
        from comment
        where status = 0
        and entity_type = #{entityType}
        and entity_id = #{entityId}
    </select>

    _<!--插入-->_
_    _<insert id="insertComment" parameterType="Comment">
        insert into comment(<include refid="insertFields"></include>)
        values(#{userId},#{entityType},#{entityId},#{targetId},#{content},#{status},#{createTime})
    </insert>

</mapper>
业务层
src/main/java/com/nowcoder/community/service/CommentService.java
@Service
public class CommentService implements CommunityConstant {

    @Autowired
    private CommentMapper commentMapper;

    @Autowired
    private SensitiveFilter sensitiveFilter;

    @Autowired
    private DiscussPostService discussPostService;

    public List<Comment> findCommentsByEntity(int entityType, int entityId, int offset, int limit) {
        return commentMapper.selectCommentsByEntity(entityType, entityId, offset, limit);
    }

    public int findCommentCount(int entityType, int entityId) {
        return commentMapper.selectCountByEntity(entityType, entityId);
    }

}
表现层(视图层)
因为是在显示 帖子详情页面的时候,同时显示 属于该帖子的评论,因此 表现层 仍然是在 src/main/java/com/nowcoder/community/controller/DiscussPostController.java 中操作
需要完成:
- 分页显示 帖子的评论
- 查询 该帖子下的所有评论
- 查询 某个评论下的所有评论
@Controller
@RequestMapping("/discuss")
public class DiscussPostController implements CommunityConstant {
    @RequestMapping(path = "/detail/{discussPostId}", method = RequestMethod._GET_)
    public String getDiscussPost(@PathVariable("discussPostId") int discussPostId, Model model, Page page) {
        // 帖子
        DiscussPost post = discussPostService.findDiscussPostById(discussPostId);
        model.addAttribute("post", post);
        // 作者
        User user = userService.findUserById(post.getUserId());
        model.addAttribute("user", user);

        // 1. 评论分页信息 自定义的分页
        page.setLimit(5);
        page.setPath("/discuss/detail/" + discussPostId);
        // 在帖子数据表(disscusspost 表) 中, 同时存储了该帖子下的评论数量
        page.setRows(post.getCommentCount());

        // 在帖子详情页面需要查询的评论分为两个方面: (1) 该帖子对于的评论 (2) 某个评论下的所有评论(回复)
        // 2. 下面需要查询该帖子下的所有评论
        // 为了使得前端页面方便显示, 使用 Map<String,Object> 进行该帖子下的评论存储

        // ===首先查询该帖子下的所有评论===
        List<Comment> commentList = commentService.findCommentsByEntity(
                _ENTITY_TYPE_POST_, post.getId(), page.getOffset(), page.getLimit());
        // 评论VO列表 存储评论信息
        List<Map<String, Object>> commentVoList = new ArrayList<>();
        if (commentList != null) {
            for (Comment comment : commentList) {
                // 评论VO
                // 存储内容:comment 实体; user 实体; 评论下的所有回复
                Map<String, Object> commentVo = new HashMap<>();
                // 评论
                commentVo.put("comment", comment);
                // 作者
                commentVo.put("user", userService.findUserById(comment.getUserId()));

                // === 其次查询该评论下的所有回复 ===
                List<Comment> replyList = commentService.findCommentsByEntity(
                        _ENTITY_TYPE_COMMENT_, comment.getId(), 0, Integer._MAX_VALUE_);
                // 回复VO列表
                List<Map<String, Object>> replyVoList = new ArrayList<>();
                if (replyList != null) {
                    for (Comment reply : replyList) {

                        // 回复 Vo:
                        // 存储内容: reply (实际上也是 comment) 实体; user 实体; target(回复对象) 实体 因为可能是 回复的回复
                        Map<String, Object> replyVo = new HashMap<>();
                        // 回复
                        replyVo.put("reply", reply);
                        // 作者
                        replyVo.put("user", userService.findUserById(reply.getUserId()));
                        // 回复目标
                        User target = reply.getTargetId() == 0 ? null : userService.findUserById(reply.getTargetId());
                        replyVo.put("target", target);

                        replyVoList.add(replyVo);
                    }
                }
                commentVo.put("replys", replyVoList);

                // 回复数量
                int replyCount = commentService.findCommentCount(_ENTITY_TYPE_COMMENT_, comment.getId());
                commentVo.put("replyCount", replyCount);

                commentVoList.add(commentVo);
            }
        }

        model.addAttribute("comments", commentVoList);

        return "/site/discuss-detail";
    }
}
前端页面
src/main/resources/templates/site/discuss-detail.html
<!doctype html>
<html lang="en" xmlns:th="http://www.thymeleaf.org">
<head>
<meta charset="utf-8">
<meta name="viewport" content="width=device-width, initial-scale=1, shrink-to-fit=no">
<link rel="icon" href="https://static.nowcoder.com/images/logo_87_87.png"/>
<link rel="stylesheet" href="https://stackpath.bootstrapcdn.com/bootstrap/4.3.1/css/bootstrap.min.css" crossorigin="anonymous">
<link rel="stylesheet" th:href="@{/css/global.css}" />
<link rel="stylesheet" th:href="@{/css/discuss-detail.css}" />
<title>牛客网-帖子详情</title>
</head>
<body>
<div class="nk-container">
<!-- 头部 -->
<header class="bg-dark sticky-top" th:replace="index::header">
</header>
<!-- 内容 -->
<div class="main">
<!-- 帖子详情 -->
<div class="container">
<!-- 标题 -->
<h6 class="mb-4">
<img src="http://static.nowcoder.com/images/img/icons/ico-discuss.png"/>
<span th:utext="${post.title}">备战春招,面试刷题跟他复习,一个月全搞定!</span>
<div class="float-right">
<button type="button" class="btn btn-danger btn-sm">置顶</button>
<button type="button" class="btn btn-danger btn-sm">加精</button>
<button type="button" class="btn btn-danger btn-sm">删除</button>
</div>
</h6>
<!-- 作者 -->
<div class="media pb-3 border-bottom">
<a href="profile.html">
<!--用户头像-->
<img th:src="${user.headerUrl}" class="align-self-start mr-4 rounded-circle user-header" alt="用户头像" >
</a>
<div class="media-body">
<div class="mt-0 text-warning" th:utext="${user.username}">发布帖子的作者名称(用户名称)</div>
<div class="text-muted mt-3">
发布于 <b th:text="${#dates.format(post.createTime,'yyyy-MM-dd HH:mm:ss')}">2019-04-15 15:32:18</b>
<ul class="d-inline float-right">
<li class="d-inline ml-2"><a href="#" class="text-primary">赞 11</a></li>
<li class="d-inline ml-2">|</li>
<!--帖子评论数量(回帖数量)-->
<li class="d-inline ml-2"><a href="#replyform" class="text-primary">回帖 <i th:text="${post.commentCount}">7</i></a></li>
</ul>
</div>
</div>
</div>
<!-- 正文 -->
<div class="mt-4 mb-3 content" th:utext="${post.content}">
帖子内容!!!
</div>
</div>
<!-- =====回帖===== -->
<div class="container mt-3">
<!-- 回帖数量 -->
<div class="row">
<div class="col-8">
<h6><b class="square"></b> <i th:text="${post.commentCount}">30</i>条回帖</h6>
</div>
<!--回复帖子的按钮 点击会跳转到评论输入框, 新增评论-->
<div class="col-4 text-right">
<a href="#replyform" class="btn btn-primary btn-sm"> 回 帖 </a>
</div>
</div>
<!-- 回帖列表 -->
<ul class="list-unstyled mt-4">
<li class="media pb-3 pt-3 mb-3 border-bottom" th:each="cvo:${comments}">
<a href="profile.html">
<img th:src="${cvo.user.headerUrl}" class="align-self-start mr-4 rounded-circle user-header" alt="用户头像" >
</a>
<div class="media-body">
<div class="mt-0">
<span class="font-size-12 text-success" th:utext="${cvo.user.username}">掉脑袋切切</span>
<!--表示楼层 一楼 二楼, 但是因为分页, 第二页是6-10-->
<!--cvoStat.count 表示当前循环次数-->
<span class="badge badge-secondary float-right floor">
<i th:text="${page.offset + cvoStat.count}">1</i>#
</span>
</div>
<div class="mt-2" th:utext="${cvo.comment.content}">
这开课时间是不是有点晚啊。。。
</div>
<div class="mt-4 text-muted font-size-12">
<span>发布于 <b th:text="${#dates.format(cvo.comment.createTime,'yyyy-MM-dd HH:mm:ss')}">2019-04-15 15:32:18</b></span>
<ul class="d-inline float-right">
<li class="d-inline ml-2"><a href="#" class="text-primary">赞(1)</a></li>
<li class="d-inline ml-2">|</li>
<li class="d-inline ml-2"><a href="#huifu" class="text-primary">回复(<i th:text="${cvo.replyCount}">2</i>)</a></li>
</ul>
</div>
<!-- 回复列表 -->
<ul class="list-unstyled mt-4 bg-gray p-3 font-size-12 text-muted">
<li class="pb-3 pt-3 mb-3 border-bottom" th:each="rvo:${cvo.replys}">
<div>
<span th:if="${rvo.target==null}">
<b class="text-info" th:text="${rvo.user.username}">Sissi</b>:
</span>
<span th:if="${rvo.target!=null}">
<i class="text-info" th:text="${rvo.user.username}">Sissi</i> 回复
<b class="text-info" th:text="${rvo.target.username}">寒江雪</b>:
</span>
<span th:utext="${rvo.reply.content}">这个是直播时间哈,觉得晚的话可以直接看之前的完整录播的~</span>
</div>
<div class="mt-3">
<span th:text="${#dates.format(rvo.reply.createTime,'yyyy-MM-dd HH:mm:ss')}">2019-04-15 15:32:18</span>
<ul class="d-inline float-right">
<li class="d-inline ml-2"><a href="#" class="text-primary">赞(1)</a></li>
<li class="d-inline ml-2">|</li>
<!--rvoStat.count 考试循环次数-->
<li class="d-inline ml-2"><a th:href="|#huifu-${rvoStat.count}|" data-toggle="collapse" class="text-primary">回复</a></li>
</ul>
<div th:id="|huifu-${rvoStat.count}|" class="mt-4 collapse">
<form method="post" th:action="@{|/comment/add/${post.id}|}">
<div>
<input type="text" class="input-size" name="content" th:placeholder="|回复${rvo.user.username}|"/>
<input type="hidden" name="entityType" value="2">
<input type="hidden" name="entityId" th:value="${cvo.comment.id}">
<input type="hidden" name="targetId" th:value="${rvo.user.id}">
</div>
<div class="text-right mt-2">
<button type="submit" class="btn btn-primary btn-sm" onclick="#"> 回 复 </button>
</div>
</form>
</div>
</div>
</li>
<!-- 回复输入框 -->
<li class="pb-3 pt-3" id="huifu">
<form method="post" th:action="@{|/comment/add/${post.id}|}">
<div>
<input type="text" class="input-size" name="content" placeholder="请输入你的观点"/>
<input type="hidden" name="entityType" value="2">
<input type="hidden" name="entityId" th:value="${cvo.comment.id}">
</div>
<div class="text-right mt-2">
<button type="submit" class="btn btn-primary btn-sm" onclick="#"> 回 复 </button>
</div>
</form>
</li>
</ul>
</div>
</li>
</ul>
<!-- 分页 使用首页的分页模块-->
<nav class="mt-5" th:replace="index::pagination">
</nav>
</div>
<!-- 回帖输入 -->
<div class="container mt-3">
<form class="replyform" method="post" th:action="@{|/comment/add/${post.id}|}">
<p class="mt-3">
<a name="replyform"></a>
<textarea placeholder="在这里畅所欲言你的看法吧!" name="content"></textarea>
<input type="hidden" name="entityType" value="1">
<input type="hidden" name="entityId" th:value="${post.id}">
</p>
<p class="text-right">
<button type="submit" class="btn btn-primary btn-sm"> 回 帖 </button>
</p>
</form>
</div>
</div>
</div>
<script src="https://code.jquery.com/jquery-3.3.1.min.js" crossorigin="anonymous"></script>
<script src="https://cdnjs.cloudflare.com/ajax/libs/popper.js/1.14.7/umd/popper.min.js" crossorigin="anonymous"></script>
<script src="https://stackpath.bootstrapcdn.com/bootstrap/4.3.1/js/bootstrap.min.js" crossorigin="anonymous"></script>
<script th:src="@{/js/global.js}"></script>
</body>
</html>3.6 添加评论
持久层
- 增加评论数据(comment 表)
- 修改帖子中的评论数量(discuss_post 表)
业务层
- 处理添加评论的功能
- 先添加评论,再修改帖子数量(事务管理)
表现层
- 处理添加评论的请求(前端请求)
持久层
comment 表
1.comment 表对应实体类 src/main/java/com/nowcoder/community/entity/Comment.java
2.操作数据库接口 src/main/java/com/nowcoder/community/dao/CommentMapper.java
配置文件中 接口方法对应的 sql 操作
src/main/resources/mapper/comment-mapper.xml
<?xml version="1.0" encoding="UTF-8" ?>
<!DOCTYPE mapper
        PUBLIC "-//mybatis.org//DTD Mapper 3.0//EN"
        "http://mybatis.org/dtd/mybatis-3-mapper.dtd">
<mapper namespace="com.nowcoder.community.dao.CommentMapper">

    <sql id="selectFields">
        id, user_id, entity_type, entity_id, target_id, content, status, create_time
    </sql>


    <sql id="insertFields">
        user_id, entity_type, entity_id, target_id, content, status, create_time
    </sql>

    <!--查询 实体对应的所有评论-->
    <select id="selectCommentsByEntity" resultType="Comment">
        select <include refid="selectFields"></include>
        from comment
        where status = 0
        and entity_type = #{entityType}
        and entity_id = #{entityId}
        order by create_time asc
        limit #{offset}, #{limit}
    </select>
    <!--查询 实体对应的所有评论的数目-->
    <select id="selectCountByEntity" resultType="int">
        select count(id)
        from comment
        where status = 0
        and entity_type = #{entityType}
        and entity_id = #{entityId}
    </select>

    <!--插入-->
    <insert id="insertComment" parameterType="Comment">
        insert into comment(<include refid="insertFields"></include>)
        values(#{userId},#{entityType},#{entityId},#{targetId},#{content},#{status},#{createTime})
    </insert>

</mapper>
业务层
需要处理 1.添加评论 2.更新帖子评论数量 的业务,需要用到事务管理
src/main/java/com/nowcoder/community/service/CommentService.java
@Service
public class CommentService implements CommunityConstant {

    @Autowired
    private CommentMapper commentMapper;

    @Autowired
    private SensitiveFilter sensitiveFilter;

    @Autowired
    private DiscussPostService discussPostService;

    public List<Comment> findCommentsByEntity(int entityType, int entityId, int offset, int limit) {
        return commentMapper.selectCommentsByEntity(entityType, entityId, offset, limit);
    }

    public int findCommentCount(int entityType, int entityId) {
        return commentMapper.selectCountByEntity(entityType, entityId);
    }

    @Transactional(isolation = Isolation._READ_COMMITTED_, propagation = Propagation._REQUIRED_)
    public int addComment(Comment comment) {
        if (comment == null) {
            throw new IllegalArgumentException("参数不能为空!");
        }

        // 添加评论
        comment.setContent(HtmlUtils._htmlEscape_(comment.getContent()));
        comment.setContent(sensitiveFilter.filter(comment.getContent()));
        int rows = commentMapper.insertComment(comment);

        // 更新帖子评论数量 需要在次数进行事务管理
        if (comment.getEntityType() == _ENTITY_TYPE_POST_) {
            int count = commentMapper.selectCountByEntity(comment.getEntityType(), comment.getEntityId());
            discussPostService.updateCommentCount(comment.getEntityId(), count);
        }

        return rows;
    }

}
src/main/java/com/nowcoder/community/service/DiscussPostService.java
@Service
public class DiscussPostService {

    @Autowired
    private DiscussPostMapper discussPostMapper;

    // 中间的其他内容省略

    public int updateCommentCount(int id, int commentCount) {
        return discussPostMapper.updateCommentCount(id, commentCount);
    }

}
表现层
Controller
@RequestMapping("/comment")
public class CommentController {

    @Autowired
    private CommentService commentService;

    @Autowired
    private HostHolder hostHolder;

    @RequestMapping(path = "/add/{discussPostId}", method = RequestMethod._POST_)
    public String addComment(@PathVariable("discussPostId") int discussPostId, Comment comment) {
        comment.setUserId(hostHolder.getUser().getId());
        comment.setStatus(0);
        comment.setCreateTime(new Date());
        commentService.addComment(comment);

        return "redirect:/discuss/detail/" + discussPostId;
    }

}
3.7 私信列表
需要实现的功能:
私信列表
- 查询当前用户的会话列表(类似于微信中的消息页,和每一个人的交流相当于一个会话)
- 每个会话只显示一条最新的信息(类似于微信消息页,只显示最新信息)
- 支持分页显示
私信详情
- 查询某个会话包含的所有私信(类似于 进入和某个人的聊天页面)
- 支持分页显示
数据表
只涉及到 message 表
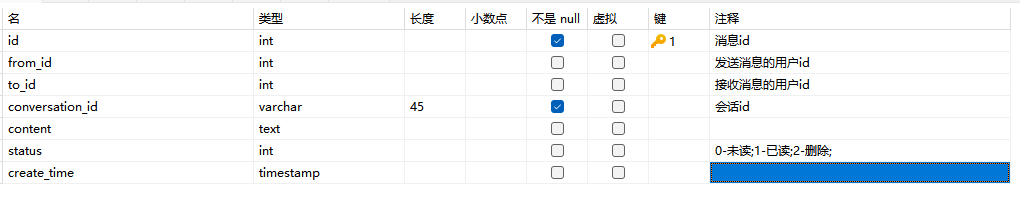
message 指的是 消息,
一个用户可以有多个会话,一个会话中有多个消息(通过 conversation_id 区分消息属于哪一个会话)
持久层
1.接口方法 src/main/java/com/nowcoder/community/dao/MessageMapper.java
@Mapper
public interface MessageMapper {

    // 查询当前用户的会话列表,针对每个会话只返回一条最新的私信.
    List<Message> selectConversations(int userId, int offset, int limit);

    // 查询当前用户的会话数量.
    int selectConversationCount(int userId);

    // 查询某个会话所包含的私信列表.
    List<Message> selectLetters(String conversationId, int offset, int limit);

    // 查询某个会话所包含的私信数量.
    int selectLetterCount(String conversationId);

    // 查询未读私信的数量
    int selectLetterUnreadCount(int userId, String conversationId);

    // 新增消息
    int insertMessage(Message message);

    // 修改消息的状态
    int updateStatus(List<Integer> ids, int status);

}
2.配置文件中 sql 实现 src/main/resources/mapper/message-mapper.xml
<?xml version="1.0" encoding="UTF-8" ?>
<!DOCTYPE mapper
        PUBLIC "-//mybatis.org//DTD Mapper 3.0//EN"
        "http://mybatis.org/dtd/mybatis-3-mapper.dtd">
<mapper namespace="com.nowcoder.community.dao.MessageMapper">

<!--    补充:
        from_id = 1, 表示是系统发送的通知
        status: 0 未读, 1 已读, 2 删除
-->


    <sql id="selectFields">
        id, from_id, to_id, conversation_id, content, status, create_time
    </sql>

    <sql id="insertFields">
        from_id, to_id, conversation_id, content, status, create_time
    </sql>

    <!--    查询和当前用户相关的所有会话的最新信息 可能是该用户接收到的, 也可能是该用户发送的-->
    <select id="selectConversations" resultType="Message">
        select <include refid="selectFields"></include>
        from message
        where id in (
            select max(id) from message
            where status != 2
            and from_id != 1
            and (from_id = #{userId} or to_id = #{userId})
            group by conversation_id
        )
        order by id desc
        limit #{offset}, #{limit}
    </select>

    <!--    查询和当前用户相关的所有会话的数量 可能是该用户接收到的, 也可能是该用户发送的-->
    <select id="selectConversationCount" resultType="int">
        select count(m.maxid) from (
            select max(id) as maxid from message
            where status != 2
            and from_id != 1
            and (from_id = #{userId} or to_id = #{userId})
            group by conversation_id
        ) as m
    </select>

    <!--   查询某一个会话中的所有信息 -->
    <select id="selectLetters" resultType="Message">
        select <include refid="selectFields"></include>
        from message
        where status != 2
        and from_id != 1
        and conversation_id = #{conversationId}
        order by id desc
        limit #{offset}, #{limit}
    </select>

    <!--   查询某一个会话中的所有信息的数量 -->
    <select id="selectLetterCount" resultType="int">
        select count(id)
        from message
        where status != 2
        and from_id != 1
        and conversation_id = #{conversationId}
    </select>

    <!--   查询某一个会话中的所有未读信息 -->
    <select id="selectLetterUnreadCount" resultType="int">
        select count(id)
        from message
        where status = 0
        and from_id != 1
        and to_id = #{userId}
        <if test="conversationId!=null">
            and conversation_id = #{conversationId}
        </if>
    </select>

    <!--  发送一条信息信息 -->
    <insert id="insertMessage" parameterType="Message" keyProperty="id">
        insert into message(<include refid="insertFields"></include>)
        values(#{fromId},#{toId},#{conversationId},#{content},#{status},#{createTime})
    </insert>

    <update id="updateStatus">
        update message set status = #{status}
        where id in
        <foreach collection="ids" item="id" open="(" separator="," close=")">
            #{id}
        </foreach>
    </update>

</mapper>
业务层
src/main/java/com/nowcoder/community/service/MessageService.java
@Service
public class MessageService {

    @Autowired
    private MessageMapper messageMapper;

    @Autowired
    private SensitiveFilter sensitiveFilter;

    public List<Message> findConversations(int userId, int offset, int limit) {
        return messageMapper.selectConversations(userId, offset, limit);
    }

    public int findConversationCount(int userId) {
        return messageMapper.selectConversationCount(userId);
    }

    public List<Message> findLetters(String conversationId, int offset, int limit) {
        return messageMapper.selectLetters(conversationId, offset, limit);
    }

    public int findLetterCount(String conversationId) {
        return messageMapper.selectLetterCount(conversationId);
    }

    public int findLetterUnreadCount(int userId, String conversationId) {
        return messageMapper.selectLetterUnreadCount(userId, conversationId);
    }

    public int addMessage(Message message) {
        // 进行敏感词过滤
        message.setContent(HtmlUtils._htmlEscape_(message.getContent()));
        message.setContent(sensitiveFilter.filter(message.getContent()));
        return messageMapper.insertMessage(message);
    }

    // 更新已读消息的状态
    public int readMessage(List<Integer> ids) {
        return messageMapper.updateStatus(ids, 1);
    }

}
表现层
src/main/java/com/nowcoder/community/controller/MessageController.java
@Controller
public class MessageController {

    @Autowired
    private MessageService messageService;

    @Autowired
    private HostHolder hostHolder;

    @Autowired
    private UserService userService;

    // 私信列表(会话列表)
    @RequestMapping(path = "/letter/list", method = RequestMethod._GET_)
    public String getLetterList(Model model, Page page) {
        User user = hostHolder.getUser();
        // 分页信息
        page.setLimit(5);
        page.setPath("/letter/list");
        page.setRows(messageService.findConversationCount(user.getId()));

        // 会话列表
        List<Message> conversationList = messageService.findConversations(
                user.getId(), page.getOffset(), page.getLimit());
        List<Map<String, Object>> conversations = new ArrayList<>();
        if (conversationList != null) {
            for (Message message : conversationList) {
                Map<String, Object> map = new HashMap<>();
                map.put("conversation", message);
                map.put("letterCount", messageService.findLetterCount(message.getConversationId()));
                map.put("unreadCount", messageService.findLetterUnreadCount(user.getId(), message.getConversationId()));
                int targetId = user.getId() == message.getFromId() ? message.getToId() : message.getFromId();
                map.put("target", userService.findUserById(targetId));

                conversations.add(map);
            }
        }
        model.addAttribute("conversations", conversations);

        // 查询未读消息数量
        int letterUnreadCount = messageService.findLetterUnreadCount(user.getId(), null);
        model.addAttribute("letterUnreadCount", letterUnreadCount);

        return "/site/letter";
    }

    // 某一个会话中的所有消息
    @RequestMapping(path = "/letter/detail/{conversationId}", method = RequestMethod._GET_)
    public String getLetterDetail(@PathVariable("conversationId") String conversationId, Page page, Model model) {
        // 分页信息
        page.setLimit(5);
        page.setPath("/letter/detail/" + conversationId);
        page.setRows(messageService.findLetterCount(conversationId));

        // 私信列表(会话中的消息列表)
        List<Message> letterList = messageService.findLetters(conversationId, page.getOffset(), page.getLimit());
        List<Map<String, Object>> letters = new ArrayList<>();
        if (letterList != null) {
            for (Message message : letterList) {
                Map<String, Object> map = new HashMap<>();
                map.put("letter", message);
                map.put("fromUser", userService.findUserById(message.getFromId()));
                letters.add(map);
            }
        }
        model.addAttribute("letters", letters);

        // 私信目标
        model.addAttribute("target", getLetterTarget(conversationId));

        // 设置已读
        List<Integer> ids = getLetterIds(letterList);
        if (!ids.isEmpty()) {
            messageService.readMessage(ids);
        }

        return "/site/letter-detail";
    }

    private User getLetterTarget(String conversationId) {
        String[] ids = conversationId.split("_");
        int id0 = Integer._parseInt_(ids[0]);
        int id1 = Integer._parseInt_(ids[1]);

        if (hostHolder.getUser().getId() == id0) {
            return userService.findUserById(id1);
        } else {
            return userService.findUserById(id0);
        }
    }

    private List<Integer> getLetterIds(List<Message> letterList) {
        List<Integer> ids = new ArrayList<>();

        if (letterList != null) {
            for (Message message : letterList) {
                if (hostHolder.getUser().getId() == message.getToId() && message.getStatus() == 0) {
                    ids.add(message.getId());
                }
            }
        }

        return ids;
    }

    @RequestMapping(path = "/letter/send", method = RequestMethod._POST_)
    @ResponseBody
    public String sendLetter(String toName, String content) {
        User target = userService.findUserByName(toName);
        if (target == null) {
            return CommunityUtil._getJSONString_(1, "目标用户不存在!");
        }

        Message message = new Message();
        message.setFromId(hostHolder.getUser().getId());
        message.setToId(target.getId());
        if (message.getFromId() < message.getToId()) {
            message.setConversationId(message.getFromId() + "_" + message.getToId());
        } else {
            message.setConversationId(message.getToId() + "_" + message.getFromId());
        }
        message.setContent(content);
        message.setCreateTime(new Date());
        messageService.addMessage(message);

        return CommunityUtil._getJSONString_(0);
    }

}
前端页面
src/main/resources/templates/site/letter.html
<!doctype html>
<html lang="en" xmlns:th="http://www.thymeleaf.org">
<head>
<meta charset="utf-8">
<meta name="viewport" content="width=device-width, initial-scale=1, shrink-to-fit=no">
<link rel="icon" href="https://static.nowcoder.com/images/logo_87_87.png"/>
<link rel="stylesheet" href="https://stackpath.bootstrapcdn.com/bootstrap/4.3.1/css/bootstrap.min.css" crossorigin="anonymous">
<link rel="stylesheet" th:href="@{/css/global.css}" />
<link rel="stylesheet" th:href="@{/css/letter.css}" />
<title>牛客网-私信列表</title>
</head>
<body>
<div class="nk-container">
<!-- 头部 -->
<header class="bg-dark sticky-top" th:replace="index::header">
</header>
<!-- 内容 -->
<div class="main">
<div class="container">
<div class="position-relative">
<!-- 选项 -->
<ul class="nav nav-tabs mb-3">
<li class="nav-item">
<a class="nav-link position-relative active" th:href="@{/letter/list}">
朋友私信<span class="badge badge-danger" th:text="${letterUnreadCount}" th:if="${letterUnreadCount!=0}">3</span>
</a>
</li>
<li class="nav-item">
<a class="nav-link position-relative" href="notice.html">系统通知<span class="badge badge-danger">27</span></a>
</li>
</ul>
<button type="button" class="btn btn-primary btn-sm position-absolute rt-0" data-toggle="modal" data-target="#sendModal">发私信</button>
</div>
<!-- 弹出框 -->
<div class="modal fade" id="sendModal" tabindex="-1" role="dialog" aria-labelledby="exampleModalLabel" aria-hidden="true">
<div class="modal-dialog modal-lg" role="document">
<div class="modal-content">
<div class="modal-header">
<h5 class="modal-title" id="exampleModalLabel">发私信</h5>
<button type="button" class="close" data-dismiss="modal" aria-label="Close">
<span aria-hidden="true">×</span>
</button>
</div>
<div class="modal-body">
<form>
<div class="form-group">
<label for="recipient-name" class="col-form-label">发给:</label>
<input type="text" class="form-control" id="recipient-name">
</div>
<div class="form-group">
<label for="message-text" class="col-form-label">内容:</label>
<textarea class="form-control" id="message-text" rows="10"></textarea>
</div>
</form>
</div>
<div class="modal-footer">
<button type="button" class="btn btn-secondary" data-dismiss="modal">取消</button>
<button type="button" class="btn btn-primary" id="sendBtn">发送</button>
</div>
</div>
</div>
</div>
<!-- 提示框 -->
<div class="modal fade" id="hintModal" tabindex="-1" role="dialog" aria-labelledby="hintModalLabel" aria-hidden="true">
<div class="modal-dialog modal-lg" role="document">
<div class="modal-content">
<div class="modal-header">
<h5 class="modal-title" id="hintModalLabel">提示</h5>
</div>
<div class="modal-body" id="hintBody">
发送完毕!
</div>
</div>
</div>
</div>
<!-- 私信列表 -->
<ul class="list-unstyled">
<li class="media pb-3 pt-3 mb-3 border-bottom position-relative" th:each="map:${conversations}">
<span class="badge badge-danger" th:text="${map.unreadCount}" th:if="${map.unreadCount!=0}">3</span>
<a href="profile.html">
<img th:src="${map.target.headerUrl}" class="mr-4 rounded-circle user-header" alt="用户头像" >
</a>
<div class="media-body">
<h6 class="mt-0 mb-3">
<span class="text-success" th:utext="${map.target.username}">落基山脉下的闲人</span>
<span class="float-right text-muted font-size-12" th:text="${#dates.format(map.conversation.createTime,'yyyy-MM-dd HH:mm:ss')}">2019-04-28 14:13:25</span>
</h6>
<div>
<a th:href="@{|/letter/detail/${map.conversation.conversationId}|}" th:utext="${map.conversation.content}">米粉车, 你来吧!</a>
<ul class="d-inline font-size-12 float-right">
<li class="d-inline ml-2"><a href="#" class="text-primary">共<i th:text="${map.letterCount}">5</i>条会话</a></li>
</ul>
</div>
</div>
</li>
</ul>
<!-- 分页 -->
<nav class="mt-5" th:replace="index::pagination">
</nav>
</div>
</div>
</div>
<script src="https://code.jquery.com/jquery-3.3.1.min.js" crossorigin="anonymous"></script>
<script src="https://cdnjs.cloudflare.com/ajax/libs/popper.js/1.14.7/umd/popper.min.js" crossorigin="anonymous"></script>
<script src="https://stackpath.bootstrapcdn.com/bootstrap/4.3.1/js/bootstrap.min.js" crossorigin="anonymous"></script>
<script th:src="@{/js/global.js}"></script>
<script th:src="@{/js/letter.js}"></script>
</body>
</html>3.8 发送私信
发送私信
- 使用异步的方式发送私信(重要 但是似乎并没有用到异步发送)
- 发送成功后 刷新 私信列表
设置已读
- 访问私信详情的时候,将显示的私信设置为已读状态
持久层
接口方法:src/main/java/com/nowcoder/community/dao/MessageMapper.java
Mapper
public interface MessageMapper {

    // 查询当前用户的会话列表,针对每个会话只返回一条最新的私信.
    List<Message> selectConversations(int userId, int offset, int limit);

    // 查询当前用户的会话数量.
    int selectConversationCount(int userId);

    // 查询某个会话所包含的私信列表.
    List<Message> selectLetters(String conversationId, int offset, int limit);

    // 查询某个会话所包含的私信数量.
    int selectLetterCount(String conversationId);

    // 查询未读私信的数量
    int selectLetterUnreadCount(int userId, String conversationId);

    // 新增消息
    int insertMessage(Message message);

    // 修改消息的状态
    int updateStatus(List<Integer> ids, int status);

}
sql 配置实现:src/main/resources/mapper/message-mapper.xml
<!--  发送一条信息信息 -->
<insert id="insertMessage" parameterType="Message" keyProperty="id">
    insert into message(<include refid="insertFields"></include>)
    values(#{fromId},#{toId},#{conversationId},#{content},#{status},#{createTime})
</insert>

<update id="updateStatus">
    update message set status = #{status}
    where id in
    <foreach collection="ids" item="id" open="(" separator="," close=")">
        #{id}
    </foreach>
</update>
业务层
src/main/java/com/nowcoder/community/service/MessageService.java
public int addMessage(Message message) {
    // 进行敏感词过滤
    message.setContent(HtmlUtils._htmlEscape_(message.getContent()));
    message.setContent(sensitiveFilter.filter(message.getContent()));
    return messageMapper.insertMessage(message);
}

// 更新已读消息的状态
public int readMessage(List<Integer> ids) {
    return messageMapper.updateStatus(ids, 1);
}
表现层
src/main/java/com/nowcoder/community/controller/MessageController.java
// 某一个会话中的所有消息
@RequestMapping(path = "/letter/detail/{conversationId}", method = RequestMethod._GET_)
public String getLetterDetail(@PathVariable("conversationId") String conversationId, Page page, Model model) {
    // 分页信息
    page.setLimit(5);
    page.setPath("/letter/detail/" + conversationId);
    page.setRows(messageService.findLetterCount(conversationId));

    // 私信列表(会话中的消息列表)
    List<Message> letterList = messageService.findLetters(conversationId, page.getOffset(), page.getLimit());
    // 将查询得到的消息都放入 letters 中, 便于前端显示
    List<Map<String, Object>> letters = new ArrayList<>();
    if (letterList != null) {
        for (Message message : letterList) {
            Map<String, Object> map = new HashMap<>();
            map.put("letter", message);
            map.put("fromUser", userService.findUserById(message.getFromId()));
            letters.add(map);
        }
    }
    model.addAttribute("letters", letters);

    // 私信目标 其实就是和当前用户交流的另一个人 需要注意: conversationId 111_145 的形式
    model.addAttribute("target", getLetterTarget(conversationId));

    // 设置已读
    List<Integer> ids = getLetterIds(letterList);
    if (!ids.isEmpty()) {
        messageService.readMessage(ids);
    }

    return "/site/letter-detail";
}

private User getLetterTarget(String conversationId) {
    String[] ids = conversationId.split("_");
    int id0 = Integer._parseInt_(ids[0]);
    int id1 = Integer._parseInt_(ids[1]);

    if (hostHolder.getUser().getId() == id0) {
        return userService.findUserById(id1);
    } else {
        return userService.findUserById(id0);
    }
}

private List<Integer> getLetterIds(List<Message> letterList) {
    List<Integer> ids = new ArrayList<>();

    if (letterList != null) {
        for (Message message : letterList) {
            // 在该消息中 当前用户是 toId, 则表明已读
            if (hostHolder.getUser().getId() == message.getToId() && message.getStatus() == 0) {
                ids.add(message.getId());
            }
        }
    }

    return ids;
}

@RequestMapping(path = "/letter/send", method = RequestMethod._POST_)
@ResponseBody
public String sendLetter(String toName, String content) {
    User target = userService.findUserByName(toName);
    if (target == null) {
        return CommunityUtil._getJSONString_(1, "目标用户不存在!");
    }

    Message message = new Message();
    message.setFromId(hostHolder.getUser().getId());
    message.setToId(target.getId());
    if (message.getFromId() < message.getToId()) {
        message.setConversationId(message.getFromId() + "_" + message.getToId());
    } else {
        message.setConversationId(message.getToId() + "_" + message.getFromId());
    }
    message.setContent(content);
    message.setCreateTime(new Date());
    messageService.addMessage(message);

    return CommunityUtil._getJSONString_(0);
}
前端页面
src/main/resources/templates/site/letter.html
<div class="position-relative">
<!-- 选项 -->
<ul class="nav nav-tabs mb-3">
<li class="nav-item">
<a class="nav-link position-relative active" th:href="@{/letter/list}">
朋友私信<span class="badge badge-danger" th:text="${letterUnreadCount}" th:if="${letterUnreadCount!=0}">3</span>
</a>
</li>
<li class="nav-item">
<a class="nav-link position-relative" href="notice.html">系统通知<span class="badge badge-danger">27</span></a>
</li>
</ul>
<button type="button" class="btn btn-primary btn-sm position-absolute rt-0" data-toggle="modal" data-target="#sendModal">发私信</button>
</div>
<!-- 弹出框 -->
<div class="modal fade" id="sendModal" tabindex="-1" role="dialog" aria-labelledby="exampleModalLabel" aria-hidden="true">
<div class="modal-dialog modal-lg" role="document">
<div class="modal-content">
<div class="modal-header">
<h5 class="modal-title" id="exampleModalLabel">发私信</h5>
<button type="button" class="close" data-dismiss="modal" aria-label="Close">
<span aria-hidden="true">×</span>
</button>
</div>
<div class="modal-body">
<form>
<div class="form-group">
<label for="recipient-name" class="col-form-label">发给:</label>
<input type="text" class="form-control" id="recipient-name">
</div>
<div class="form-group">
<label for="message-text" class="col-form-label">内容:</label>
<textarea class="form-control" id="message-text" rows="10"></textarea>
</div>
</form>
</div>
<div class="modal-footer">
<button type="button" class="btn btn-secondary" data-dismiss="modal">取消</button>
<button type="button" class="btn btn-primary" id="sendBtn">发送</button>
</div>
</div>
</div>
</div>
<!-- 提示框 -->
<div class="modal fade" id="hintModal" tabindex="-1" role="dialog" aria-labelledby="hintModalLabel" aria-hidden="true">
<div class="modal-dialog modal-lg" role="document">
<div class="modal-content">
<div class="modal-header">
<h5 class="modal-title" id="hintModalLabel">提示</h5>
</div>
<div class="modal-body" id="hintBody">
发送完毕!
</div>
</div>
</div>
</div>letter.js
$(function(){
    $("#sendBtn").click(send_letter);
    $(".close").click(delete_msg);
});

function send_letter() {
    $("#sendModal").modal("hide");

    var toName = $("#recipient-name").val();
    var content = $("#message-text").val();
    $.post(
        _CONTEXT_PATH _+ "/letter/send",
        {"toName":toName,"content":content},
        function(data) {
            data = $.parseJSON(data);
            if(data.code == 0) {
                $("#hintBody").text("发送成功!");
            } else {
                $("#hintBody").text(data.msg);
            }

            $("#hintModal").modal("show");
            setTimeout(function(){
                $("#hintModal").modal("hide");
                _location_.reload();
            }, 2000);
        }
    );
}

function delete_msg() {
    // _TODO 删除数据_
_    _$(this).parents(".media").remove();
}
3.9 统一异常处理
理论
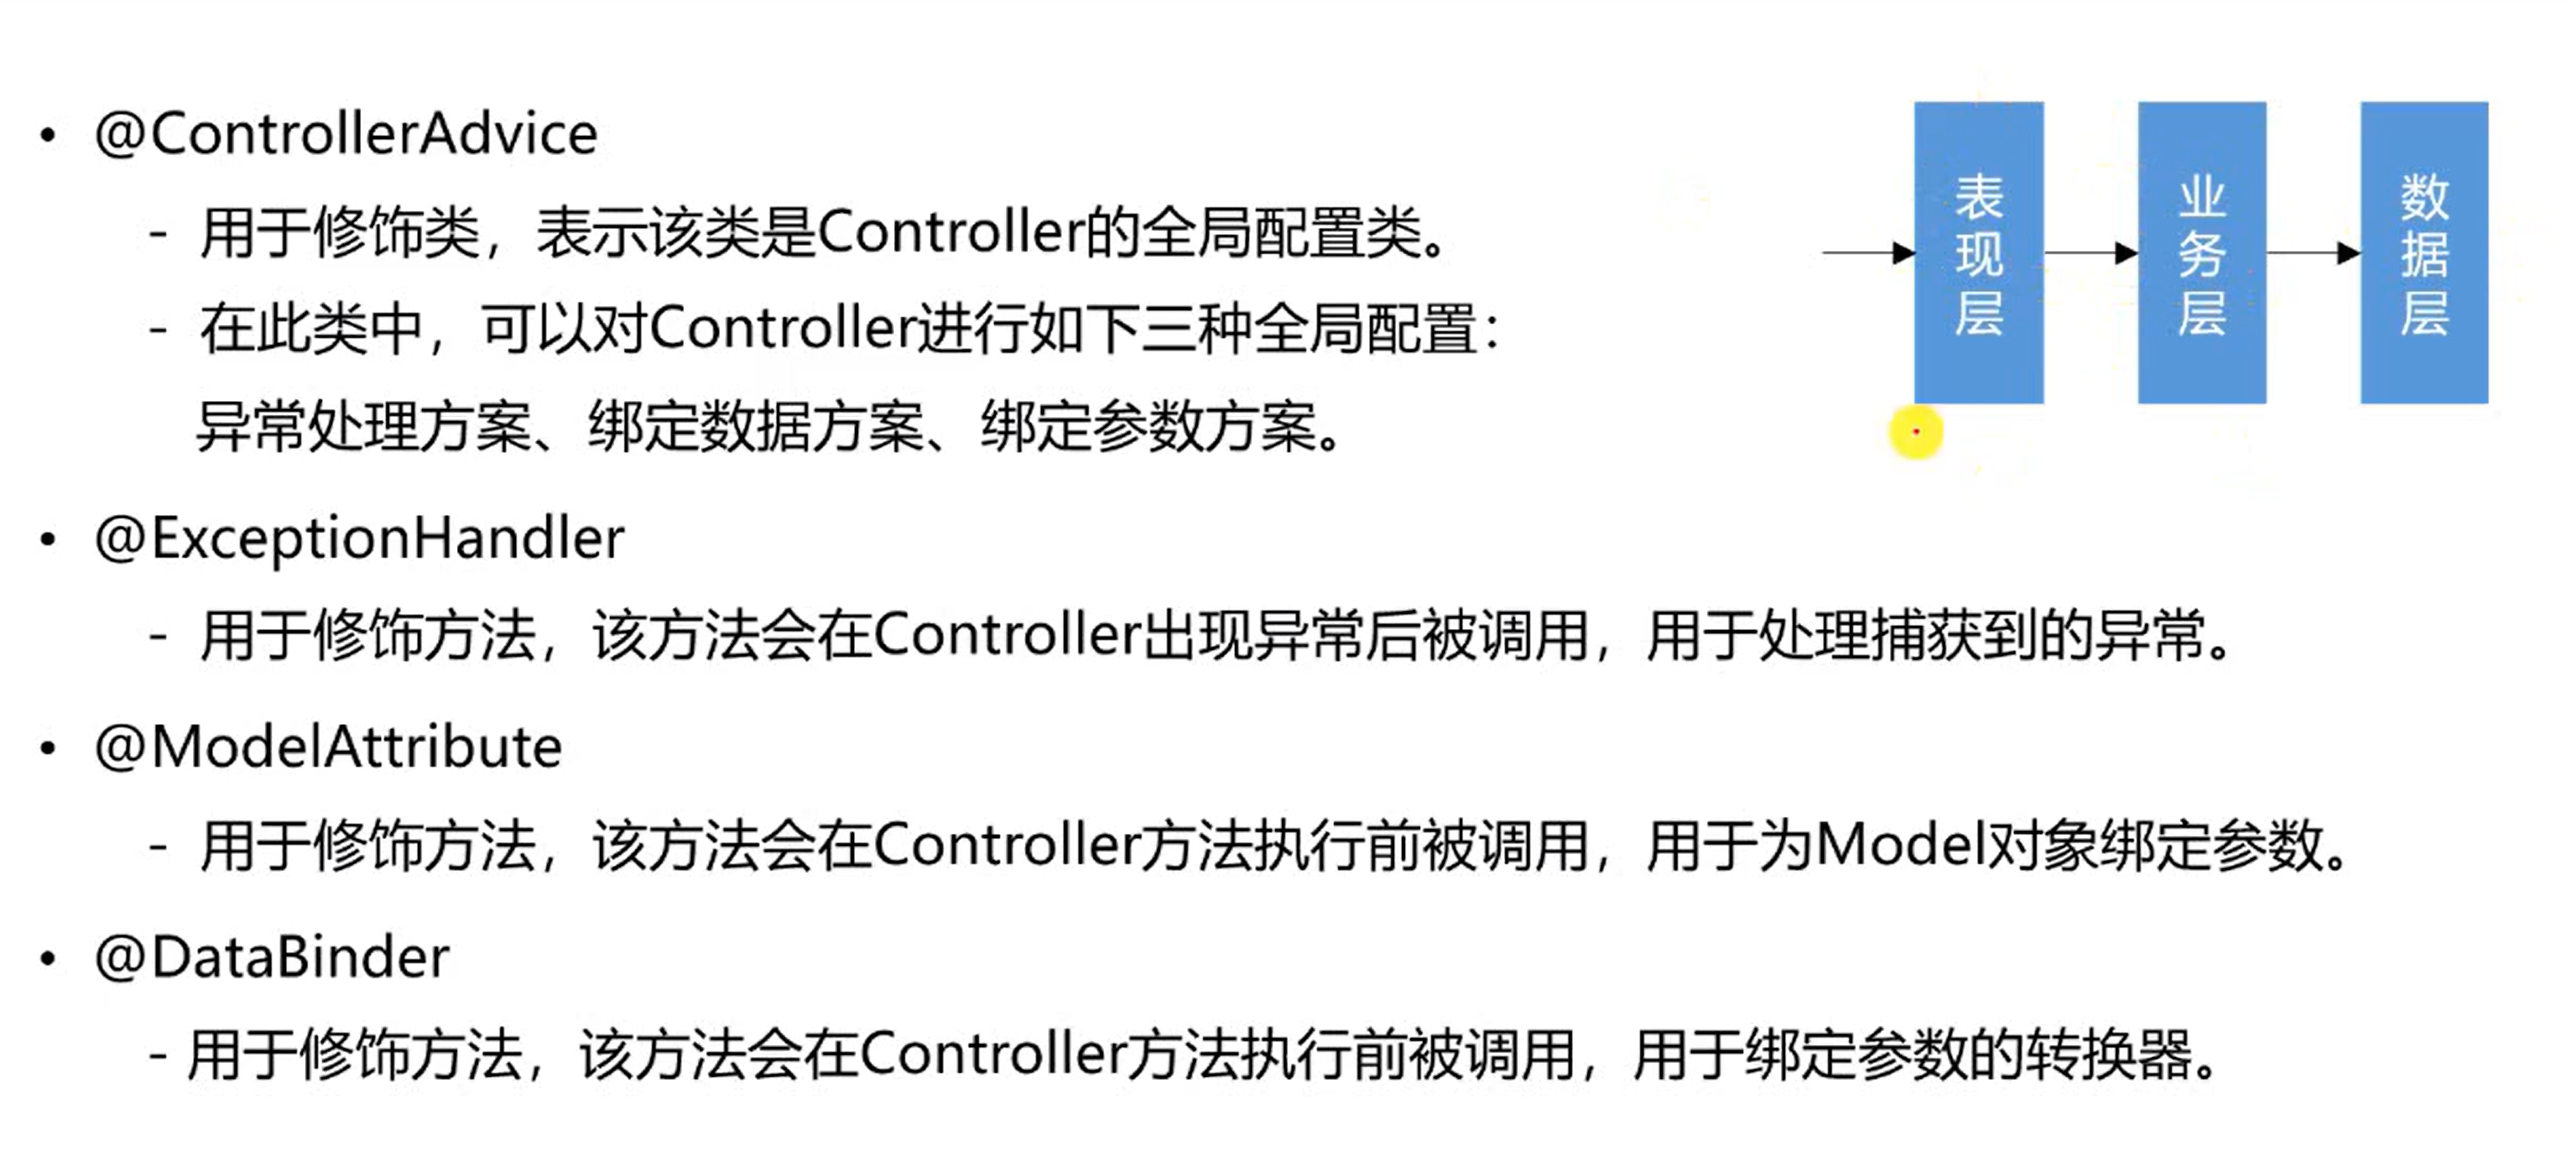
表现层
定义到异常页面
src/main/java/com/nowcoder/community/controller/HomeController.java
@RequestMapping(path = "/error", method = RequestMethod._GET_)
public String getErrorPage() {
    return "/error/500";
}
自定义 Controller 相关的所有异常处理
src/main/java/com/nowcoder/community/controller/advice/ExceptionAdvice.java
@ControllerAdvice(annotations = Controller.class)
public class ExceptionAdvice {

    private static final Logger _logger _= LoggerFactory._getLogger_(ExceptionAdvice.class);

    @ExceptionHandler({Exception.class})
    public void handleException(Exception e, HttpServletRequest request, HttpServletResponse response) throws IOException {
        _logger_.error("服务器发生异常: " + e.getMessage());
        for (StackTraceElement element : e.getStackTrace()) {
            _logger_.error(element.toString());
        }
        // 判断是同步请求还是异步请求
        // 异步处理指的是 前端页面通过ajax、jquery 发送相关请求, 需要返回json格式数据
        String xRequestedWith = request.getHeader("x-requested-with");
        if ("XMLHttpRequest".equals(xRequestedWith)) {
            response.setContentType("application/plain;charset=utf-8");
            PrintWriter writer = response.getWriter();
            writer.write(CommunityUtil._getJSONString_(1, "服务器异常!"));
        } else {
        // 同步请求 需要定位到访问的页面
            response.sendRedirect(request.getContextPath() + "/error");
        }
    }

}
3.10 统一记录日志
需求:对 所有 Service 进行日志记录
理论
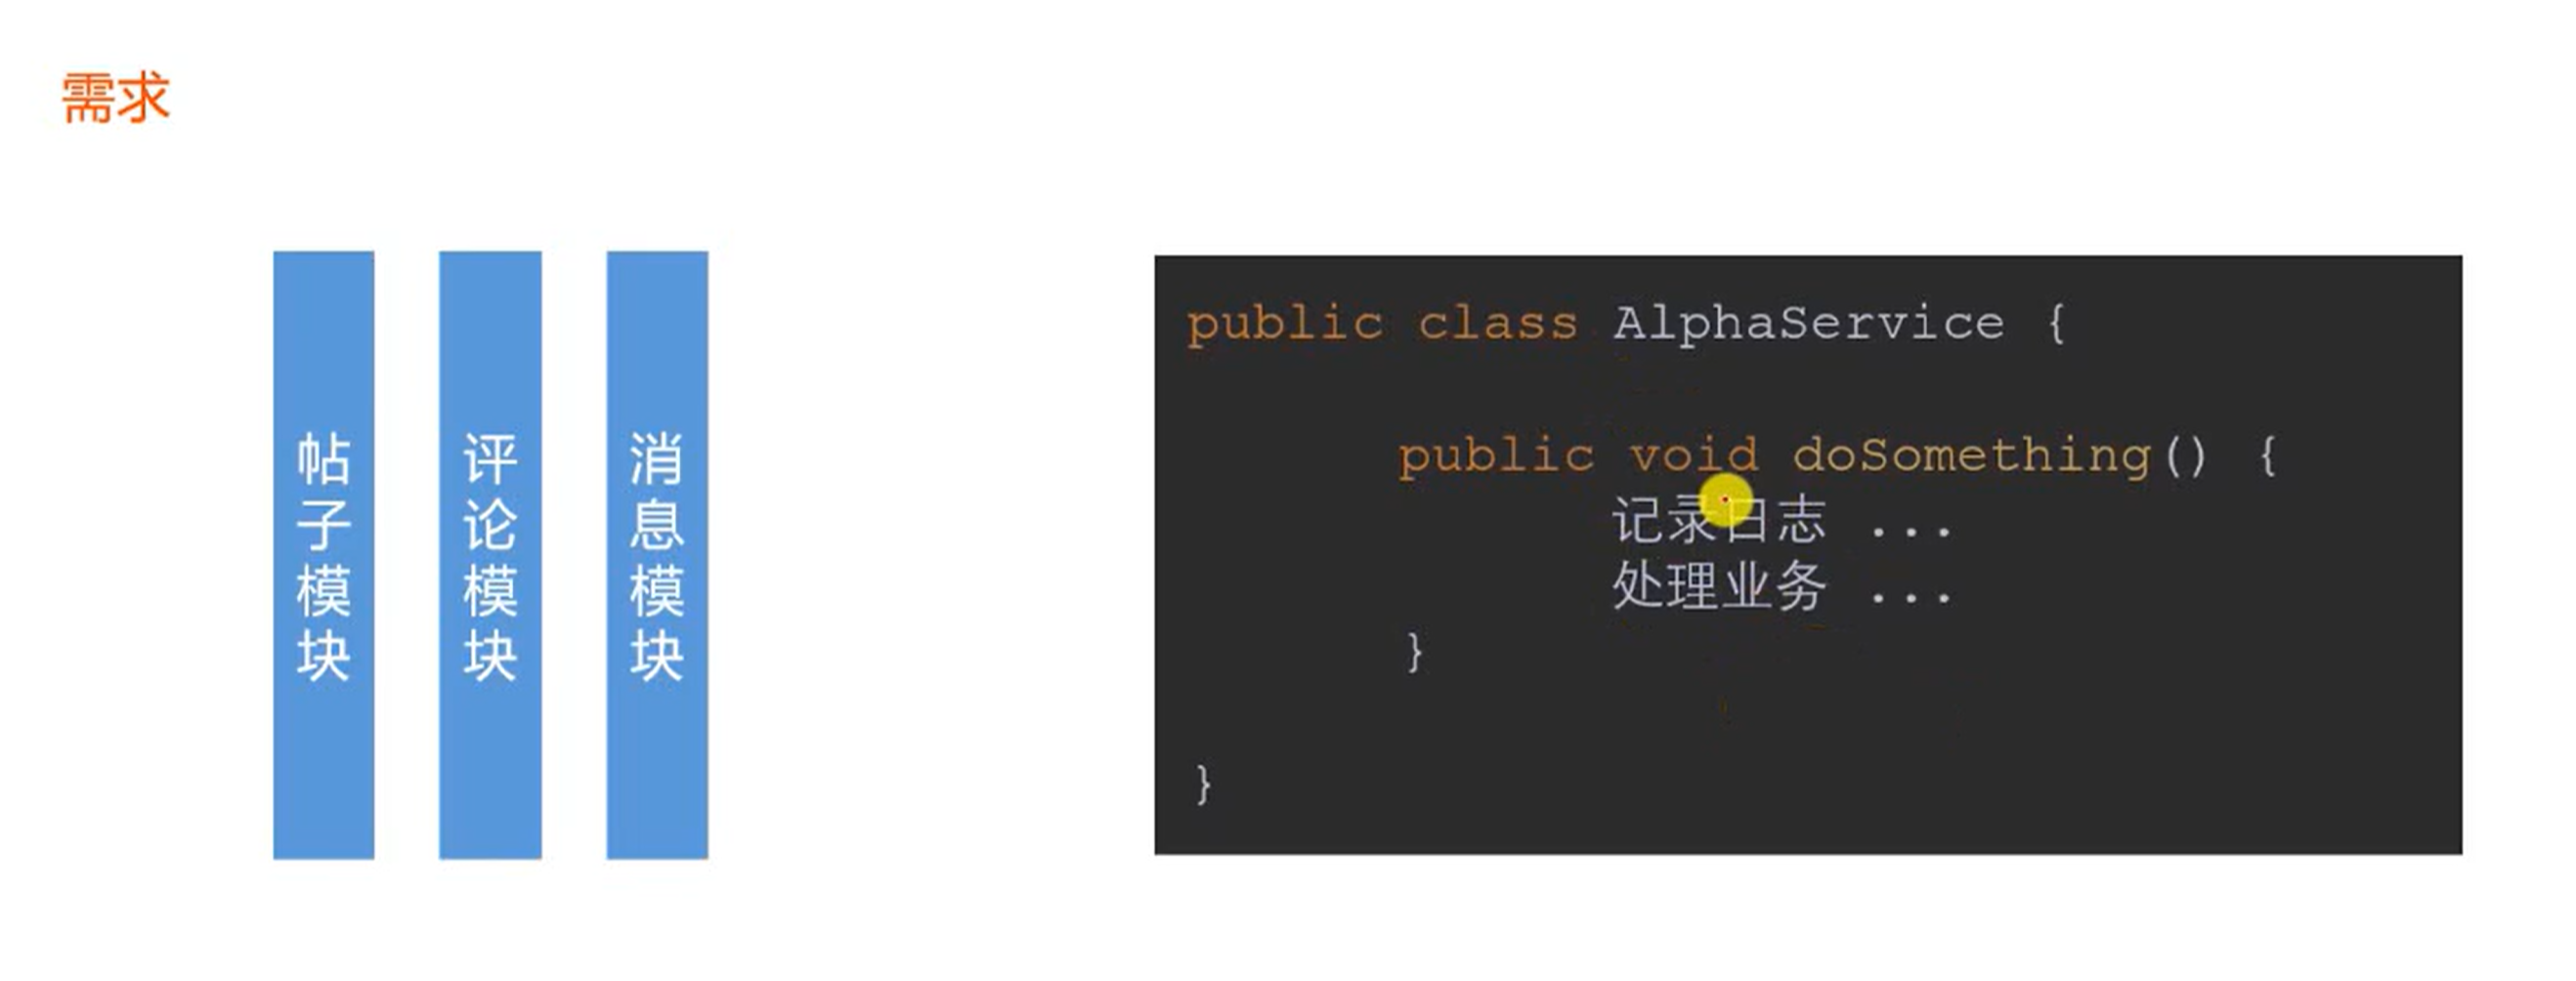
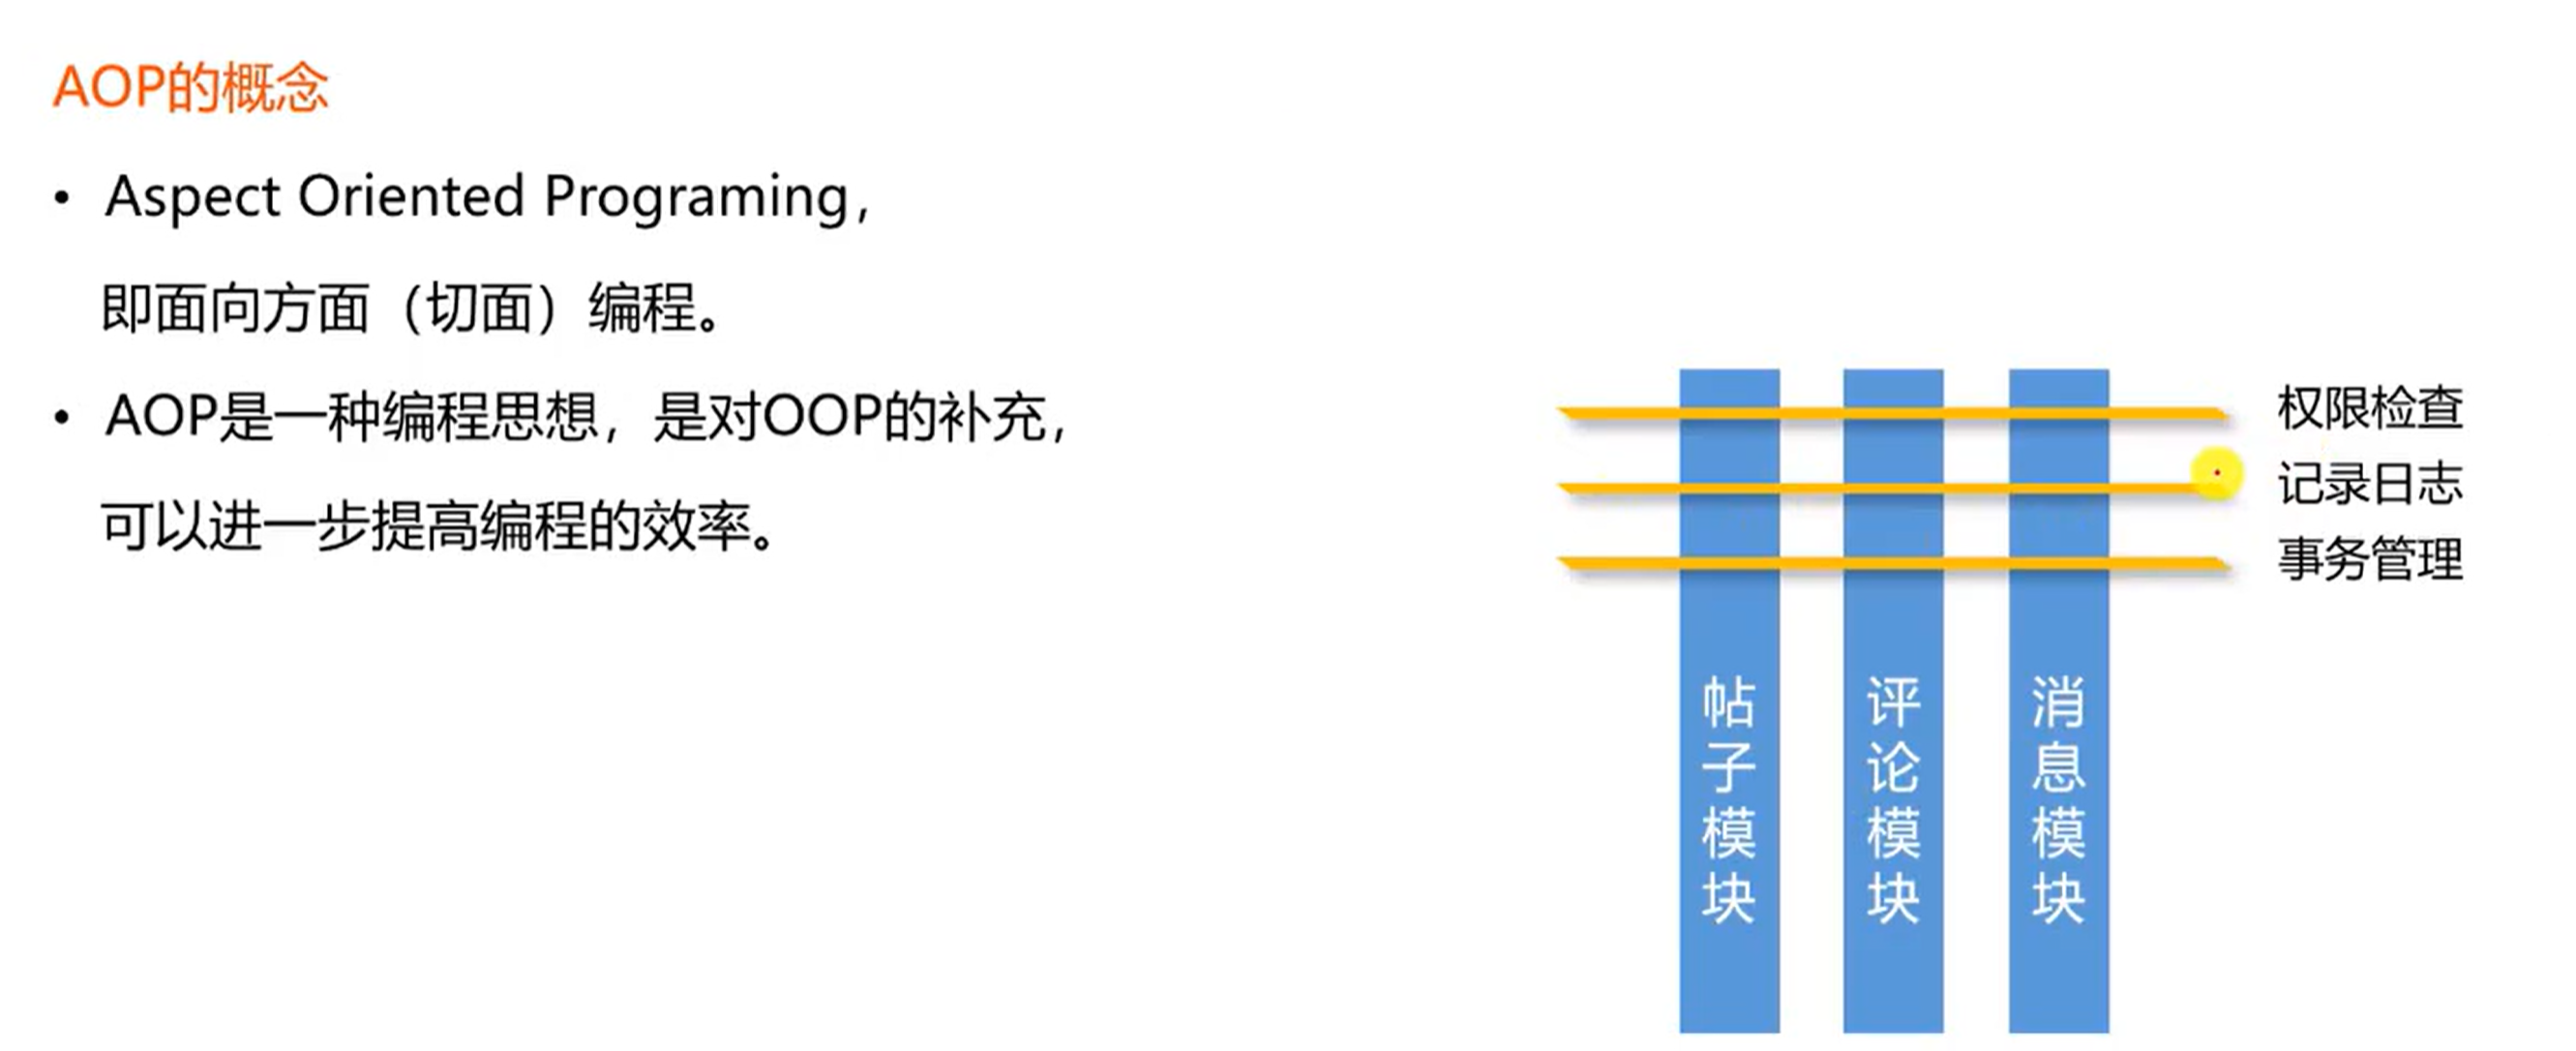
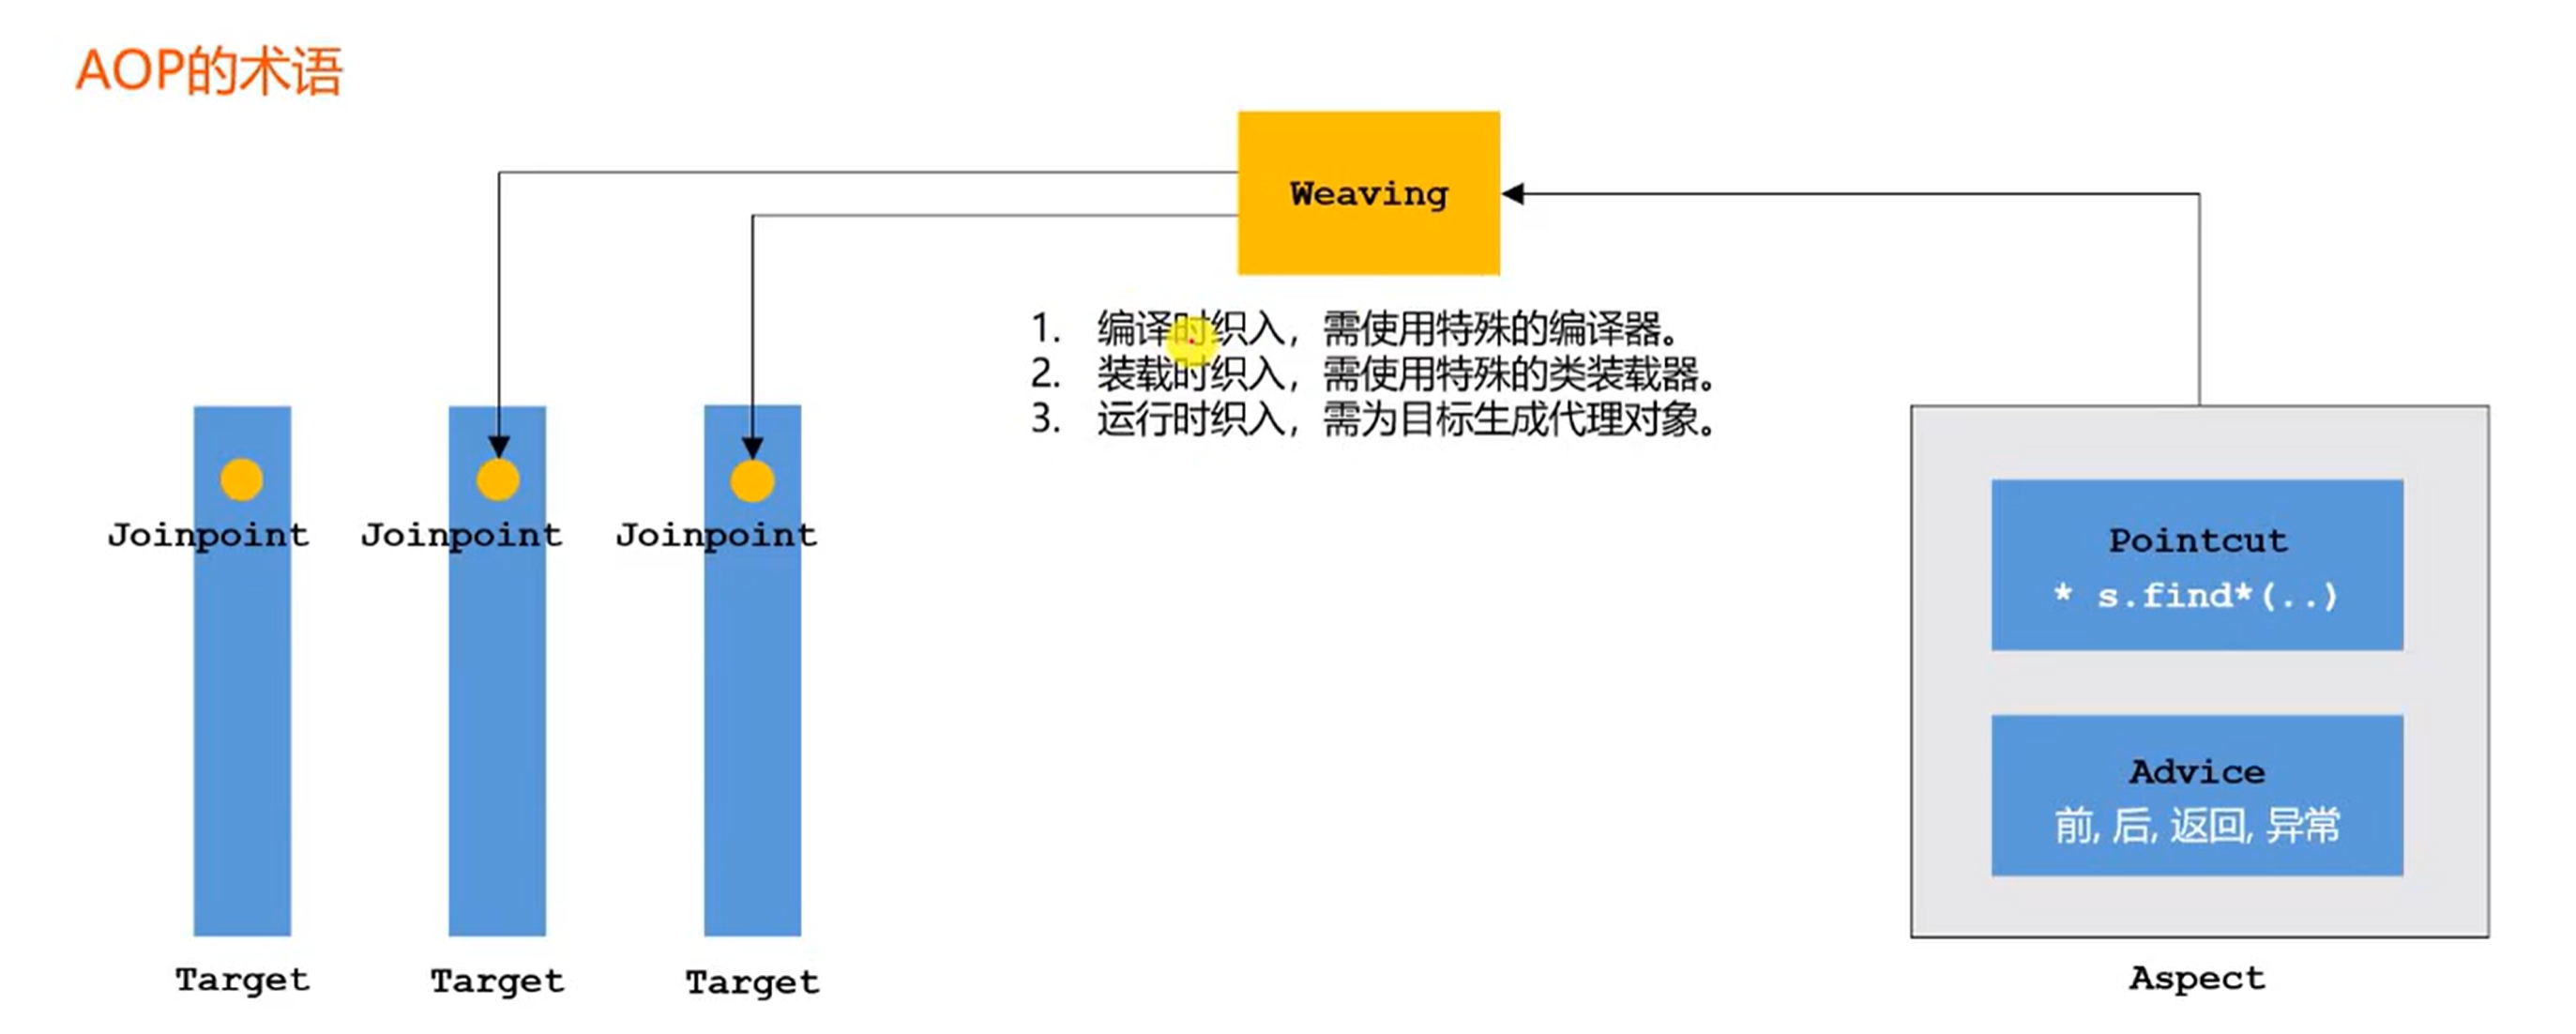
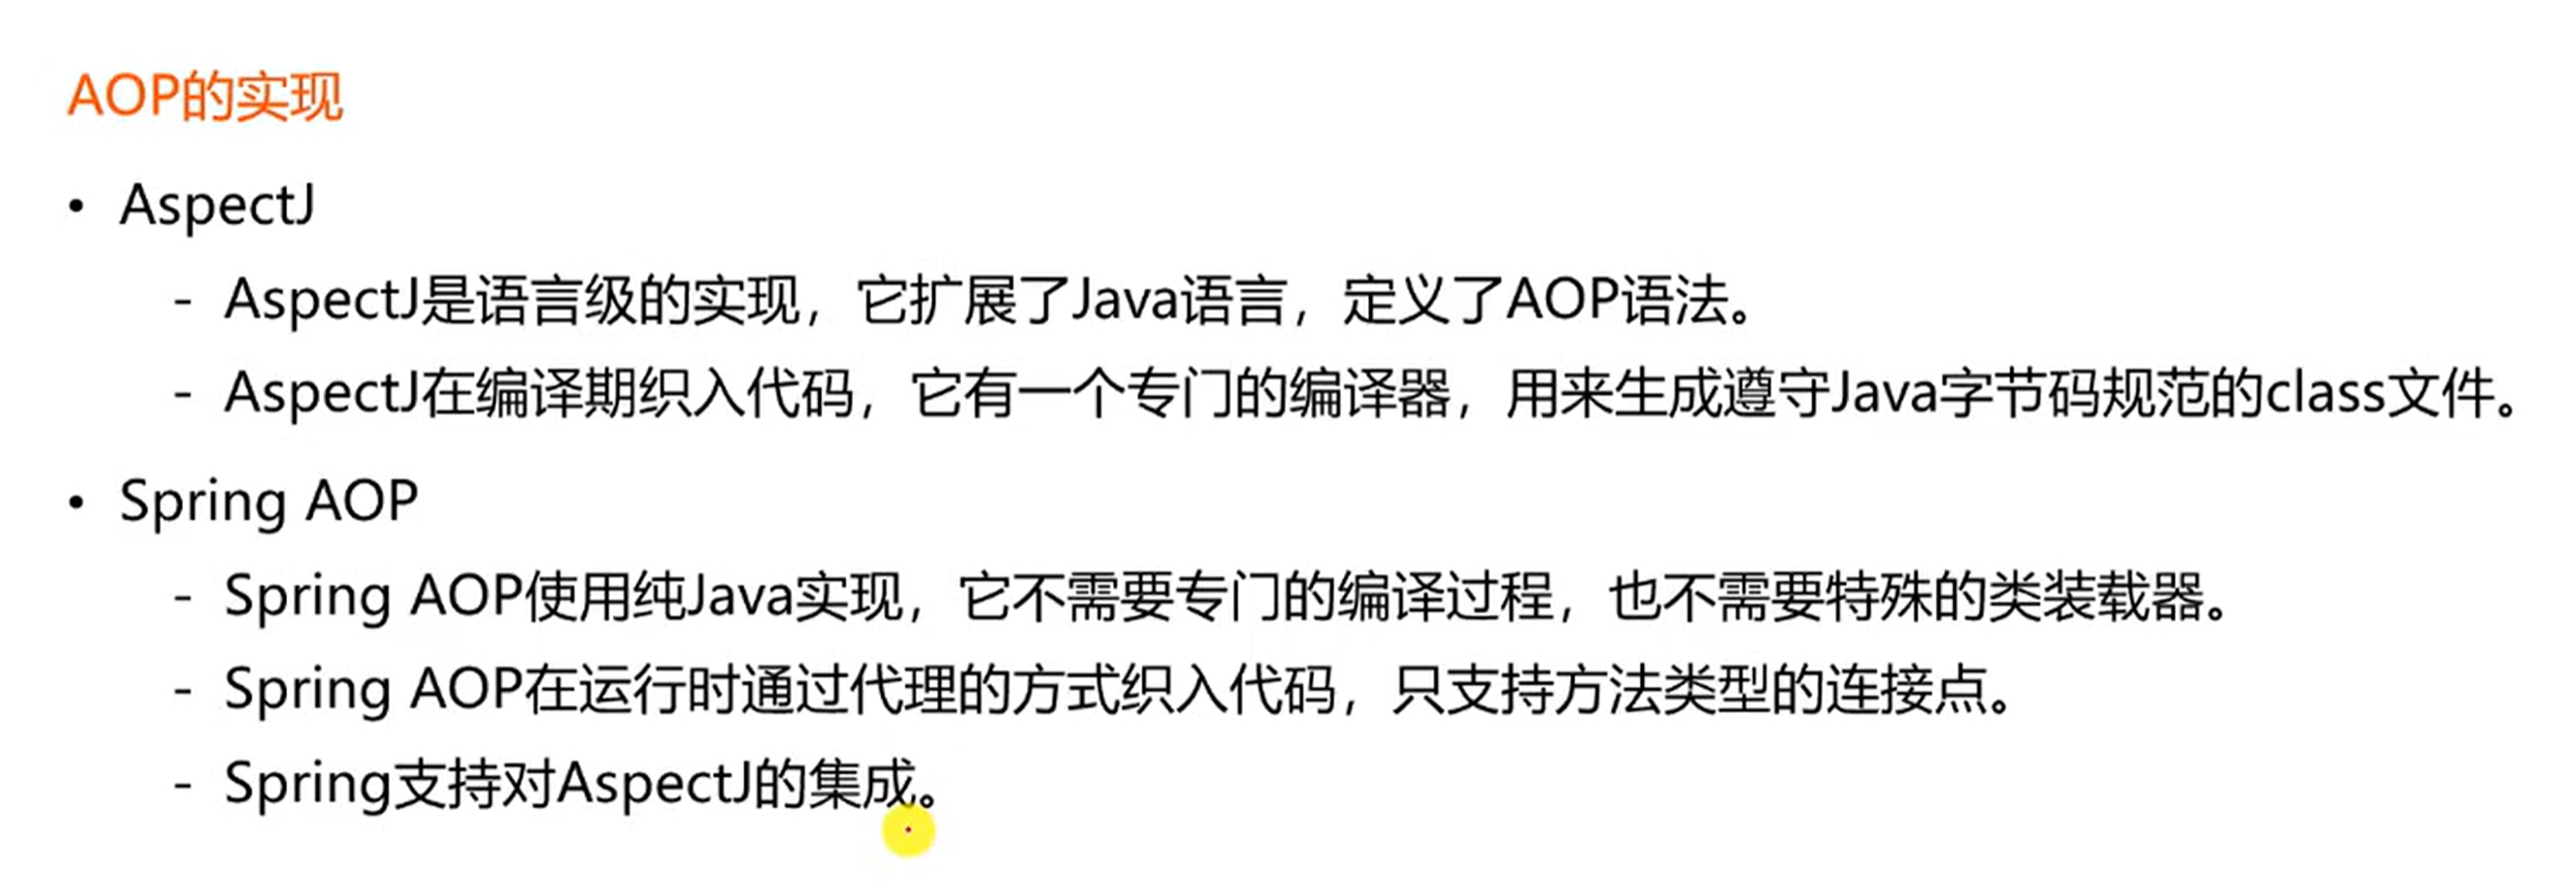
AOP 实现
实例:src/main/java/com/nowcoder/community/aspect/AlphaAspect.java
@Component
@Aspect
public class AlphaAspect {

    @Pointcut("execution(* com.nowcoder.community.service.*.*(..))")
    public void pointcut() {

    }

    @Before("pointcut()")
    public void before() {
        System._out_.println("before");
    }

    @After("pointcut()")
    public void after() {
        System._out_.println("after");
    }

    @AfterReturning("pointcut()")
    public void afterRetuning() {
        System._out_.println("afterRetuning");
    }

    @AfterThrowing("pointcut()")
    public void afterThrowing() {
        System._out_.println("afterThrowing");
    }

    @Around("pointcut()")
    public Object around(ProceedingJoinPoint joinPoint) throws Throwable {
        System._out_.println("around before");
        Object obj = joinPoint.proceed();
        System._out_.println("around after");
        return obj;
    }

}
日志记录 实现:src/main/java/com/nowcoder/community/aspect/ServiceLogAspect.java
@Component
@Aspect
public class ServiceLogAspect {

    private static final Logger _logger _= LoggerFactory._getLogger_(ServiceLogAspect.class);

    // 切点声明
    @Pointcut("execution(* com.nowcoder.community.service.*.*(..))")
    public void pointcut() {

    }

    @Before("pointcut()")
    public void before(JoinPoint joinPoint) {
        // 用户[1.2.3.4],在[xxx],访问了[com.nowcoder.community.service.xxx()].
        ServletRequestAttributes attributes = (ServletRequestAttributes) RequestContextHolder._getRequestAttributes_();
        HttpServletRequest request = attributes.getRequest();
        String ip = request.getRemoteHost();
        String now = new SimpleDateFormat("yyyy-MM-dd HH:mm:ss").format(new Date());
        String target = joinPoint.getSignature().getDeclaringTypeName() + "." + joinPoint.getSignature().getName();
        _logger_.info(String._format_("用户[%s],在[%s],访问了[%s].", ip, now, target));
    }

}
Redis 高性能存储
4.1 redis 入门
redis 相关的操作
4.2 Spring 整合 Redis
步骤:
- 引入依赖
pom.xml
_<!--添加 redis 相关依赖-->_
_    _<dependency>
       <groupId>org.springframework.boot</groupId>
       <artifactId>spring-boot-starter-data-redis</artifactId>
</dependency>- 配置数据库参数,并编写配置类 RedisTemplate
配置数据库参数:application.properties
_# redis 相关配置_
spring.redis.database=11
spring.redis.host=119.3.239.131
spring.redis.port=6379
配置类 config/RedisConfig.java
@Configuration
public class RedisConfig {

    @Bean
    public RedisTemplate<String, Object> redisTemplate(RedisConnectionFactory redisConnectionFactory) {
        RedisTemplate<String, Object> redisTemplate = new RedisTemplate<>();
        redisTemplate.setConnectionFactory(redisConnectionFactory);

        _// 设置key的序列化方式_
_        _redisTemplate.setKeySerializer(RedisSerializer._string_());
        _// 设置value的序列化方式_
_        _redisTemplate.setValueSerializer(RedisSerializer._json_());
        redisTemplate.setHashKeySerializer(RedisSerializer._string_());
        redisTemplate.setHashValueSerializer(RedisSerializer._json_());

        _// 进行初始化_
_        _redisTemplate.afterPropertiesSet();
        return redisTemplate;
    }
}- 进行测试
src/test/java/com/nowcoder/community/RedisTests.java
@RunWith(SpringRunner.class)
@SpringBootTest
@ContextConfiguration(classes = CommunityApplication.class)
public class RedisTests {

    @Autowired
    private RedisTemplate redisTemplate;

    @Test
    public void testStrings() {
        String redisKey = "test:count";

        redisTemplate.opsForValue().set(redisKey, 1);

        System._out_.println(redisTemplate.opsForValue().get(redisKey));
        System._out_.println(redisTemplate.opsForValue().increment(redisKey));
        System._out_.println(redisTemplate.opsForValue().decrement(redisKey));
    }

    @Test
    public void testHashes() {
        String redisKey = "test:user";

        redisTemplate.opsForHash().put(redisKey, "id", 1);
        redisTemplate.opsForHash().put(redisKey, "username", "zhangsan");

        System._out_.println(redisTemplate.opsForHash().get(redisKey, "id"));
        System._out_.println(redisTemplate.opsForHash().get(redisKey, "username"));
    }

    @Test
    public void testLists() {
        _// 列表相关操作_
_        /**_
_         *_
_         * LPUSH key value [value ...]:将一个或多个元素插入到列表的左端(头部)。_
_         * RPUSH key value [value ...]:将一个或多个元素插入到列表的右端(尾部)。_
_         * LPOP key:移除并返回列表左端(头部)的第一个元素。_
_         * RPOP key:移除并返回列表右端(尾部)的第一个元素。_
_         * LINDEX key index:获取列表中指定索引位置的元素。_
_         * LRANGE key start stop:获取列表在指定范围内的元素。索引是从 0 开始的,负数索引表示从列表的末尾开始计数。_
_         *_
_         */_

_        _String redisKey = "test:ids";

        redisTemplate.opsForList().leftPush(redisKey, 101);
        redisTemplate.opsForList().leftPush(redisKey, 102);
        redisTemplate.opsForList().leftPush(redisKey, 103);

        System._out_.println(redisTemplate.opsForList().size(redisKey));
        System._out_.println(redisTemplate.opsForList().index(redisKey, 0));
        System._out_.println(redisTemplate.opsForList().range(redisKey, 0, 2));


        System._out_.println(redisTemplate.opsForList().leftPop(redisKey));
        System._out_.println(redisTemplate.opsForList().leftPop(redisKey));
        System._out_.println(redisTemplate.opsForList().leftPop(redisKey));
    }

    @Test
    public void testSets() {
        _// sets 是无序的, 并且值是唯一的_
_        /**_
_         * SADD key member [member ...]:向集合中添加一个或多个成员。_
_         * SREM key member [member ...]:移除集合中的一个或多个成员。_
_         * SMEMBERS key:返回集合中的所有成员。_
_         * SISMEMBER key member:判断指定的成员是否在集合中,返回 1 表示存在,0 表示不存在。_
_         * SPOP key [count]:随机移除集合中的一个或多个成员,并返回被移除的成员。_
_         * SRANDMEMBER key [count]:随机返回集合中的一个或多个成员,但不移除这些成员。_
_         * SCARD key:返回集合中的成员数量。_
_         */_


_        _String redisKey = "test:teachers";

        redisTemplate.opsForSet().add(redisKey, "刘备", "关羽", "张飞", "赵云", "诸葛亮");

        System._out_.println(redisTemplate.opsForSet().size(redisKey));
        System._out_.println(redisTemplate.opsForSet().pop(redisKey));
        System._out_.println(redisTemplate.opsForSet().members(redisKey));
    }

    @Test
    public void testSortedSets() {

        _// zsets: 有序集合, ZSet 中的每个元素不仅是唯一的,还关联了一个称为“分数”(score)的值,Redis 根据这个分数对集合中的元素进行排序。_
_        /**_
_         * ZADD key score member [score member ...]:将一个或多个成员及其分数添加到有序集合中。如果成员已存在,则更新其分数。_
_         * ZRANGE key start stop [WITHSCORES]:返回指定范围内的成员(按分数从小到大排列),WITHSCORES 选项可以同时返回成员和分数。_
_         * ZREVRANGE key start stop [WITHSCORES]:返回指定范围内的成员(按分数从大到小排列)。_
_         * ZRANK key member:返回指定成员在有序集合中的排名(从小到大),排名从 0 开始。_
_         * ZREVRANK key member:返回指定成员在有序集合中的倒序排名(从大到小)。_
_         * ZREM key member [member ...]:移除一个或多个成员。_
_         * ZSCORE key member:返回指定成员的分数。_
_         * ZCARD key:返回有序集合中的成员数量。_
_         * ZCOUNT key min max:返回指定分数范围内的成员数量。_
_         * ZRANGEBYSCORE key min max [WITHSCORES] [LIMIT offset count]:按分数范围返回成员,支持返回分数和分页。_
_         * ZREMRANGEBYSCORE key min max:移除指定分数范围内的所有成员。_
_         */_
_        _String redisKey = "test:students";

        redisTemplate.opsForZSet().add(redisKey, "唐僧", 80);
        redisTemplate.opsForZSet().add(redisKey, "悟空", 90);
        redisTemplate.opsForZSet().add(redisKey, "八戒", 50);
        redisTemplate.opsForZSet().add(redisKey, "沙僧", 70);
        redisTemplate.opsForZSet().add(redisKey, "白龙马", 60);

        _// 返回有序集合中的成员数量_
_        _System._out_.println(redisTemplate.opsForZSet().zCard(redisKey));
        _// 返回指定成员的分数_
_        _System._out_.println(redisTemplate.opsForZSet().score(redisKey, "八戒"));
        _// reverseRank: 返回指定成员在有序集合中的倒序排名(从0开始)_
_        _System._out_.println(redisTemplate.opsForZSet().reverseRank(redisKey, "八戒"));
        _// reverseRange: 返回指定范围内的成员(按分数从大到小排列)。_
_        _System._out_.println(redisTemplate.opsForZSet().reverseRange(redisKey, 0, 2));
    }

    @Test
    public void testKeys() {
        redisTemplate.delete("test:user");
        _// 判断是否有这个key_
_        _System._out_.println(redisTemplate.hasKey("test:user"));

        redisTemplate.expire("test:students", 10, TimeUnit._SECONDS_);
    }

    _// 多次访问同一个key_
_    _@Test
    public void testBoundOperations() {
        String redisKey = "test:count";
        _// 先将这个key进行操作绑定_
_        _BoundValueOperations operations = redisTemplate.boundValueOps(redisKey);
        operations.increment();
        operations.increment();
        operations.increment();
        operations.increment();
        operations.increment();
        System._out_.println(operations.get());
    }

    _// 编程式事务_
_    _@Test
    public void testTransactional() {
        Object obj = redisTemplate.execute(new SessionCallback() {
            @Override
            public Object execute(RedisOperations operations) throws DataAccessException {
                String redisKey = "test:tx";
                _// operations.multi():启动一个 Redis 事务。在调用 multi() 之后,所有的 Redis 操作都会被放入一个事务队列中,直到 exec() 被调用时,这些操作才会被执行。_
_                _operations.multi();

                operations.opsForSet().add(redisKey, "zhangsan");
                operations.opsForSet().add(redisKey, "lisi");
                operations.opsForSet().add(redisKey, "wangwu");

                System._out_.println(operations.opsForSet().members(redisKey));

                _// operations.exec():执行事务队列中的所有操作,并提交事务。事务中的所有命令要么全部执行,要么全部失败。_
_                _return operations.exec();
            }
        });
        System._out_.println(obj);
    }

}
4.3 实现点赞功能(重要)
理论分析
业务层
redis key 进行封装:
com/nowcoder/community/util/RedisKeyUtil.java
public class RedisKeyUtil {

    private static final String _SPLIT _= ":";
    private static final String _PREFIX_ENTITY_LIKE _= "like:entity";
    private static final String _PREFIX_USER_LIKE _= "like:user";
    private static final String _PREFIX_FOLLOWEE _= "followee";
    private static final String _PREFIX_FOLLOWER _= "follower";
    private static final String _PREFIX_KAPTCHA _= "kaptcha";
    private static final String _PREFIX_TICKET _= "ticket";
    private static final String _PREFIX_USER _= "user";

    _// 某个实体的赞(可能是 帖子、评论、评论的评论)_
_    // like:entity:entityType:entityId -> set(userId)_
_    _public static String getEntityLikeKey(int entityType, int entityId) {
        return _PREFIX_ENTITY_LIKE _+ _SPLIT _+ entityType + _SPLIT _+ entityId;
    }

    _// 某个用户的赞(给某个用户点赞)_
_    // like:user:userId -> int_
_    _public static String getUserLikeKey(int userId) {
        return _PREFIX_USER_LIKE _+ _SPLIT _+ userId;
    }

    _// 某个用户关注的实体_
_    // followee:userId:entityType -> zset(entityId,now)_
_    _public static String getFolloweeKey(int userId, int entityType) {
        return _PREFIX_FOLLOWEE _+ _SPLIT _+ userId + _SPLIT _+ entityType;
    }
src/main/java/com/nowcoder/community/service/LikeService.java
@Service
public class LikeService {

    @Autowired
    private RedisTemplate redisTemplate;

    _// 点赞 当用户进行点赞, 需要将redis中对应的地方添加这个行为, 因此使用编程式事务_
_    // 因为可能是给帖子点赞, 可能是给帖子的评论点赞,可能是给评论的评论点赞_
_    // 因此 entityType:0 对应帖子, 1 对应评论_
_    // entityUserId: 发布实体的用户id_
_    _public void like(int userId, int entityType, int entityId, int entityUserId) {
        redisTemplate.execute(new SessionCallback() {
            @Override
            public Object execute(RedisOperations operations) throws DataAccessException {
                _// 获取实体的点赞key_
_                _String entityLikeKey = RedisKeyUtil._getEntityLikeKey_(entityType, entityId);
                _// 获取用户key(即发布实体的用户)_
_                _String userLikeKey = RedisKeyUtil._getUserLikeKey_(entityUserId);

                _// 判断当前登陆的用户是否已经给 该实体点赞_
_                _boolean isMember = operations.opsForSet().isMember(entityLikeKey, userId);

                _// 下面进行事务处理_
_                _operations.multi();
                _// 如果已经点赞, 则再次点击相当于三取消点赞_
_                _if (isMember) {
                    operations.opsForSet().remove(entityLikeKey, userId);
                    operations.opsForValue().decrement(userLikeKey);
                } else {
                    _// 如果没有点赞, 则点赞_
_                    _operations.opsForSet().add(entityLikeKey, userId);
                    operations.opsForValue().increment(userLikeKey);
                }

                return operations.exec();
            }
        });
    }

    _// 查询某实体获得的 点赞数量_
_    _public long findEntityLikeCount(int entityType, int entityId) {
        String entityLikeKey = RedisKeyUtil._getEntityLikeKey_(entityType, entityId);
        return redisTemplate.opsForSet().size(entityLikeKey);
    }

    _// 查询某人对某实体的点赞状态_
_    _public int findEntityLikeStatus(int userId, int entityType, int entityId) {
        String entityLikeKey = RedisKeyUtil._getEntityLikeKey_(entityType, entityId);
        return redisTemplate.opsForSet().isMember(entityLikeKey, userId) ? 1 : 0;
    }

    _// 查询某个用户获得的赞_
_    _public int findUserLikeCount(int userId) {
        String userLikeKey = RedisKeyUtil._getUserLikeKey_(userId);
        Integer count = (Integer) redisTemplate.opsForValue().get(userLikeKey);
        return count == null ? 0 : count.intValue();
    }

}
视图层
src/main/java/com/nowcoder/community/controller/LikeController.java
@Controller
public class LikeController {

    @Autowired
    private LikeService likeService;

    @Autowired
    private HostHolder hostHolder;

    @RequestMapping(path = "/like", method = RequestMethod._POST_)
    @ResponseBody
    public String like(int entityType, int entityId, int entityUserId) {
        User user = hostHolder.getUser();
        _// 点赞_
_        _likeService.like(user.getId(), entityType, entityId, entityUserId);

        _// 获取实体的点赞数量_
_        _long likeCount = likeService.findEntityLikeCount(entityType, entityId);
        _// 获取当前用户对实体点赞的 状态_
_        _int likeStatus = likeService.findEntityLikeStatus(user.getId(), entityType, entityId);
        _// 返回的结果_
_        _Map<String, Object> map = new HashMap<>();
        map.put("likeCount", likeCount);
        map.put("likeStatus", likeStatus);

        return CommunityUtil._getJSONString_(0, null, map);
    }

}
前端页面
对于帖子列表,需要在右边显示 每一个帖子 总的点赞数
帖子列表页面 对应视图层请求 src/main/java/com/nowcoder/community/controller/HomeController.java,添加如下代码:
_// 统计帖子对应的点赞数量_
long likeCount = likeService.findEntityLikeCount(_ENTITY_TYPE_POST_, post.getId());
map.put("likeCount", likeCount);
帖子列表页面对应 index.html
需要修改:<li class="d-inline ml-2">赞 <span th:text="${map.likeCount}">11</span></li>
<ul class="list-unstyled">
    <li class="media pb-3 pt-3 mb-3 border-bottom" th:each="map:${discussPosts}">
        <a th:href="@{|/user/profile/${map.user.id}|}">
            <img th:src="${map.user.headerUrl}" class="mr-4 rounded-circle" alt="用户头像" style="width:50px;height:50px;">
        </a>
        <div class="media-body">
            <h6 class="mt-0 mb-3">
                <a th:href="@{|/discuss/detail/${map.post.id}|}" th:utext="${map.post.title}">备战春招,面试刷题跟他复习,一个月全搞定!</a>
                <span class="badge badge-secondary bg-primary" th:if="${map.post.type==1}">置顶</span>
                <span class="badge badge-secondary bg-danger" th:if="${map.post.status==1}">精华</span>
            </h6>
            <div class="text-muted font-size-12">
                <u class="mr-3" th:utext="${map.user.username}">寒江雪</u> 发布于 <b th:text="${#dates.format(map.post.createTime,'yyyy-MM-dd HH:mm:ss')}">2019-04-15 15:32:18</b>
                <ul class="d-inline float-right">
                    <li class="d-inline ml-2">赞 <span th:text="${map.likeCount}">11</span></li>
                    <li class="d-inline ml-2">|</li>
                    <li class="d-inline ml-2">回帖 <span th:text="${map.post.commentCount}">7</span></li>
                </ul>
            </div>
        </div>
    </li>
</ul>
对于帖子详情页面,需要显示该帖子的 点赞数目,并且登陆用户可以进行点赞和取消点赞的操作
帖子详情页面对应视图层:src/main/java/com/nowcoder/community/controller/DiscussPostController.java
需要添加如下代码:
@RequestMapping(path = "/detail/{discussPostId}", method = RequestMethod._GET_)
public String getDiscussPost(@PathVariable("discussPostId") int discussPostId, Model model, Page page) {
    _// 帖子_
_    _DiscussPost post = discussPostService.findDiscussPostById(discussPostId);
    model.addAttribute("post", post);
    _// 作者_
_    _User user = userService.findUserById(post.getUserId());
    model.addAttribute("user", user);

    _// 帖子对应的点赞_
_    // 点赞数量_
_    _long likeCount = likeService.findEntityLikeCount(_ENTITY_TYPE_POST_, discussPostId);
    model.addAttribute("likeCount", likeCount);
    _// 点赞状态_
_    _int likeStatus = hostHolder.getUser() == null ? 0 :
            likeService.findEntityLikeStatus(hostHolder.getUser().getId(), _ENTITY_TYPE_POST_, discussPostId);
    model.addAttribute("likeStatus", likeStatus);


    _// 1. 评论分页信息 自定义的分页_
_    _page.setLimit(5);
    page.setPath("/discuss/detail/" + discussPostId);
    _// 在帖子数据表(disscusspost 表) 中, 同时存储了该帖子下的评论数量_
_    _page.setRows(post.getCommentCount());

    _// 在帖子详情页面需要查询的评论分为两个方面: (1) 该帖子对于的评论 (2) 某个评论下的所有评论(回复)_
_    // 2. 下面需要查询该帖子下的所有评论_
_    // 为了使得前端页面方便显示, 使用 Map<String,Object> 进行该帖子下的评论存储_

_    // ===首先查询该帖子下的所有评论===_
_    _List<Comment> commentList = commentService.findCommentsByEntity(
            _ENTITY_TYPE_POST_, post.getId(), page.getOffset(), page.getLimit());
    _// 评论VO列表 存储评论信息_
_    _List<Map<String, Object>> commentVoList = new ArrayList<>();
    if (commentList != null) {
        for (Comment comment : commentList) {
            _// 评论VO_
_            // 存储内容:comment 实体; user 实体; 评论下的所有回复_
_            _Map<String, Object> commentVo = new HashMap<>();
            _// 评论_
_            _commentVo.put("comment", comment);
            _// 作者_
_            _commentVo.put("user", userService.findUserById(comment.getUserId()));

            _// 帖子下评论的点赞_
_            // 点赞数量_
_            _likeCount = likeService.findEntityLikeCount(_ENTITY_TYPE_COMMENT_, comment.getId());
            commentVo.put("likeCount", likeCount);
            _// 点赞状态_
_            _likeStatus = hostHolder.getUser() == null ? 0 :
                    likeService.findEntityLikeStatus(hostHolder.getUser().getId(), _ENTITY_TYPE_COMMENT_, comment.getId());
            commentVo.put("likeStatus", likeStatus);


            _// === 其次查询该评论下的所有回复 ===_
_            _List<Comment> replyList = commentService.findCommentsByEntity(
                    _ENTITY_TYPE_COMMENT_, comment.getId(), 0, Integer._MAX_VALUE_);
            _// 回复VO列表_
_            _List<Map<String, Object>> replyVoList = new ArrayList<>();
            if (replyList != null) {
                for (Comment reply : replyList) {

                    _// 回复 Vo:_
_                    // 存储内容: reply (实际上也是 comment) 实体; user 实体; target(回复对象) 实体 因为可能是 回复的回复_
_                    _Map<String, Object> replyVo = new HashMap<>();
                    _// 回复_
_                    _replyVo.put("reply", reply);
                    _// 作者_
_                    _replyVo.put("user", userService.findUserById(reply.getUserId()));
                    _// 评论的回复 点赞_
_                    // 点赞数量_
_                    _likeCount = likeService.findEntityLikeCount(_ENTITY_TYPE_COMMENT_, reply.getId());
                    replyVo.put("likeCount", likeCount);
                    _// 点赞状态_
_                    _likeStatus = hostHolder.getUser() == null ? 0 :
                            likeService.findEntityLikeStatus(hostHolder.getUser().getId(), _ENTITY_TYPE_COMMENT_, reply.getId());
                    replyVo.put("likeStatus", likeStatus);


                    _// 回复目标_
_                    // 如果reply.getTargetId() == 0, 表示是对顶层评论进行回复; 如果不等于0, 则表示是回复的回复_
_                    _User target = reply.getTargetId() == 0 ? null : userService.findUserById(reply.getTargetId());
                    replyVo.put("target", target);

                    replyVoList.add(replyVo);
                }
            }
            commentVo.put("replys", replyVoList);

            _// 回复数量_
_            _int replyCount = commentService.findCommentCount(_ENTITY_TYPE_COMMENT_, comment.getId());
            commentVo.put("replyCount", replyCount);

            commentVoList.add(commentVo);
        }
    }

    model.addAttribute("comments", commentVoList);

    return "/site/discuss-detail";
}
帖子详情页面对应: templates/site/discuss-detail.html
<!--对于帖子进行点赞操作和取消点赞操作
    this: 当前组件
    post.id: 帖子的id
    post.userId: 发布该帖子的用户id
-->
<a href="javascript:;" th:onclick="|like(this,1,${post.id},${post.userId});|" class="text-primary">
    <b th:text="${likeStatus==1?'已赞':'赞'}">赞</b> <i th:text="${likeCount}">11</i>
</a>

_<!--对于帖子的评论进行点赞操作和取消点赞操作-->_
<a href="javascript:;" th:onclick="|like(this,2,${cvo.comment.id},${cvo.comment.userId});|" class="text-primary">
   <b th:text="${cvo.likeStatus==1?'已赞':'赞'}">赞</b>(<i th:text="${cvo.likeCount}">1</i>)
</a>

_<!--对于评论的回复进行点赞操作和取消点赞操作-->_
<a href="javascript:;" th:onclick="|like(this,2,${rvo.reply.id},${rvo.reply.userId});|" class="text-primary">
   <b th:text="${rvo.likeStatus==1?'已赞':'赞'}">赞</b>(<i th:text="${rvo.likeCount}">1</i>)
</a>
对应的 js 异步请求 /images/nowder/discuss.js
function like(btn, entityType, entityId, entityUserId) {
    $.post(
        CONTEXT_PATH + "/like",
        {"entityType":entityType,"entityId":entityId,"entityUserId":entityUserId},
        function(data) {
            data = $.parseJSON(data);
            if(data.code == 0) {
                $(btn).children("i").text(data.likeCount);
                $(btn).children("b").text(data.likeStatus==1?'已赞':"赞");
            } else {
                alert(data.msg);
            }
        }
    );
}
4.4 用户本人收到的赞
理论分析
redis 工具类
对于用户收到的赞,使用 redis 进行存储,key 为 like:user:userId,value 使用 int ,表示该用户收到的赞的数量,对应文件 src/main/java/com/nowcoder/community/util/RedisKeyUtil.java:
public class RedisKeyUtil {

    private static final String _SPLIT _= ":";
    private static final String _PREFIX_ENTITY_LIKE _= "like:entity";
    private static final String _PREFIX_USER_LIKE _= "like:user";
    private static final String _PREFIX_FOLLOWEE _= "followee";
    private static final String _PREFIX_FOLLOWER _= "follower";
    private static final String _PREFIX_KAPTCHA _= "kaptcha";
    private static final String _PREFIX_TICKET _= "ticket";
    private static final String _PREFIX_USER _= "user";

    _// 某个实体的赞(可能是 帖子、评论、评论的评论) 使用set存储所有给该实体点赞的用户id_
_    // like:entity:entityType:entityId -> set(userId)_
_    _public static String getEntityLikeKey(int entityType, int entityId) {
        return _PREFIX_ENTITY_LIKE _+ _SPLIT _+ entityType + _SPLIT _+ entityId;
    }

    _// 某个用户的赞(某个用户收到的赞) 使用一个整数表示收到的赞的数量_
_    // like:user:userId -> int_
_    _public static String getUserLikeKey(int userId) {
        return _PREFIX_USER_LIKE _+ _SPLIT _+ userId;
    }


 }
业务层
对某个实体进行点赞的时候,需要加发布该实体的用户获得的赞加 1,反之减一;
src/main/java/com/nowcoder/community/service/LikeService.java:
@Service
public class LikeService {

    @Autowired
    private RedisTemplate redisTemplate;

    _// 点赞动作, 当用户进行点赞, 需要将redis中对应的地方添加这个行为, 因此使用编程式事务_
_    // 因为可能是给帖子点赞, 可能是给帖子的评论点赞,可能是给评论的评论点赞_
_    // 因此 entityType:0 对应帖子, 1 对应评论_
_    // entityUserId: 发布实体的用户id_
_    _public void like(int userId, int entityType, int entityId, int entityUserId) {
        redisTemplate.execute(new SessionCallback() {
            @Override
            public Object execute(RedisOperations operations) throws DataAccessException {
                _// 获取实体的点赞key_
_                _String entityLikeKey = RedisKeyUtil._getEntityLikeKey_(entityType, entityId);
                _// 获取用户key(即发布实体的用户)_
_                _String userLikeKey = RedisKeyUtil._getUserLikeKey_(entityUserId);

                _// 判断当前登陆的用户是否已经给 该实体点赞_
_                _boolean isMember = operations.opsForSet().isMember(entityLikeKey, userId);

                _// 下面进行事务处理_
_                _operations.multi();
                _// 如果已经点赞, 则再次点击相当于三取消点赞_
_                _if (isMember) {
                    operations.opsForSet().remove(entityLikeKey, userId);
                    _// 新添加: 发布该帖子的用户收到的赞减去一_
_                    _operations.opsForValue().decrement(userLikeKey);
                } else {
                    _// 如果没有点赞, 则点赞_
_                    _operations.opsForSet().add(entityLikeKey, userId);
                    _// 新添加: 发布该实体的用户得到的赞加1_
_                    _operations.opsForValue().increment(userLikeKey);
                }

                return operations.exec();
            }
        });
    }

    _// 查询某实体获得的 点赞数量_
_    _public long findEntityLikeCount(int entityType, int entityId) {
        String entityLikeKey = RedisKeyUtil._getEntityLikeKey_(entityType, entityId);
        return redisTemplate.opsForSet().size(entityLikeKey);
    }

    _// 查询某人对某实体的点赞状态_
_    _public int findEntityLikeStatus(int userId, int entityType, int entityId) {
        String entityLikeKey = RedisKeyUtil._getEntityLikeKey_(entityType, entityId);
        return redisTemplate.opsForSet().isMember(entityLikeKey, userId) ? 1 : 0;
    }

    _// 查询某个用户获得的赞的数量_
_    _public int findUserLikeCount(int userId) {
        String userLikeKey = RedisKeyUtil._getUserLikeKey_(userId);
        Integer count = (Integer) redisTemplate.opsForValue().get(userLikeKey);
        return count == null ? 0 : count.intValue();
    }

}
视图层
定位到 个人主页
src/main/java/com/nowcoder/community/controller/UserController.java
_// 定位到个人首页_
@RequestMapping(path = "profile/{userId}", method = RequestMethod._GET_)
public String getProfilePage(@PathVariable("userId") int userId, Model model){
    User user = userService.findUserById(userId);
    _// 判断是否有该用户_
_    _if (user == null){
        throw new RuntimeException("该用户不存在");
    }
    _// 用户添加到上下文中_
_    _model.addAttribute("user", user);
    _// 该用户收到的点赞_
_    _int likeCount = likeService.findUserLikeCount(userId);
    model.addAttribute("likeCount", likeCount);

    return "/site/profile";
}
前端页面
index.html:
需要将头部中 个人主页 和帖子列表中的头像 进行修改:
<a class="dropdown-item text-c-detailenter" th:href="@{|/user/profile/${loginUser.id}|}">个人主页</a>


<li class="media pb-3 pt-3 mb-3 border-bottom" th:each="map:${discussPosts}">
    <a th:href="@{|/user/profile/${map.user.id}|}">
        <img th:src="${map.user.headerUrl}" class="mr-4 rounded-circle" alt="用户头像" style="width:50px;height:50px;">
    </a>
 </li>
discuss-detail.html
帖子详情中 用户头像 和 评论中的用户名称 进行修改:
<div class="media pb-3 border-bottom">
    <a th:href="@{|/user/profile/${user.id}|}">
       _<!--用户头像-->_
_       _<img th:src="${user.headerUrl}" class="align-self-start mr-4 rounded-circle user-header" alt="用户头像" >
    </a>

</div>

_<!-- 回帖列表 -->_
<ul class="list-unstyled mt-4">
    <li class="media pb-3 pt-3 mb-3 border-bottom" th:each="cvo:${comments}">
       <a th:href="@{|/user/profile/${cvo.user.id}|}">
          <img th:src="${cvo.user.headerUrl}" class="align-self-start mr-4 rounded-circle user-header" alt="用户头像" >
       </a>
    </li>
</ul>templates/site/profile.html: 个人主页对应文件
<!doctype html>
<html lang="en" xmlns:th="http://www.thymeleaf.org">
<head>
    <meta charset="utf-8">
    <meta name="viewport" content="width=device-width, initial-scale=1, shrink-to-fit=no">
    <link rel="icon" href="https://static.nowcoder.com/images/logo_87_87.png"/>
    <link rel="stylesheet" th:href="@{/css/bootstrap.min.css}" crossorigin="anonymous">
    <link rel="stylesheet" href="../css/global.css" />
    <title>牛客网-个人主页</title>
</head>
<body>
    <div class="nk-container">
       _<!-- 头部 -->_
_       _<header class="bg-dark sticky-top" th:replace="index::header">
       </header>

       _<!-- 内容 -->_
_       _<div class="main">
          <div class="container">
             _<!-- 选项 -->_
_             _<div class="position-relative">
                <ul class="nav nav-tabs">
                   <li class="nav-item">
                      <a class="nav-link active" th:href="@{|/user/profile/${user.id}|}">个人信息</a>
                   </li>
                   <li class="nav-item">
                      <a class="nav-link" href="my-post.html">我的帖子</a>
                   </li>
                   <li class="nav-item">
                      <a class="nav-link" href="my-reply.html">我的回复</a>
                   </li>
                </ul>
             </div>
             _<!-- 个人信息 -->_
_             _<div class="media mt-5">
                <img th:src="${user.headerUrl}" class="align-self-start mr-4 rounded-circle" alt="用户头像" style="width:50px;">
                <div class="media-body">
                   <h5 class="mt-0 text-warning">
                      <span th:text="${user.username}">nowcoder</span>
                      <button type="button" class="btn btn-info btn-sm float-right mr-5 follow-btn">关注TA</button>
                   </h5>
                   <div class="text-muted mt-3">
                      <span>注册于 <i class="text-muted">2015-06-12 15:20:12</i></span>
                   </div>
                   <div class="text-muted mt-3 mb-5">
                      <span>关注了 <a class="text-primary" href="followee.html">5</a> 人</span>
                      <span class="ml-4">关注者 <a class="text-primary" href="follower.html">123</a> 人</span>
                      <span class="ml-4">获得了 <i class="text-danger" th:text="${likeCount}">87</i> 个赞</span>
                   </div>
                </div>
             </div>
          </div>
       </div>

       _<!-- 尾部 -->_
_       _<footer class="bg-dark" th:replace="index::footer">
       </footer>
    </div>

    <script src="https://code.jquery.com/jquery-3.3.1.min.js" crossorigin="anonymous"></script>
    <script src="https://cdnjs.cloudflare.com/ajax/libs/popper.js/1.14.7/umd/popper.min.js" crossorigin="anonymous"></script>
    <script src="https://stackpath.bootstrapcdn.com/bootstrap/4.3.1/js/bootstrap.min.js" crossorigin="anonymous"></script>
    <script th:src="@{/js/global.js}"></script>
    <script th:src="@{/js/profile.js}"></script>
</body>
</html>
4.5 关注功能实现
理论分析
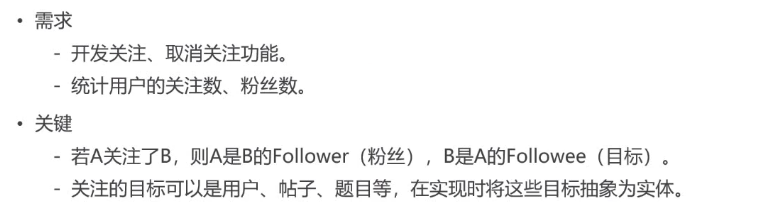
redis 工具类
src/main/java/com/nowcoder/community/util/RedisKeyUtil.java 需要添加关于 关注 和 被关注 的 key
// 关注
private static final String _PREFIX_FOLLOWEE _= "followee";
// 粉丝
private static final String _PREFIX_FOLLOWER _= "follower";

// 某个用户关注的实体
// followee:userId:entityType -> zset(entityId,now)
// 使用排序集合存储 某个用户 关注的所有这种实体类型的 实体 的id
public static String getFolloweeKey(int userId, int entityType) {
    return _PREFIX_FOLLOWEE _+ _SPLIT _+ userId + _SPLIT _+ entityType;
}

// 某个实体拥有的粉丝
// follower:entityType:entityId -> zset(userId,now)
// 使用排序集合存储 这个实体拥有的 所有粉丝的 id, 使用时间排序
// 或者说使用排序集合存储 关注这个实体 的所有 用户的id
public static String getFollowerKey(int entityType, int entityId) {
    return _PREFIX_FOLLOWER _+ _SPLIT _+ entityType + _SPLIT _+ entityId;
}
业务层
src/main/java/com/nowcoder/community/service/FollowService.java
@Service
public class FollowService implements CommunityConstant {

    @Autowired
    private RedisTemplate redisTemplate;

    @Autowired
    private UserService userService;

    // 关注动作 进行处理
    public void follow(int userId, int entityType, int entityId){
        redisTemplate.execute(new SessionCallback() {
            @Override
            public Object execute(RedisOperations redisOperations) throws DataAccessException {

                String followeeKey = RedisKeyUtil._getFolloweeKey_(userId, entityType);
                String followerKey = RedisKeyUtil._getFollowerKey_(entityType, entityId);

                redisOperations.multi();
                // 当前用户关注的这个实体类型的 集合中 新增关于当前实体类型的id
                redisOperations.opsForZSet().add(followeeKey, entityId, System._currentTimeMillis_());
                // 当前这个实体新增一个关注者
                redisOperations.opsForZSet().add(followerKey, userId, System._currentTimeMillis_());

                return redisOperations.exec();
            }
        });
    }

    // 取消关注动作 进行处理
    public void unfollow(int userId, int entityType, int entityId){
        redisTemplate.execute(new SessionCallback() {
            @Override
            public Object execute(RedisOperations redisOperations) throws DataAccessException {

                String followeeKey = RedisKeyUtil._getFolloweeKey_(userId, entityType);
                String followerKey = RedisKeyUtil._getFollowerKey_(entityType, entityId);

                redisOperations.multi();
                // 当前用户取消对这个实体的关注,则当前用户关注的这个实体类型的 集合中 删除关于当前实体类型的id
                redisOperations.opsForZSet().remove(followeeKey, entityId, System._currentTimeMillis_());
                // 当前这个实体删除一个关注者
                redisOperations.opsForZSet().remove(followerKey, userId, System._currentTimeMillis_());

                return redisOperations.exec();
            }
        });
    }

    // 查询 某个用户关注的实体的数量
    public long findFolloweeCount(int userId, int entityType){
        String followeeKey = RedisKeyUtil._getFolloweeKey_(userId, entityType);

        return redisTemplate.opsForZSet().zCard(followeeKey);
    }

    // 返回 某个实体 的粉丝数(被多少人关注)
    public long findFollowerCount(int entityType, int entityId){
        String followerKey = RedisKeyUtil._getFollowerKey_(entityType, entityId);

        return redisTemplate.opsForZSet().zCard(followerKey);
    }

    // 查询当前用户是否已经关注该 实体
    public boolean hasFollowed(int userId, int entityType, int entityId){
        String followeeKey = RedisKeyUtil._getFolloweeKey_(userId, entityType);
        return redisTemplate.opsForZSet().score(followeeKey, entityId) != null;
    }


}
视图层
src/main/java/com/nowcoder/community/controller/FollowController.java
@Controller
public class FollowController implements CommunityConstant {


    @Autowired
    private FollowService followService;

    @Autowired
    private HostHolder hostHolder;

    @Autowired
    private UserService userService;

    // 关注动作请求 异步请求
    @RequestMapping(path = "/follow", method = RequestMethod._POST_)
    @ResponseBody
    public String follow(int entityType, int entityId){
        User user = hostHolder.getUser();
        followService.follow(user.getId(), entityType, entityId);
        return CommunityUtil._getJSONString_(0, "已关注");
    }

    // 取消关注请求 异步请求
    @RequestMapping(path = "/unfollow", method = RequestMethod._POST_)
    @ResponseBody
    public String unfollow(int entityType, int entityId){
        User user = hostHolder.getUser();
        followService.unfollow(user.getId(), entityType, entityId);

        return CommunityUtil._getJSONString_(0, "已取消关注");
    }

    private boolean hasFollowed(int userId) {
        if (hostHolder.getUser() == null) {
            return false;
        }

        return followService.hasFollowed(hostHolder.getUser().getId(), _ENTITY_TYPE_USER_, userId);
    }

}
因为需要定位到 site/profile.html,因此需要修改 src/main/java/com/nowcoder/community/controller/UserController.java 中的代码:
// 定位到个人首页
@RequestMapping(path = "profile/{userId}", method = RequestMethod._GET_)
public String getProfilePage(@PathVariable("userId") int userId, Model model){
    User user = userService.findUserById(userId);
    // 判断是否有该用户
    if (user == null){
        throw new RuntimeException("该用户不存在");
    }
    // 用户添加到上下文中
    model.addAttribute("user", user);
    // 该用户收到的点赞
    int likeCount = likeService.findUserLikeCount(userId);
    model.addAttribute("likeCount", likeCount);

    // 关注数量 即某个用户 关注的其他用户的数量
    long followeeCount = followService.findFolloweeCount(userId, _ENTITY_TYPE_USER_);
    model.addAttribute("followeeCount", followeeCount);
    // 粉丝数量 即关注该用户的人
    long followerCount = followService.findFollowerCount(_ENTITY_TYPE_USER_, userId);
    model.addAttribute("followerCount", followerCount);
    // 判断登录用户是否关注了该用户
    boolean hasFollowed = false;
    if (hostHolder.getUser() != null) {
        hasFollowed = followService.hasFollowed(hostHolder.getUser().getId(), _ENTITY_TYPE_USER_, userId);
    }
    model.addAttribute("hasFollowed", hasFollowed);

    return "/site/profile";
}
前端页面
templates/site/profile.html
<!doctype html>
<html lang="en" xmlns:th="http://www.thymeleaf.org">
<head>
    <meta charset="utf-8">
    <meta name="viewport" content="width=device-width, initial-scale=1, shrink-to-fit=no">
    <link rel="icon" href="https://static.nowcoder.com/images/logo_87_87.png"/>
    <link rel="stylesheet" th:href="@{/css/bootstrap.min.css}" crossorigin="anonymous">
    <link rel="stylesheet" th:href="@{/css/global.css}" />
    <title>牛客网-个人主页</title>
</head>
<body>
    <div class="nk-container">
       <!-- 头部 -->
       <header class="bg-dark sticky-top" th:replace="index::header">
       </header>

       <!-- 内容 -->
       <div class="main">
          <div class="container">
             <!-- 选项 -->
             <div class="position-relative">
                <ul class="nav nav-tabs">
                   <li class="nav-item">
                      <a class="nav-link active" th:href="@{|/user/profile/${user.id}|}">个人信息</a>
                   </li>
                   <li class="nav-item">
                      <a class="nav-link" href="my-post.html">我的帖子</a>
                   </li>
                   <li class="nav-item">
                      <a class="nav-link" href="my-reply.html">我的回复</a>
                   </li>
                </ul>
             </div>
             <!-- 个人信息 -->
             <div class="media mt-5">
                <img th:src="${user.headerUrl}" class="align-self-start mr-4 rounded-circle" alt="用户头像" style="width:50px;">
                <div class="media-body">
                   <h5 class="mt-0 text-warning">
                      <span th:text="${user.username}">nowcoder</span>
                      <input type="hidden" id="entityId" th:value="${user.id}">

                      <button type="button" th:class="|btn ${hasFollowed?'btn-secondary':'btn-info'} btn-sm float-right mr-5 follow-btn|"
                            th:text="${hasFollowed?'已关注':'关注TA'}" th:if="${loginUser!=null&&loginUser.id!=user.id}">关注TA</button>
                   </h5>
                   <div class="text-muted mt-3">
                      <span>注册于 <i class="text-muted">2015-06-12 15:20:12</i></span>
                   </div>
                   <div class="text-muted mt-3 mb-5">
                      <span>关注了 <a class="text-primary" th:href="@{|/followees/${user.id}|}" th:text="${followeeCount}">5</a> 人</span>
                      <span class="ml-4">关注者(粉丝) <a class="text-primary" th:href="@{|/followers/${user.id}|}" th:text="${followerCount}">123</a> 人</span>
                      <span class="ml-4">获得了 <i class="text-danger" th:text="${likeCount}">87</i> 个赞</span>
                   </div>
                </div>
             </div>
          </div>
       </div>

       <!-- 尾部 -->
       <footer class="bg-dark" th:replace="index::footer">
       </footer>
    </div>

    <script src="https://code.jquery.com/jquery-3.3.1.min.js" crossorigin="anonymous"></script>
    <script src="https://cdnjs.cloudflare.com/ajax/libs/popper.js/1.14.7/umd/popper.min.js" crossorigin="anonymous"></script>
    <script src="https://stackpath.bootstrapcdn.com/bootstrap/4.3.1/js/bootstrap.min.js" crossorigin="anonymous"></script>
    <script th:src="@{/js/global.js}"></script>
    <script th:src="@{/js/profile.js}"></script>
</body>
</html>
profile.js
$(function(){
    $(".follow-btn").click(follow);
});

function follow() {
    var btn = this;
    // 判断当前的状态, 前端 th:class="|btn ${hasFollowed?'btn-secondary':'btn-info'} btn-sm float-right mr-5 follow-btn|“ 已经设置
    // 如果有 btn-info 属性, 则当前状态是 当前登录用户未关注该用户, 点击该按钮后是 关注的动作
    if($(btn).hasClass("btn-info")) {
       // 关注TA
       $.post(
          _CONTEXT_PATH _+ "/follow",
          // entityType: 3 表示关注的是User
          {"entityType":3,"entityId":$(btn).prev().val()},
          function(data) {
             data = $.parseJSON(data);
             if(data.code == 0) {
                _window_.location.reload();
             } else {
                alert(data.msg);
             }
          }
       );
       // $(btn).text("已关注").removeClass("btn-info").addClass("btn-secondary");
    } else {
       // 取消关注
       $.post(
          _CONTEXT_PATH _+ "/unfollow",
          {"entityType":3,"entityId":$(btn).prev().val()},
          function(data) {
             data = $.parseJSON(data);
             if(data.code == 0) {
                _window_.location.reload();
             } else {
                alert(data.msg);
             }
          }
       );
       //$(btn).text("关注TA").removeClass("btn-secondary").addClass("btn-info");
    }
}
4.6 关注的人的列表
关注的人的列表,粉丝的列表
理论分析
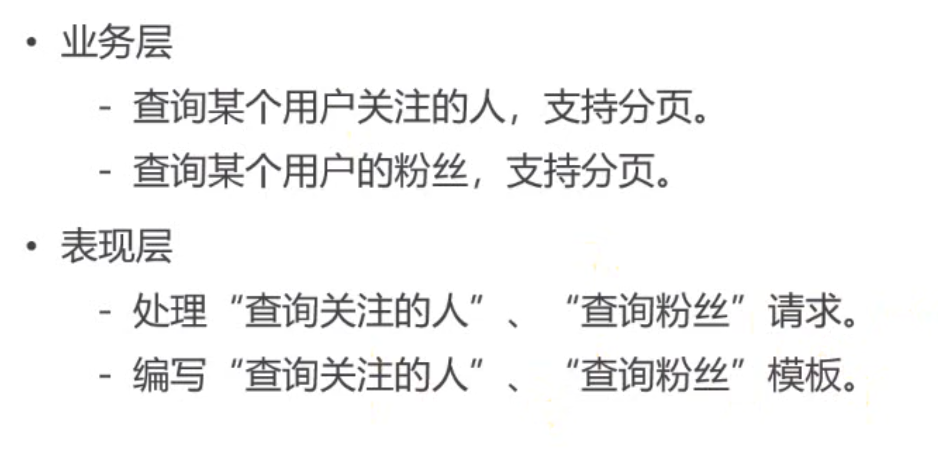
业务层
src/main/java/com/nowcoder/community/service/FollowService.java 需要添加的代码:
_// 查询某个用户关注的人_
public List<Map<String, Object>> findFollowees(int userId, int offset, int limit) {
    _// user 实体对应 ENTITY_TYPE_USER_
_    _String followeeKey = RedisKeyUtil._getFolloweeKey_(userId, _ENTITY_TYPE_USER_);
    _// opsForZSet().reverseRange: 因为某个用户关注的人是使用有序集合存储的userId, 并且使用时间进行顺序排序_
_    // 查询的时候最新关注的放在最前方,因此倒叙查询_
_    _Set<Integer> targetIds = redisTemplate.opsForZSet().reverseRange(followeeKey, offset, offset + limit - 1);
    if (targetIds == null) {
        return null;
    }

    _// 将关注的每一个人都封装到 一个Map中, 最后添加到 List_
_    _List<Map<String, Object>> list = new ArrayList<>();
    for (Integer targetId : targetIds) {
        Map<String, Object> map = new HashMap<>();
        User user = userService.findUserById(targetId);
        map.put("user", user);
        _// 获取关注的这个人的时间_
_        _Double score = redisTemplate.opsForZSet().score(followeeKey, targetId);
        map.put("followTime", new Date(score.longValue()));
        list.add(map);
    }

    return list;
}

_// 查询某用户的粉丝_
public List<Map<String, Object>> findFollowers(int userId, int offset, int limit) {
    String followerKey = RedisKeyUtil._getFollowerKey_(_ENTITY_TYPE_USER_, userId);
    _// 某个实体的粉丝id也是使用 排序集合 存储的,并且按照关注时间进行排序_
_    // 因此查询的时候倒叙查询_
_    _Set<Integer> targetIds = redisTemplate.opsForZSet().reverseRange(followerKey, offset, offset + limit - 1);

    if (targetIds == null) {
        return null;
    }

    _// 遍历关注该实体的每一个粉丝, 并封装到每一个Map中, 最后添加到List中_
_    _List<Map<String, Object>> list = new ArrayList<>();
    for (Integer targetId : targetIds) {
        Map<String, Object> map = new HashMap<>();
        User user = userService.findUserById(targetId);
        map.put("user", user);
        Double score = redisTemplate.opsForZSet().score(followerKey, targetId);
        map.put("followTime", new Date(score.longValue()));
        list.add(map);
    }

    return list;
}
业务层整体代码:
@Service
public class FollowService implements CommunityConstant {

    @Autowired
    private RedisTemplate redisTemplate;

    @Autowired
    private UserService userService;

    _// 关注动作 进行处理_
_    _public void follow(int userId, int entityType, int entityId){
        redisTemplate.execute(new SessionCallback() {
            @Override
            public Object execute(RedisOperations redisOperations) throws DataAccessException {

                String followeeKey = RedisKeyUtil._getFolloweeKey_(userId, entityType);
                String followerKey = RedisKeyUtil._getFollowerKey_(entityType, entityId);

                redisOperations.multi();
                _// 当前用户关注的这个实体类型的 集合中 新增关于当前实体类型的id_
_                _redisOperations.opsForZSet().add(followeeKey, entityId, System._currentTimeMillis_());
                _// 当前这个实体新增一个关注者_
_                _redisOperations.opsForZSet().add(followerKey, userId, System._currentTimeMillis_());

                return redisOperations.exec();
            }
        });
    }

    _// 取消关注动作 进行处理_
_    _public void unfollow(int userId, int entityType, int entityId){
        redisTemplate.execute(new SessionCallback() {
            @Override
            public Object execute(RedisOperations redisOperations) throws DataAccessException {

                String followeeKey = RedisKeyUtil._getFolloweeKey_(userId, entityType);
                String followerKey = RedisKeyUtil._getFollowerKey_(entityType, entityId);

                redisOperations.multi();
                _// 当前用户取消对这个实体的关注,则当前用户关注的这个实体类型的 集合中 删除关于当前实体类型的id_
_                _redisOperations.opsForZSet().remove(followeeKey, entityId, System._currentTimeMillis_());
                _// 当前这个实体删除一个关注者_
_                _redisOperations.opsForZSet().remove(followerKey, userId, System._currentTimeMillis_());

                return redisOperations.exec();
            }
        });
    }

    _// 查询 某个用户关注的实体的数量_
_    _public long findFolloweeCount(int userId, int entityType){
        String followeeKey = RedisKeyUtil._getFolloweeKey_(userId, entityType);

        return redisTemplate.opsForZSet().zCard(followeeKey);
    }

    _// 返回 某个实体 的粉丝数(被多少人关注)_
_    _public long findFollowerCount(int entityType, int entityId){
        String followerKey = RedisKeyUtil._getFollowerKey_(entityType, entityId);

        return redisTemplate.opsForZSet().zCard(followerKey);
    }

    _// 查询当前用户是否已经关注该 实体_
_    _public boolean hasFollowed(int userId, int entityType, int entityId){
        String followeeKey = RedisKeyUtil._getFolloweeKey_(userId, entityType);
        return redisTemplate.opsForZSet().score(followeeKey, entityId) != null;
    }

    _// 查询某个用户关注的人_
_    _public List<Map<String, Object>> findFollowees(int userId, int offset, int limit) {
        _// user 实体对应 ENTITY_TYPE_USER_
_        _String followeeKey = RedisKeyUtil._getFolloweeKey_(userId, _ENTITY_TYPE_USER_);
        _// opsForZSet().reverseRange: 因为某个用户关注的人是使用有序集合存储的userId, 并且使用时间进行顺序排序_
_        // 查询的时候最新关注的放在最前方,因此倒叙查询_
_        _Set<Integer> targetIds = redisTemplate.opsForZSet().reverseRange(followeeKey, offset, offset + limit - 1);
        if (targetIds == null) {
            return null;
        }

        _// 将关注的每一个人都封装到 一个Map中, 最后添加到 List_
_        _List<Map<String, Object>> list = new ArrayList<>();
        for (Integer targetId : targetIds) {
            Map<String, Object> map = new HashMap<>();
            User user = userService.findUserById(targetId);
            map.put("user", user);
            _// 获取关注的这个人的时间_
_            _Double score = redisTemplate.opsForZSet().score(followeeKey, targetId);
            map.put("followTime", new Date(score.longValue()));
            list.add(map);
        }

        return list;
    }

    _// 查询某用户的粉丝_
_    _public List<Map<String, Object>> findFollowers(int userId, int offset, int limit) {
        String followerKey = RedisKeyUtil._getFollowerKey_(_ENTITY_TYPE_USER_, userId);
        _// 某个实体的粉丝id也是使用 排序集合 存储的,并且按照关注时间进行排序_
_        // 因此查询的时候倒叙查询_
_        _Set<Integer> targetIds = redisTemplate.opsForZSet().reverseRange(followerKey, offset, offset + limit - 1);

        if (targetIds == null) {
            return null;
        }

        _// 遍历关注该实体的每一个粉丝, 并封装到每一个Map中, 最后添加到List中_
_        _List<Map<String, Object>> list = new ArrayList<>();
        for (Integer targetId : targetIds) {
            Map<String, Object> map = new HashMap<>();
            User user = userService.findUserById(targetId);
            map.put("user", user);
            Double score = redisTemplate.opsForZSet().score(followerKey, targetId);
            map.put("followTime", new Date(score.longValue()));
            list.add(map);
        }

        return list;
    }


}
视图层
src/main/java/com/nowcoder/community/controller/FollowController.java 需要添加:
_// 判断当前登陆用户是否已经关注 某个实体(更多是判断当前登陆用户是否已经关注 某个用户)_
private boolean hasFollowed(int userId) {
    if (hostHolder.getUser() == null) {
        return false;
    }

    return followService.hasFollowed(hostHolder.getUser().getId(), _ENTITY_TYPE_USER_, userId);
}

_// 访问用户 关注的人 页面, 需要查询某个用户关注的所有人_
@RequestMapping(path = "/followees/{userId}", method = RequestMethod._GET_)
public String getFollowees(@PathVariable("userId") int userId, Page page, Model model) {
    User user = userService.findUserById(userId);
    if (user == null) {
        throw new RuntimeException("该用户不存在!");
    }
    model.addAttribute("user", user);

    page.setLimit(5);
    page.setPath("/followees/" + userId);
    _// 查询某个用户关注的人的数量, 从而设置页数_
_    _page.setRows((int) followService.findFolloweeCount(userId, _ENTITY_TYPE_USER_));
    _// 查询某个用户关注的所有人_
_    _List<Map<String, Object>> userList = followService.findFollowees(userId, page.getOffset(), page.getLimit());

    _// 需要判断当前登陆用户 对于某个用户关注的所有人 是“已关注”的状态, 还是“未关注”的状态_
_    _if (userList != null) {
        for (Map<String, Object> map : userList) {
            User u = (User) map.get("user");
            map.put("hasFollowed", hasFollowed(u.getId()));
        }
    }
    model.addAttribute("users", userList);

    return "/site/followee";
}

_// 访问用户 粉丝 页面, 需要查询某个用户的所有粉丝_
@RequestMapping(path = "/followers/{userId}", method = RequestMethod._GET_)
public String getFollowers(@PathVariable("userId") int userId, Page page, Model model) {
    User user = userService.findUserById(userId);
    if (user == null) {
        throw new RuntimeException("该用户不存在!");
    }
    model.addAttribute("user", user);

    page.setLimit(5);
    page.setPath("/followers/" + userId);
    _// 查询某个用户 粉丝的数量, 从而设置页数_
_    _page.setRows((int) followService.findFollowerCount(_ENTITY_TYPE_USER_, userId));

    _// 需要判断当前登陆用户 对于某个用户的 所有粉丝 是“已关注”的状态, 还是“未关注”的状态_
_    _List<Map<String, Object>> userList = followService.findFollowers(userId, page.getOffset(), page.getLimit());
    if (userList != null) {
        for (Map<String, Object> map : userList) {
            User u = (User) map.get("user");
            map.put("hasFollowed", hasFollowed(u.getId()));
        }
    }
    model.addAttribute("users", userList);

    return "/site/follower";
}
完整视图层:
@Controller
public class FollowController implements CommunityConstant {


    @Autowired
    private FollowService followService;

    @Autowired
    private HostHolder hostHolder;

    @Autowired
    private UserService userService;

    _// 关注动作请求 异步请求_
_    _@RequestMapping(path = "/follow", method = RequestMethod._POST_)
    @ResponseBody
    public String follow(int entityType, int entityId){
        User user = hostHolder.getUser();
        followService.follow(user.getId(), entityType, entityId);
        return CommunityUtil._getJSONString_(0, "已关注");
    }

    _// 取消关注请求 异步请求_
_    _@RequestMapping(path = "/unfollow", method = RequestMethod._POST_)
    @ResponseBody
    public String unfollow(int entityType, int entityId){
        User user = hostHolder.getUser();
        followService.unfollow(user.getId(), entityType, entityId);

        return CommunityUtil._getJSONString_(0, "已取消关注");
    }

    _// 判断当前登陆用户是否已经关注 某个实体(更多是判断当前登陆用户是否已经关注 某个用户)_
_    _private boolean hasFollowed(int userId) {
        if (hostHolder.getUser() == null) {
            return false;
        }

        return followService.hasFollowed(hostHolder.getUser().getId(), _ENTITY_TYPE_USER_, userId);
    }

    _// 访问用户 关注的人 页面, 需要查询某个用户关注的所有人_
_    _@RequestMapping(path = "/followees/{userId}", method = RequestMethod._GET_)
    public String getFollowees(@PathVariable("userId") int userId, Page page, Model model) {
        User user = userService.findUserById(userId);
        if (user == null) {
            throw new RuntimeException("该用户不存在!");
        }
        model.addAttribute("user", user);

        page.setLimit(5);
        page.setPath("/followees/" + userId);
        _// 查询某个用户关注的人的数量, 从而设置页数_
_        _page.setRows((int) followService.findFolloweeCount(userId, _ENTITY_TYPE_USER_));
        _// 查询某个用户关注的所有人_
_        _List<Map<String, Object>> userList = followService.findFollowees(userId, page.getOffset(), page.getLimit());

        _// 需要判断当前登陆用户 对于某个用户关注的所有人 是“已关注”的状态, 还是“未关注”的状态_
_        _if (userList != null) {
            for (Map<String, Object> map : userList) {
                User u = (User) map.get("user");
                map.put("hasFollowed", hasFollowed(u.getId()));
            }
        }
        model.addAttribute("users", userList);

        return "/site/followee";
    }

    _// 访问用户 粉丝 页面, 需要查询某个用户的所有粉丝_
_    _@RequestMapping(path = "/followers/{userId}", method = RequestMethod._GET_)
    public String getFollowers(@PathVariable("userId") int userId, Page page, Model model) {
        User user = userService.findUserById(userId);
        if (user == null) {
            throw new RuntimeException("该用户不存在!");
        }
        model.addAttribute("user", user);

        page.setLimit(5);
        page.setPath("/followers/" + userId);
        _// 查询某个用户 粉丝的数量, 从而设置页数_
_        _page.setRows((int) followService.findFollowerCount(_ENTITY_TYPE_USER_, userId));

        _// 需要判断当前登陆用户 对于某个用户的 所有粉丝 是“已关注”的状态, 还是“未关注”的状态_
_        _List<Map<String, Object>> userList = followService.findFollowers(userId, page.getOffset(), page.getLimit());
        if (userList != null) {
            for (Map<String, Object> map : userList) {
                User u = (User) map.get("user");
                map.put("hasFollowed", hasFollowed(u.getId()));
            }
        }
        model.addAttribute("users", userList);

        return "/site/follower";
    }

}
前端页面:
site/profile.html: 修改对应的跳转链接, 使得可以正常跳转到 "关注的人" 列表页面 和 "粉丝" 列表页面
<span>关注了 <a class="text-primary" th:href="@{|/followees/${user.id}|}" th:text="${followeeCount}">5</a> 人</span>
<span class="ml-4">关注者 <a class="text-primary" th:href="@{|/followers/${user.id}|}" th:text="${followerCount}">123</a> 人</span>
site/followee.html
<!doctype html>
<html lang="en" xmlns:th="http://www.thymeleaf.org">
<head>
<meta charset="utf-8">
<meta name="viewport" content="width=device-width, initial-scale=1, shrink-to-fit=no">
<link rel="icon" href="https://static.nowcoder.com/images/logo_87_87.png"/>
<link rel="stylesheet" href="https://stackpath.bootstrapcdn.com/bootstrap/4.3.1/css/bootstrap.min.css" crossorigin="anonymous">
<link rel="stylesheet" th:href="@{/css/global.css}" />
<title>牛客网-关注</title>
</head>
<body>
<div class="nk-container">
_<!-- 头部 -->_
_ _<header class="bg-dark sticky-top" th:replace="index::header">
</header>
_<!-- 内容 -->_
_ _<div class="main">
<div class="container">
<div class="position-relative">
_<!-- 选项 -->_
_ _<ul class="nav nav-tabs mb-3">
<li class="nav-item">
<a class="nav-link position-relative active" th:href="@{|/followees/${user.id}|}">
<i class="text-info" th:utext="${user.username}">Nowcoder</i> 关注的人
</a>
</li>
<li class="nav-item">
<a class="nav-link position-relative" th:href="@{|/followers/${user.id}|}">
关注 <i class="text-info" th:utext="${user.username}">Nowcoder</i> 的人
</a>
</li>
</ul>
<a th:href="@{|/user/profile/${user.id}|}" class="text-muted position-absolute rt-0">返回个人主页></a>
</div>
_<!-- 关注列表 -->_
_ _<ul class="list-unstyled">
<li class="media pb-3 pt-3 mb-3 border-bottom position-relative" th:each="map:${users}">
<a th:href="@{|/user/profile/${map.user.id}|}">
<img th:src="${map.user.headerUrl}" class="mr-4 rounded-circle user-header" alt="用户头像" >
</a>
<div class="media-body">
<h6 class="mt-0 mb-3">
<span class="text-success" th:utext="${map.user.username}">落基山脉下的闲人</span>
<span class="float-right text-muted font-size-12">
关注于 <i th:text="${#dates.format(map.followTime,'yyyy-MM-dd HH:mm:ss')}">2019-04-28 14:13:25</i>
</span>
</h6>
<div>
<input type="hidden" id="entityId" th:value="${map.user.id}">
<button type="button" th:class="|btn ${map.hasFollowed?'btn-secondary':'btn-info'} btn-sm float-right follow-btn|"
th:if="${loginUser!=null && loginUser.id!=map.user.id}" th:text="${map.hasFollowed?'已关注':'关注TA'}">关注TA</button>
</div>
</div>
</li>
</ul>
_<!-- 分页 -->_
_ _<nav class="mt-5" th:replace="index::pagination">
</nav>
</div>
</div>
_<!-- 尾部 -->_
_ _<footer class="bg-dark">
</footer>
</div>
<script src="https://code.jquery.com/jquery-3.3.1.min.js" crossorigin="anonymous"></script>
<script src="https://cdnjs.cloudflare.com/ajax/libs/popper.js/1.14.7/umd/popper.min.js" crossorigin="anonymous"></script>
<script src="https://stackpath.bootstrapcdn.com/bootstrap/4.3.1/js/bootstrap.min.js" crossorigin="anonymous"></script>
<script th:src="@{/js/global.js}"></script>
<script th:src="@{/js/profile.js}"></script>
</body>
</html>site/follower.html
<!doctype html>
<html lang="en" xmlns:th="http://www.thymeleaf.org">
<head>
<meta charset="utf-8">
<meta name="viewport" content="width=device-width, initial-scale=1, shrink-to-fit=no">
<link rel="icon" href="https://static.nowcoder.com/images/logo_87_87.png"/>
<link rel="stylesheet" href="https://stackpath.bootstrapcdn.com/bootstrap/4.3.1/css/bootstrap.min.css" crossorigin="anonymous">
<link rel="stylesheet" th:href="@{/css/global.css}" />
<title>牛客网-关注</title>
</head>
<body>
<div class="nk-container">
_<!-- 头部 -->_
_ _<header class="bg-dark sticky-top" th:replace="index::header">
</header>
_<!-- 内容 -->_
_ _<div class="main">
<div class="container">
<div class="position-relative">
_<!-- 选项 -->_
_ _<ul class="nav nav-tabs mb-3">
<li class="nav-item">
<a class="nav-link position-relative" th:href="@{|/followees/${user.id}|}">
<i class="text-info" th:utext="${user.username}">Nowcoder</i> 关注的人
</a>
</li>
<li class="nav-item">
<a class="nav-link position-relative active" th:href="@{|/followers/${user.id}|}">
关注 <i class="text-info" th:utext="${user.username}">Nowcoder</i> 的人
</a>
</li>
</ul>
<a th:href="@{|/user/profile/${user.id}|}" class="text-muted position-absolute rt-0">返回个人主页></a>
</div>
_<!-- 粉丝列表 -->_
_ _<ul class="list-unstyled">
<li class="media pb-3 pt-3 mb-3 border-bottom position-relative" th:each="map:${users}">
<a th:href="@{|/user/profile/${map.user.id}|}">
<img th:src="${map.user.headerUrl}" class="mr-4 rounded-circle user-header" alt="用户头像" >
</a>
<div class="media-body">
<h6 class="mt-0 mb-3">
<span class="text-success" th:utext="${map.user.username}">落基山脉下的闲人</span>
<span class="float-right text-muted font-size-12">
关注于 <i th:text="${#dates.format(map.followTime,'yyyy-MM-dd HH:mm:ss')}">2019-04-28 14:13:25</i>
</span>
</h6>
<div>
<input type="hidden" id="entityId" th:value="${map.user.id}">
<button type="button" th:class="|btn ${map.hasFollowed?'btn-secondary':'btn-info'} btn-sm float-right follow-btn|"
th:if="${loginUser!=null && loginUser.id!=map.user.id}" th:text="${map.hasFollowed?'已关注':'关注TA'}">关注TA</button>
</div>
</div>
</li>
</ul>
_<!-- 分页 -->_
_ _<nav class="mt-5" th:replace="index::pagination">
</nav>
</div>
</div>
_<!-- 尾部 -->_
_ _<footer class="bg-dark">
</footer>
</div>
<script src="https://code.jquery.com/jquery-3.3.1.min.js" crossorigin="anonymous"></script>
<script src="https://cdnjs.cloudflare.com/ajax/libs/popper.js/1.14.7/umd/popper.min.js" crossorigin="anonymous"></script>
<script src="https://stackpath.bootstrapcdn.com/bootstrap/4.3.1/js/bootstrap.min.js" crossorigin="anonymous"></script>
<script th:src="@{/js/global.js}"></script>
<script th:src="@{/js/profile.js}"></script>
</body>
</html>4.7 优化登陆模块
理论分析
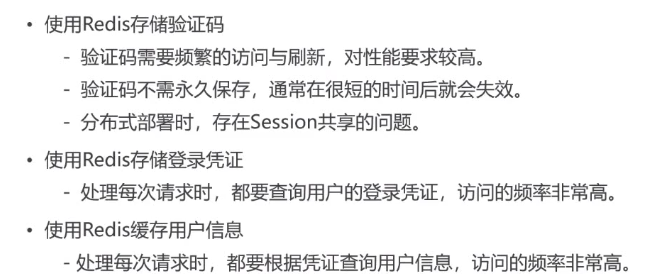
redis 工具类
src/main/java/com/nowcoder/community/util/RedisKeyUtil.java
public class RedisKeyUtil {

    private static final String _SPLIT _= ":";
    private static final String _PREFIX_ENTITY_LIKE _= "like:entity";
    private static final String _PREFIX_USER_LIKE _= "like:user";
    _// 关注_
_    _private static final String _PREFIX_FOLLOWEE _= "followee";
    _// 粉丝_
_    _private static final String _PREFIX_FOLLOWER _= "follower";
    _// 验证码 key_
_    _private static final String _PREFIX_KAPTCHA _= "kaptcha";
    _// 登陆凭证_
_    _private static final String _PREFIX_TICKET _= "ticket";
    _// 用户信息 _
_    _private static final String _PREFIX_USER _= "user";

    _// 某个实体的赞(可能是 帖子、评论、评论的评论) 使用set存储所有给该实体点赞的用户id_
_    // like:entity:entityType:entityId -> set(userId)_
_    _public static String getEntityLikeKey(int entityType, int entityId) {
        return _PREFIX_ENTITY_LIKE _+ _SPLIT _+ entityType + _SPLIT _+ entityId;
    }

    _// 某个用户的赞(某个用户收到的赞) 使用一个整数表示收到的赞的数量_
_    // like:user:userId -> int_
_    _public static String getUserLikeKey(int userId) {
        return _PREFIX_USER_LIKE _+ _SPLIT _+ userId;
    }

    _// 某个用户关注的实体_
_    // followee:userId:entityType -> zset(entityId,now)_
_    // 使用排序集合存储 某个用户 关注的所有这种实体类型的 实体 的id_
_    _public static String getFolloweeKey(int userId, int entityType) {
        return _PREFIX_FOLLOWEE _+ _SPLIT _+ userId + _SPLIT _+ entityType;
    }

    _// 某个实体拥有的粉丝_
_    // follower:entityType:entityId -> zset(userId,now)_
_    // 使用排序集合存储 这个实体拥有的 所有粉丝的 id, 使用时间排序_
_    // 或者说使用排序集合存储 关注这个实体 的所有 用户的id_
_    _public static String getFollowerKey(int entityType, int entityId) {
        return _PREFIX_FOLLOWER _+ _SPLIT _+ entityType + _SPLIT _+ entityId;
    }

    _// 登录验证码_
_    _public static String getKaptchaKey(String owner) {
        return _PREFIX_KAPTCHA _+ _SPLIT _+ owner;
    }

    _// 登录的凭证_
_    _public static String getTicketKey(String ticket) {
        return _PREFIX_TICKET _+ _SPLIT _+ ticket;
    }

    _// 用户_
_    _public static String getUserKey(int userId) {
        return _PREFIX_USER _+ _SPLIT _+ userId;
    }

}
redis 存储验证码
**redis 存储验证码 **是对 src/main/java/com/nowcoder/community/controller/LoginController.java 进行修改,修改 /kaptcha 获取验证码请求 和 login 登陆请求
@RequestMapping(path = "/kaptcha", method = RequestMethod._GET_)
    public void getKaptcha(HttpServletResponse response, HttpSession session) {
        _// 生成验证码_
_        _String text = kaptchaProducer.createText();
        BufferedImage image = kaptchaProducer.createImage(text);

        _// 将验证码存入session_
_//        session.setAttribute("kaptcha", text);_

_        // 不再将验证码存入到session中, 而是使用 redis进行存储_
_        // 验证码的归属_
_        _String kaptchaOwner = CommunityUtil._generateUUID_();
        _// 将 kaptchaOwner 存入到 cookie中, 这样前端发送请求的时候cookie会携带_
_        _Cookie cookie = new Cookie("kaptchaOwner", kaptchaOwner);
        cookie.setMaxAge(60);
        cookie.setPath(contextPath);
        response.addCookie(cookie);
        _// 服务器端 使用redis存储验证码_
_        _String redisKey = RedisKeyUtil._getKaptchaKey_(kaptchaOwner);
        redisTemplate.opsForValue().set(redisKey, text, 60, TimeUnit._SECONDS_);

        _// 将突图片输出给浏览器_
_        _response.setContentType("image/png");
        try {
            OutputStream os = response.getOutputStream();
            ImageIO._write_(image, "png", os);
        } catch (IOException e) {
            _logger_.error("响应验证码失败:" + e.getMessage());
        }
    }

    @RequestMapping(path = "/login", method = RequestMethod._POST_)
    public String login(String username, String password, String code, boolean rememberme,
                        Model model, HttpServletResponse response, @CookieValue("kaptchaOwner") String kaptchaOwner) {
        _// 检查验证码_
_//        String kaptcha = (String) session.getAttribute("kaptcha");_
_        // 因为不再使用 session 存储验证码, 因此也无法使用session获取_

_        // 判断验证码key是否超时_
_        _String kaptcha = null;
        if (StringUtils._isNotBlank_(kaptchaOwner)) {
            _// 不为空, 说明存储在cookie中的 kaptchaOwner 没有超时_
_            _String redisKey = RedisKeyUtil._getKaptchaKey_(kaptchaOwner);
            kaptcha = (String) redisTemplate.opsForValue().get(redisKey);
        }

        if (StringUtils._isBlank_(kaptcha) || StringUtils._isBlank_(code) || !kaptcha.equalsIgnoreCase(code)) {
            model.addAttribute("codeMsg", "验证码不正确!");
            return "/site/login";
        }

        _// 检查账号,密码_
_        _int expiredSeconds = rememberme ? _REMEMBER_EXPIRED_SECONDS _: _DEFAULT_EXPIRED_SECONDS_;
        Map<String, Object> map = userService.login(username, password, expiredSeconds);
        if (map.containsKey("ticket")) {
            Cookie cookie = new Cookie("ticket", map.get("ticket").toString());
            cookie.setPath(contextPath);
            cookie.setMaxAge(expiredSeconds);
            response.addCookie(cookie);
            return "redirect:/index";
        } else {
            model.addAttribute("usernameMsg", map.get("usernameMsg"));
            model.addAttribute("passwordMsg", map.get("passwordMsg"));
            return "/site/login";
        }
    }
redis 存储登陆凭证
MySQL 数据库中不再使用 login_ticket 表, 持久化层也不再使用 LoginTicketMapper
需要修改 UserService 中的 登陆、登出和查找凭证的逻辑
public Map<String, Object> login(String username, String password, int expiredSeconds) {
        Map<String, Object> map = new HashMap<>();

        _// 空值处理_
_        _if (StringUtils._isBlank_(username)) {
            map.put("usernameMsg", "账号不能为空!");
            return map;
        }
        if (StringUtils._isBlank_(password)) {
            map.put("passwordMsg", "密码不能为空!");
            return map;
        }

        _// 验证账号_
_        _User user = userMapper.selectByName(username);
        if (user == null) {
            map.put("usernameMsg", "该账号不存在!");
            return map;
        }

        _// 验证状态_
_        _if (user.getStatus() == 0) {
            map.put("usernameMsg", "该账号未激活!");
            return map;
        }

        _// 验证密码_
_        _password = CommunityUtil._md5_(password + user.getSalt());
        if (!user.getPassword().equals(password)) {
            map.put("passwordMsg", "密码不正确!");
            return map;
        }

        _// 生成登录凭证_
_        _LoginTicket loginTicket = new LoginTicket();
        loginTicket.setUserId(user.getId());
        loginTicket.setTicket(CommunityUtil._generateUUID_());
        loginTicket.setStatus(0);
        loginTicket.setExpired(new Date(System._currentTimeMillis_() + expiredSeconds * 1000));
_//        loginTicketMapper.insertLoginTicket(loginTicket);_
_        _String redisKey = RedisKeyUtil._getTicketKey_(loginTicket.getTicket());
        redisTemplate.opsForValue().set(redisKey, loginTicket);

        map.put("ticket", loginTicket.getTicket());
        return map;
    }

    public void logout(String ticket) {
        String redisKey = RedisKeyUtil._getTicketKey_(ticket);
        LoginTicket loginTicket = (LoginTicket) redisTemplate.opsForValue().get(redisKey);
        loginTicket.setStatus(1);
        redisTemplate.opsForValue().set(redisKey, loginTicket);
    }

    public LoginTicket findLoginTicket(String ticket) {
        String redisKey = RedisKeyUtil._getTicketKey_(ticket);
        LoginTicket loginTicket = (LoginTicket) redisTemplate.opsForValue().get(redisKey);
        return loginTicket;
    }
redis 缓存用户信息
需要修改 UserService 中所有需要获取用户信息的方法
public User findUserById(int id) {
    User user = getCache(id);
    if (user == null) {
        initCache(id);
        user = getCache(id);
    }
    return user;
}

_// 1.优先从缓存中取值_
private User getCache(int userId) {
    String redisKey = RedisKeyUtil._getUserKey_(userId);
    return (User) redisTemplate.opsForValue().get(redisKey);
}

_// 2.取不到时初始化缓存数据_
private User initCache(int userId) {
    User user = userMapper.selectById(userId);
    String redisKey = RedisKeyUtil._getUserKey_(userId);
    redisTemplate.opsForValue().set(redisKey, user, 3600, TimeUnit._SECONDS_);
    return user;
}

_// 3.数据变更时清除缓存数据 所有进行数据变更的地方都需要清理缓存_
private void clearCache(int userId) {
    String redisKey = RedisKeyUtil._getUserKey_(userId);
    redisTemplate.delete(redisKey);
}
Kafka,构建 TB 级异步消息系统
5.1 阻塞队列
常见阻塞队列的实现
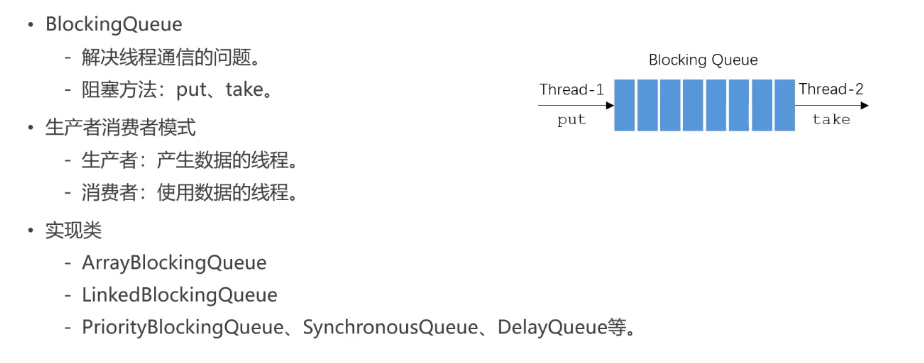
代码示例
src/test/java/com/nowcoder/community/BlockingQueueTests.java
生产者生产的快,消费者消费的慢
public class BlockingQueueTests {

    public static void main(String[] args) {
        BlockingQueue queue = new ArrayBlockingQueue(10);
        new Thread(new Producer(queue)).start();
        new Thread(new Consumer(queue)).start();
        new Thread(new Consumer(queue)).start();
        new Thread(new Consumer(queue)).start();
    }

}

class Producer implements Runnable {

    private BlockingQueue<Integer> queue;

    public Producer(BlockingQueue<Integer> queue) {
        this.queue = queue;
    }

    @Override
    public void run() {
        try {
            for (int i = 0; i < 100; i++) {
                Thread._sleep_(20);
                queue.put(i);
                System._out_.println(Thread._currentThread_().getName() + "生产:" + queue.size());
            }
        } catch (Exception e) {
            e.printStackTrace();
        }
    }

}

class Consumer implements Runnable {

    private BlockingQueue<Integer> queue;

    public Consumer(BlockingQueue<Integer> queue) {
        this.queue = queue;
    }

    @Override
    public void run() {
        try {
            while (true) {
                Thread._sleep_(new Random().nextInt(1000));
                queue.take();
                System._out_.println(Thread._currentThread_().getName() + "消费:" + queue.size());
            }
        } catch (Exception e) {
            e.printStackTrace();
        }
    }
}
5.2 Kafka 入门
理论
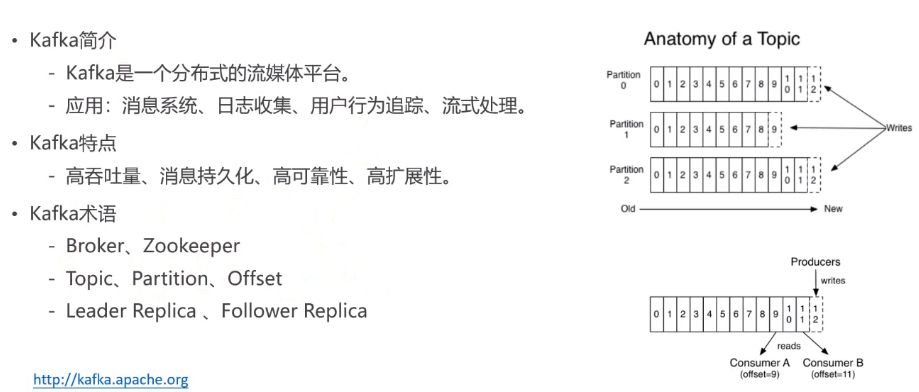
broker:服务器,kafka 集群中的每一台服务器,称其为一个 broker
zookeeper:一个独立的应用,用来管理集群
消息队列实现的方式大致有两种:
- 点对点方式:生产者把数据放入一个队列中,消费者从这个队列中取值
- 发布订阅模式:生产者把数据(或消息)放到某一个位置,可以有很多消费者同时关注(订阅)这个位置,这个消息(数据)可以被多个消费者同时读到(或者先后读到)
topic: 生产者把消息放入的位置(或空间)就叫 topic (可以理解为一个文件夹,用来存放消息的位置)
partition:分区,对 topic 的分区
offset:消息在队列中存放的索引
Kafka 下载
下载链接: https://kafka.apache.org/downloads
其中 windows 版本和 linux 版本是都集成的
Kafka 配置
首先需要修改 config/zookeeper.properties 文件中的配置,修改数据保存的路径
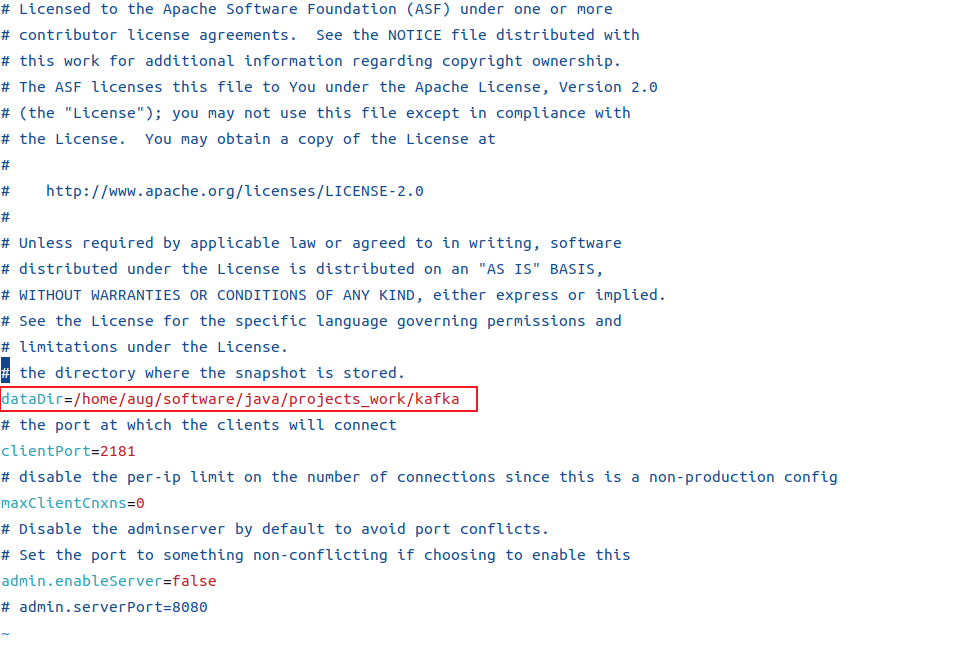
其次修改 config/server.properties, 修改 Kafka 的日志保存路径
log.dirs=//home/aug/software/java/projects_work/kafka/kafka-logsKafka 启动
因为 Kafkla 依赖于 Zookeeper,因此需要先启动 Zookeeper
ubuntu:
./bin/zookeeper-server-start.sh config/zookeeper.propertieswindows
./bin/windows/zookeeper-server-start.bat config/zookeeper.properties启动 Kafka
./bin/kafka-server-start.sh config/server.properties创建 topic
./kafka-topics.sh --create --bootstrap-server 192.168.6.216:9092 --replication-factor 1 --partitions 1 --topic test在服务器 192.168.6.216:9092 创建一个名称为 test 的 topic, --replication-factor 表示备份数量,
--partitions 表示分区数量
查看所有的 topic
./kafka-topics.sh --list --bootstrap-server 192.168.6.216:9092生产者 产生数据(消息)
./kafka-console-producer.sh --broker-list 192.168.6.216:9092 --topic test
消费者 查看数据(消息)
需要启动新的窗口
./kafka-console-consumer.sh --bootstrap-server 192.168.6.216:9092 --topic test --from-beginning
5.3 Spring 整合 Kafka
分析
依赖引入
pom.xml
<dependency>
            <groupId>org.springframework.kafka</groupId>
            <artifactId>spring-kafka</artifactId>
        </dependency>
配置
application.properties
_
# KafkaProperties
spring.kafka.bootstrap-servers=192.168.6.216:9092
# 消费者的 group-id, 需要和 config/consumer.properties 中的配置一致
spring.kafka.consumer.group-id=community-consumer-group
# 是否自动提交消费者读取 数据时的偏移量
spring.kafka.consumer.enable-auto-commit=true
# 消费者提交读取 数据时的偏移量 的时间间隔
__spring.kafka.consumer.auto-commit-interval=3000_
config/consumer.properties
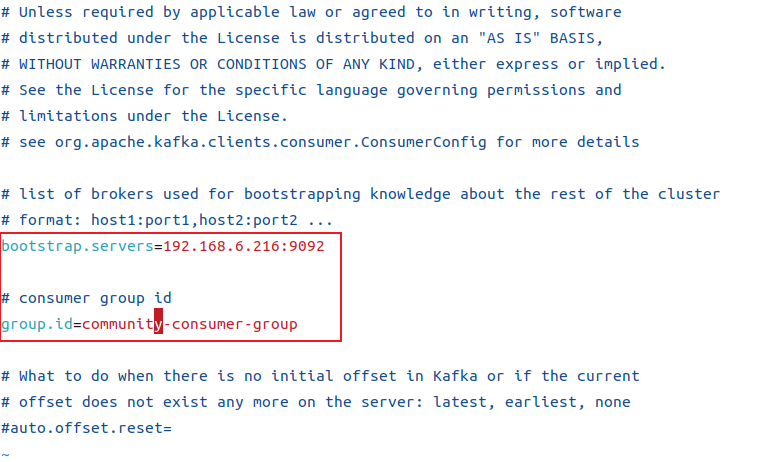
测试
src/test/java/com/nowcoder/community/KafkaTests.java
@RunWith(SpringRunner.class)
@SpringBootTest
@ContextConfiguration(classes = CommunityApplication.class)
public class KafkaTests {

    @Autowired
    private KafkaProducer kafkaProducer;

    @Test
    public void testKafka() {
        kafkaProducer.sendMessage("test", "你好");
        kafkaProducer.sendMessage("test", "在吗");

        try {
            Thread._sleep_(1000 * 10);
        } catch (InterruptedException e) {
            e.printStackTrace();
        }
    }

}

_// 生产者_
@Component
class KafkaProducer {
    @Autowired
    private KafkaTemplate kafkaTemplate;

    public void sendMessage(String topic, String content) {
        kafkaTemplate.send(topic, content);
    }

}

_// 消费者_
@Component
class KafkaConsumer {

    _// @KafkaListener 监听这个topic, 如果有生产者向这个topic中添加(send)了数据, 那么会自动执行下面的方法_
_    _@KafkaListener(topics = {"test"})
    public void handleMessage(ConsumerRecord record) {
        System._out_.println(record.value());
    }
}
5.4 发送系统通知
理论分析
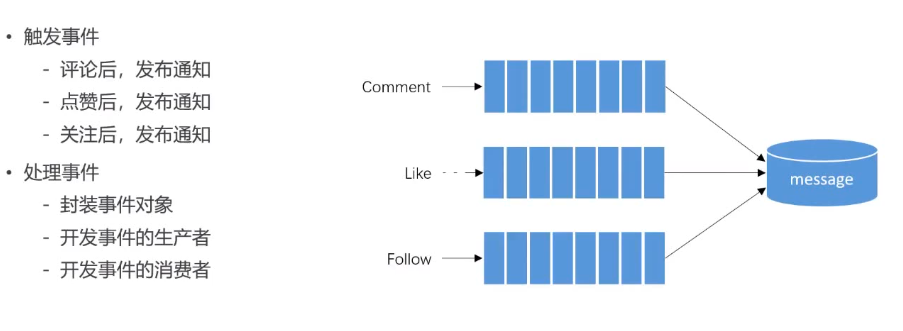
不同的事件,放入不同的 topic
需要对事件进行封装,将事件封装成对象,便于扩展
封装事件对象
entity/Event.java
public class Event {
    _/**_
_     * 目前的三个事件:_
_     * 1. 评论后,发布通知_
_     * 2. 点赞后,发布通知_
_     * 3. 关注后,发布通知_
_     */_
_    // 事件存储的位置(topic)_
_    _private String topic;
    _// 触发该事件的用户 当前登陆用户触发, 产生一个消息_
_    _private int userId;
    _// 实体类型(帖子、用户) (事件发生在哪个实体上)_
_    _private int entityType;
    _// 实体类型的id_
_    _private int entityId;
    _// 该实体的作者_
_    _private int entityUserId;
    _// 一些其他数据, 便于之后扩展(因为目前只有这三种事件, 之后可能有其他事件, 需要其他的数据,无法预判需要哪些数据, 因此使用Map)_
_    _private Map<String, Object> data = new HashMap<>();

    public String getTopic() {
        return topic;
    }

    public Event setTopic(String topic) {
        this.topic = topic;
        return this;
    }

    public int getUserId() {
        return userId;
    }

    public Event setUserId(int userId) {
        this.userId = userId;
        return this;
    }

    public int getEntityType() {
        return entityType;
    }

    public Event setEntityType(int entityType) {
        this.entityType = entityType;
        return this;
    }

    public int getEntityId() {
        return entityId;
    }

    public Event setEntityId(int entityId) {
        this.entityId = entityId;
        return this;
    }

    public int getEntityUserId() {
        return entityUserId;
    }

    public Event setEntityUserId(int entityUserId) {
        this.entityUserId = entityUserId;
        return this;
    }

    public Map<String, Object> getData() {
        return data;
    }

    public Event setData(String key, Object value) {
        this.data.put(key, value);
        return this;
    }

}
创建生产者
src/main/java/com/nowcoder/community/event/EventProducer.java
@Component
public class EventProducer {

    @Autowired
    private KafkaTemplate kafkaTemplate;

    _// 处理事件 生产者 生产数据到 topic_
_    _public void fireEvent(Event event) {
        _// 将事件发布到指定的主题, 即触发事件后, 添加事件到topic_
_        // 因为存储到topic的只能是String, 因此需要将抽象出来的Event转换为JSON格式的String_
_        _kafkaTemplate.send(event.getTopic(), JSONObject._toJSONString_(event));
    }

}
创建消费者
消费者需要监听 topic, 当生产者生产数据后到 topic 后,消费者读取到数据后需要对数据进行处理
在当前任务中,消费者需要将 消息 发送给 实体的作者
src/main/java/com/nowcoder/community/event/EventConsumer.java
@Component
public class EventConsumer implements CommunityConstant {

    private static final Logger _logger _= LoggerFactory._getLogger_(EventConsumer.class);

    _// 发送消息其实是 对 message 表进行操作_
_    _@Autowired
    private MessageService messageService;

    _// 消费者, 对topic进行监听, 当生产者添加数据/消息 到 topic, 下面的方法自动执行_
_    _@KafkaListener(topics = {_TOPIC_COMMENT_, _TOPIC_LIKE_, _TOPIC_FOLLOW_})
    public void handleCommentMessage(ConsumerRecord record) {
        if (record == null || record.value() == null) {
            _logger_.error("消息的内容为空!");
            return;
        }

        _// 因为生产者是将Eent转为 json 格式的字符串放入 topic, 因此需要将字符串转换为 Event_
_        _Event event = JSONObject._parseObject_(record.value().toString(), Event.class);
        if (event == null) {
            _logger_.error("消息格式错误!");
            return;
        }

        _// 得到Event后, 封装Message_
_        // 发送站内通知_
_        _Message message = new Message();
        _// 因为事件发生后, 是系统将这个事件发送给 实体作者_
_        _message.setFromId(_SYSTEM_USER_ID_);
        message.setToId(event.getEntityUserId());
        _// conversationId : 其实是存储了事件的类别(评论、点赞、关注)_
_        _message.setConversationId(event.getTopic());
        message.setCreateTime(new Date());

        _// 设置content属性_
_        _Map<String, Object> content = new HashMap<>();
        content.put("userId", event.getUserId());
        content.put("entityType", event.getEntityType());
        content.put("entityId", event.getEntityId());
        _// Event中封装到map中的其他数据,都加入到content中_
_        _if (!event.getData().isEmpty()) {
            for (Map.Entry<String, Object> entry : event.getData().entrySet()) {
                content.put(entry.getKey(), entry.getValue());
            }
        }
        _// 将map类型转换为json格式的字符串_
_        _message.setContent(JSONObject._toJSONString_(content));
        messageService.addMessage(message);
    }
}
触发事件
**添加评论会触发事件,需要修改 **controller/CommentController
@Controller
@RequestMapping("/comment")
public class CommentController implements CommunityConstant {

    @Autowired
    private CommentService commentService;

    @Autowired
    private DiscussPostService discussPostService;

    @Autowired
    private EventProducer eventProducer;

    @Autowired
    private HostHolder hostHolder;

    @RequestMapping(path = "/add/{discussPostId}", method = RequestMethod._POST_)
    public String addComment(@PathVariable("discussPostId") int discussPostId, Comment comment) {
        comment.setUserId(hostHolder.getUser().getId());
        comment.setStatus(0);
        comment.setCreateTime(new Date());
        commentService.addComment(comment);
        _// 添加评论, 触发评论事件, 由系统通知该实体的作者_

_        // 触发评论事件_
_        _Event event = new Event()
                .setTopic(_TOPIC_COMMENT_)
                .setUserId(hostHolder.getUser().getId())
                .setEntityType(comment.getEntityType())  _// 得到实体类型 因为可能是给帖子评论, 也可能是给 评论评论_
_                _.setEntityId(comment.getEntityId())
                .setData("postId", discussPostId); _// 得到帖子详情页的帖子id_
_        // 如果是给帖子评论_
_        _if (comment.getEntityType() == _ENTITY_TYPE_POST_) {
            _// 根据帖子的id获取该帖子的作者_
_            _DiscussPost target = discussPostService.findDiscussPostById(comment.getEntityId());
            event.setEntityUserId(target.getUserId());
        } else if (comment.getEntityType() == _ENTITY_TYPE_COMMENT_) {
            _// 如果是给评论 添加评论_
_            // 根据评论的id获取该评论的作者_
_            _Comment target = commentService.findCommentById(comment.getEntityId());
            event.setEntityUserId(target.getUserId());
        }
        _// 生产者处理事件, 将对应内容添加到 topic 中_
_        _eventProducer.fireEvent(event);
        _// 生产者会自动监听topic_
_        _return "redirect:/discuss/detail/" + discussPostId;
    }

}
**点赞会触发事件,需要修改 **controller/LikeController
@RequestMapping(path = "/like", method = RequestMethod._POST_)
@ResponseBody
public String like(int entityType, int entityId, int entityUserId, int postId) {
    User user = hostHolder.getUser();
    _// 点赞_
_    _likeService.like(user.getId(), entityType, entityId, entityUserId);

    _// 获取实体的点赞数量_
_    _long likeCount = likeService.findEntityLikeCount(entityType, entityId);
    _// 获取当前用户对实体点赞的 状态_
_    _int likeStatus = likeService.findEntityLikeStatus(user.getId(), entityType, entityId);
    _// 返回的结果_
_    _Map<String, Object> map = new HashMap<>();
    map.put("likeCount", likeCount);
    map.put("likeStatus", likeStatus);

    _// 点赞触发事件_
_    // 判断是否是点赞行为, 如果是点赞行为, 则触发点赞事件 (如果是取消点赞的行为, 则不触发点赞事件)_
_    _if (likeStatus == 1) {
        Event event = new Event()
                .setTopic(_TOPIC_LIKE_)
                .setUserId(hostHolder.getUser().getId())
                .setEntityType(entityType)
                .setEntityId(entityId)
                .setEntityUserId(entityUserId)
                .setData("postId", postId); _// 帖子id_
_        _eventProducer.fireEvent(event);
    }
    return CommunityUtil._getJSONString_(0, null, map);
}
**关注 会触发事件,需要修改 **controller/FollowController
_// 关注动作请求 异步请求_
@RequestMapping(path = "/follow", method = RequestMethod._POST_)
@ResponseBody
public String follow(int entityType, int entityId){
    User user = hostHolder.getUser();
    followService.follow(user.getId(), entityType, entityId);

    _// 触发更多事件_
_    _Event event = new Event()
            .setTopic(_TOPIC_FOLLOW_)
            .setUserId(user.getId())
            .setEntityId(entityId)
            .setEntityType(entityType)
            .setEntityUserId(entityId);

    eventProducer.fireEvent(event);

    return CommunityUtil._getJSONString_(0, "已关注");
}
前端页面
discuss-detail.html
在点赞的时候同时把帖子 id 传递过去
<a href="javascript:;" th:onclick="|like(this,1,${post.id},${post.userId}, ${post.id});|" class="text-primary">
    <b th:text="${likeStatus==1?'已赞':'赞'}">赞</b> <i th:text="${likeCount}">11</i>
</a>

<a href="javascript:;" th:onclick="|like(this,2,${cvo.comment.id},${cvo.comment.userId}, ${post.id});|" class="text-primary">
    <b th:text="${cvo.likeStatus==1?'已赞':'赞'}">赞</b>(<i th:text="${cvo.likeCount}">1</i>)
</a>

<a href="javascript:;" th:onclick="|like(this,2,${rvo.reply.id},${rvo.reply.userId}, ${post.id});|" class="text-primary">
    <b th:text="${rvo.likeStatus==1?'已赞':'赞'}">赞</b>(<i th:text="${rvo.likeCount}">1</i>)
</a>
disscuss.js
function _like_(btn, entityType, entityId, entityUserId, postId) {
    $.post(
        CONTEXT_PATH + "/like",
        {"entityType":entityType,"entityId":entityId,"entityUserId":entityUserId, "postId":postId},
        function(data) {
            data = $.parseJSON(data);
            if(data.code == 0) {
                $(btn).children("i").text(data.likeCount);
                $(btn).children("b").text(data.likeStatus==1?'已赞':"赞");
            } else {
                _alert_(data.msg);
            }
        }
    );
}
测试
运行程序,进行评论后,查看 Kafka 中对应 topic 的内容:
./kafka-console-consumer.sh --bootstrap-server 192.168.6.216:9092 --topic comment --from-beginning
5.5 显示系统通知
理论分析

持久化层
系统通知涉及到 Message 表,因此需要修改持久化层 MessageMapper
src/main/java/com/nowcoder/community/dao/MessageMapper.java
_// 系统通知相关_
_// 查询某个主题下最新的通知_
Message selectLatestNotice(int userId, String topic);

_// 查询某个主题所包含的通知数量_
int selectNoticeCount(int userId, String topic);

_// 查询未读的通知的数量_
int selectNoticeUnreadCount(int userId, String topic);

_// 查询某个主题所包含的通知列表_
List<Message> selectNotices(int userId, String topic, int offset, int limit);
对应配置文件 src/main/resources/mapper/message-mapper.xml
_<!--系统通知相关-->_
_<!--查询某个主题下最新的通知-->_
<select id="selectLatestNotice" resultType="Message">
    select <include refid="selectFields"></include>
    from message
    where id in (
    select max(id) from message
    where status != 2
    and from_id = 1
    and to_id = #{userId}
    and conversation_id = #{topic}
    )
</select>
_<!--查询某个主题下 通知的数量-->_
<select id="selectNoticeCount" resultType="int">
    select count(id) from message
    where status != 2
    and from_id = 1
    and to_id = #{userId}
      and conversation_id = #{topic}
</select>

_<!--查询某个主题下 未读的通知的数量-->_
<select id="selectNoticeUnreadCount" resultType="int">
    select count(id) from message
    where status = 0
    and from_id = 1
    and to_id = #{userId}
    <if test="topic!=null">
        and conversation_id = #{topic}
    </if>
</select>

_<!--查询某个主题下 所有的通知-->_
<select id="selectNotices" resultType="Message">
    select <include refid="selectFields"></include>
    from message
    where status != 2
    and from_id = 1
    and to_id = #{userId}
    and conversation_id = #{topic}
    order by create_time desc
    limit #{offset}, #{limit}
</select>
业务层
src/main/java/com/nowcoder/community/service/MessageService.java 需要添加下面的代码:
public Message findLatestNotice(int userId, String topic) {
        return messageMapper.selectLatestNotice(userId, topic);
    }

    public int findNoticeCount(int userId, String topic) {
        return messageMapper.selectNoticeCount(userId, topic);
    }

    public int findNoticeUnreadCount(int userId, String topic) {
        return messageMapper.selectNoticeUnreadCount(userId, topic);
    }

    public List<Message> findNotices(int userId, String topic, int offset, int limit) {
        return messageMapper.selectNotices(userId, topic, offset, limit);
    }
视图层
src/main/java/com/nowcoder/community/controller/MessageController.java
@RequestMapping(path = "/notice/list", method = RequestMethod._GET_)
public String getNoticeList(Model model) {
    User user = hostHolder.getUser();

    _// 查询评论主题 最新通知_
_    _Message message = messageService.findLatestNotice(user.getId(), _TOPIC_COMMENT_);
    Map<String, Object> messageVO = new HashMap<>();
    if (message != null) {
        messageVO.put("message", message);
        _// 将 一些转义字符转为本身的含义_
_        _String content = HtmlUtils._htmlUnescape_(message.getContent());
        _// 因为在消费者中, 是通过将map转为JSON格式的字符串存为 Message 的content 并存入到数据库中的_
_        // 因此从数据库中读取数据的时候, 需要重新转为Map_
_        _Map<String, Object> data = JSONObject._parseObject_(content, HashMap.class);

        _// user:  触发这个事件的人_
_        _messageVO.put("user", userService.findUserById((Integer) data.get("userId")));
        _// 实体类型, 根据entityType 判断是对 帖子 还是对 评论 进行评论_
_        _messageVO.put("entityType", data.get("entityType"));
        messageVO.put("entityId", data.get("entityId"));
        _// 帖子id_
_        _messageVO.put("postId", data.get("postId"));

        _// 评论主题下的 通知数量_
_        _int count = messageService.findNoticeCount(user.getId(), _TOPIC_COMMENT_);
        messageVO.put("count", count);
        _// 评论主题下的 未读的通知数量_
_        _int unread = messageService.findNoticeUnreadCount(user.getId(), _TOPIC_COMMENT_);
        messageVO.put("unread", unread);
    }
    model.addAttribute("commentNotice", messageVO);

    _// 查询点赞类 最新通知_
_    _message = messageService.findLatestNotice(user.getId(), _TOPIC_LIKE_);
    messageVO = new HashMap<>();
    if (message != null) {
        messageVO.put("message", message);

        String content = HtmlUtils._htmlUnescape_(message.getContent());
        Map<String, Object> data = JSONObject._parseObject_(content, HashMap.class);
        _// user: 触发事件的人_
_        _messageVO.put("user", userService.findUserById((Integer) data.get("userId")));
        messageVO.put("entityType", data.get("entityType"));
        messageVO.put("entityId", data.get("entityId"));
        messageVO.put("postId", data.get("postId"));
        _// 点赞主题下的 通知数量_
_        _int count = messageService.findNoticeCount(user.getId(), _TOPIC_LIKE_);
        messageVO.put("count", count);

        int unread = messageService.findNoticeUnreadCount(user.getId(), _TOPIC_LIKE_);
        messageVO.put("unread", unread);
    }
    model.addAttribute("likeNotice", messageVO);

    _// 查询关注类 最新通知_
_    _message = messageService.findLatestNotice(user.getId(), _TOPIC_FOLLOW_);
    messageVO = new HashMap<>();
    if (message != null) {
        messageVO.put("message", message);

        String content = HtmlUtils._htmlUnescape_(message.getContent());
        Map<String, Object> data = JSONObject._parseObject_(content, HashMap.class);

        messageVO.put("user", userService.findUserById((Integer) data.get("userId")));
        messageVO.put("entityType", data.get("entityType"));
        messageVO.put("entityId", data.get("entityId"));

        int count = messageService.findNoticeCount(user.getId(), _TOPIC_FOLLOW_);
        messageVO.put("count", count);

        int unread = messageService.findNoticeUnreadCount(user.getId(), _TOPIC_FOLLOW_);
        messageVO.put("unread", unread);
    }
    model.addAttribute("followNotice", messageVO);

    _// 查询未读消息数量 总的未读读私信的数量_
_    _int letterUnreadCount = messageService.findLetterUnreadCount(user.getId(), null);
    model.addAttribute("letterUnreadCount", letterUnreadCount);
    _// 查询未读系统通知的数量_
_    _int noticeUnreadCount = messageService.findNoticeUnreadCount(user.getId(), null);
    model.addAttribute("noticeUnreadCount", noticeUnreadCount);

    return "/site/notice";
}
前端页面
私信页面 templates/site/letter.html 需要修改 系统通知部分:
<li class="nav-item">
    <a class="nav-link position-relative" th:href="@{/notice/list}">系统通知<span class="badge badge-danger" th:text="${noticeUnreadCount}">27</span></a>
</li>
系统通知页面 templates/site/notice.html
<!doctype html>
<html lang="en" xmlns:th="http://www.thymeleaf.org">
<head>
    <meta charset="utf-8">
    <meta name="viewport" content="width=device-width, initial-scale=1, shrink-to-fit=no">
    <link rel="icon" href="https://static.nowcoder.com/images/logo_87_87.png"/>
    <link rel="stylesheet" href="https://stackpath.bootstrapcdn.com/bootstrap/4.3.1/css/bootstrap.min.css" crossorigin="anonymous">
    <link rel="stylesheet" th:href="@{/css/global.css}" />
    <link rel="stylesheet" th:href="@{/css/letter.css}" />
    <title>牛客网-通知</title>
</head>
<body>
<div class="nk-container">
    _<!-- 头部 -->_
_    _<header class="bg-dark sticky-top" th:replace="index::header">
    </header>

    _<!-- 内容 -->_
_    _<div class="main">
       <div class="container">
          <div class="position-relative">
             _<!-- 选项 -->_
_             _<ul class="nav nav-tabs mb-3">
                <li class="nav-item">
                   <a class="nav-link position-relative" th:href="@{/letter/list}">
                      朋友私信<span class="badge badge-danger" th:text="${letterUnreadCount}" th:if="${letterUnreadCount!=0}">3</span>
                   </a>
                </li>
                <li class="nav-item">
                   <a class="nav-link position-relative active" th:href="@{/notice/list}">
                      系统通知<span class="badge badge-danger" th:text="${noticeUnreadCount}" th:if="${noticeUnreadCount!=0}">27</span>
                   </a>
                </li>
             </ul>
          </div>

          _<!-- 通知列表 -->_
_          _<ul class="list-unstyled">
             _<!--评论类通知-->_
_             _<li class="media pb-3 pt-3 mb-3 border-bottom position-relative" th:if="${commentNotice.message!=null}">
                <span class="badge badge-danger" th:text="${commentNotice.unread!=0?commentNotice.unread:''}">3</span>
                <img src="http://static.nowcoder.com/images/head/reply.png" class="mr-4 user-header" alt="通知图标">
                <div class="media-body">
                   <h6 class="mt-0 mb-3">
                      <span>评论</span>
                      <span class="float-right text-muted font-size-12"
                           th:text="${#dates.format(commentNotice.message.createTime,'yyyy-MM-dd HH:mm:ss')}">2019-04-28 14:13:25</span>
                   </h6>
                   <div>
                      <a th:href="@{/notice/detail/comment}">
                         用户
                         <i th:utext="${commentNotice.user.username}">nowcoder</i>
                         评论了你的<b th:text="${commentNotice.entityType==1?'帖子':'回复'}">帖子</b> ...
                      </a>
                      <ul class="d-inline font-size-12 float-right">
                         <li class="d-inline ml-2"><span class="text-primary">共 <i th:text="${commentNotice.count}">3</i> 条会话</span></li>
                      </ul>
                   </div>
                </div>
             </li>
             _<!--点赞类通知-->_
_             _<li class="media pb-3 pt-3 mb-3 border-bottom position-relative" th:if="${likeNotice.message!=null}">
                <span class="badge badge-danger" th:text="${likeNotice.unread!=0?likeNotice.unread:''}">3</span>
                <img src="http://static.nowcoder.com/images/head/like.png" class="mr-4 user-header" alt="通知图标">
                <div class="media-body">
                   <h6 class="mt-0 mb-3">
                      <span>赞</span>
                      <span class="float-right text-muted font-size-12"
                           th:text="${#dates.format(likeNotice.message.createTime,'yyyy-MM-dd HH:mm:ss')}">2019-04-28 14:13:25</span>
                   </h6>
                   <div>
                      <a th:href="@{/notice/detail/like}">
                         用户
                         <i th:utext="${likeNotice.user.username}">nowcoder</i>
                         点赞了你的<b th:text="${likeNotice.entityType==1?'帖子':'回复'}">帖子</b> ...
                      </a>
                      <ul class="d-inline font-size-12 float-right">
                         <li class="d-inline ml-2"><span class="text-primary">共 <i th:text="${likeNotice.count}">3</i> 条会话</span></li>
                      </ul>
                   </div>
                </div>
             </li>
             _<!--关注类通知-->_
_             _<li class="media pb-3 pt-3 mb-3 border-bottom position-relative" th:if="${followNotice.message!=null}">
                <span class="badge badge-danger" th:text="${followNotice.unread!=0?followNotice.unread:''}">3</span>
                <img src="http://static.nowcoder.com/images/head/follow.png" class="mr-4 user-header" alt="通知图标">
                <div class="media-body">
                   <h6 class="mt-0 mb-3">
                      <span>关注</span>
                      <span class="float-right text-muted font-size-12"
                           th:text="${#dates.format(followNotice.message.createTime,'yyyy-MM-dd HH:mm:ss')}">2019-04-28 14:13:25</span>
                   </h6>
                   <div>
                      <a th:href="@{/notice/detail/follow}">
                         用户
                         <i th:utext="${followNotice.user.username}">nowcoder</i>
                         关注了你 ...
                      </a>
                      <ul class="d-inline font-size-12 float-right">
                         <li class="d-inline ml-2"><span class="text-primary">共 <i th:text="${followNotice.count}">3</i> 条会话</span></li>
                      </ul>
                   </div>
                </div>
             </li>
          </ul>
       </div>
    </div>

    _<!-- 尾部 -->_
_    _<footer class="bg-dark" th:replace="index::footer">
    </footer>
</div>

<script src="https://code.jquery.com/jquery-3.3.1.min.js" crossorigin="anonymous"></script>
<script src="https://cdnjs.cloudflare.com/ajax/libs/popper.js/1.14.7/umd/popper.min.js" crossorigin="anonymous"></script>
<script src="https://stackpath.bootstrapcdn.com/bootstrap/4.3.1/js/bootstrap.min.js" crossorigin="anonymous"></script>
<script th:src="@{/js/global.js}"></script>
</body>
</html>
5.6 通知详情
业务层
src/main/java/com/nowcoder/community/service/MessageService.java
public List<Message> findNotices(int userId, String topic, int offset, int limit) {
    return messageMapper.selectNotices(userId, topic, offset, limit);
}
视图层
src/main/java/com/nowcoder/community/controller/MessageController.java
@RequestMapping(path = "/notice/detail/{topic}", method = RequestMethod._GET_)
public String getNoticeDetail(@PathVariable("topic") String topic, Page page, Model model) {
    User user = hostHolder.getUser();

    page.setLimit(5);
    page.setPath("/notice/detail/" + topic);
    page.setRows(messageService.findNoticeCount(user.getId(), topic));

    List<Message> noticeList = messageService.findNotices(user.getId(), topic, page.getOffset(), page.getLimit());
    List<Map<String, Object>> noticeVoList = new ArrayList<>();
    if (noticeList != null) {
        for (Message notice : noticeList) {
            Map<String, Object> map = new HashMap<>();
            _// 通知_
_            _map.put("notice", notice);
            _// 内容_
_            _String content = HtmlUtils._htmlUnescape_(notice.getContent());
            Map<String, Object> data = JSONObject._parseObject_(content, HashMap.class);
            map.put("user", userService.findUserById((Integer) data.get("userId")));
            map.put("entityType", data.get("entityType"));
            map.put("entityId", data.get("entityId"));
            map.put("postId", data.get("postId"));
            _// 通知作者_
_            _map.put("fromUser", userService.findUserById(notice.getFromId()));

            noticeVoList.add(map);
        }
    }
    model.addAttribute("notices", noticeVoList);

    _// 设置已读_
_    _List<Integer> ids = getLetterIds(noticeList);
    if (!ids.isEmpty()) {
        messageService.readMessage(ids);
    }

    return "/site/notice-detail";
}
前端页面
notice-detail.html
<!doctype html>
<html lang="en" xmlns:th="http://www.thymeleaf.org">
<head>
<meta charset="utf-8">
<meta name="viewport" content="width=device-width, initial-scale=1, shrink-to-fit=no">
<link rel="icon" href="https://static.nowcoder.com/images/logo_87_87.png"/>
<link rel="stylesheet" href="https://stackpath.bootstrapcdn.com/bootstrap/4.3.1/css/bootstrap.min.css" crossorigin="anonymous">
<link rel="stylesheet" th:href="@{/css/global.css}" />
<link rel="stylesheet" th:href="@{/css/letter.css}" />
<title>牛客网-通知详情</title>
</head>
<body>
<div class="nk-container">
_<!-- 头部 -->_
_ _<header class="bg-dark sticky-top" th:replace="index::header">
</header>
_<!-- 内容 -->_
_ _<div class="main">
<div class="container">
<div class="row">
<div class="col-8">
<h6><b class="square"></b> 系统通知</h6>
</div>
<div class="col-4 text-right">
<button type="button" class="btn btn-secondary btn-sm" onclick="_back_();">返回</button>
</div>
</div>
_<!-- 通知列表 -->_
_ _<ul class="list-unstyled mt-4">
<li class="media pb-3 pt-3 mb-2" th:each="map:${notices}">
<img th:src="${map.fromUser.headerUrl}" class="mr-4 rounded-circle user-header" alt="系统图标">
<div class="toast show d-lg-block" role="alert" aria-live="assertive" aria-atomic="true">
<div class="toast-header">
<strong class="mr-auto" th:utext="${map.fromUser.username}">落基山脉下的闲人</strong>
<small th:text="${#dates.format(map.notice.createTime,'yyyy-MM-dd HH:mm:ss')}">2019-04-25 15:49:32</small>
<button type="button" class="ml-2 mb-1 close" data-dismiss="toast" aria-label="Close">
<span aria-hidden="true">×</span>
</button>
</div>
<div class="toast-body">
<span th:if="${topic.equals('comment')}">
用户
<i th:utext="${map.user.username}">nowcoder</i>
评论了你的<b th:text="${map.entityType==1?'帖子':'回复'}">帖子</b>,
<a class="text-primary" th:href="@{|/discuss/detail/${map.postId}|}">点击查看</a> !
</span>
<span th:if="${topic.equals('like')}">
用户
<i th:utext="${map.user.username}">nowcoder</i>
点赞了你的<b th:text="${map.entityType==1?'帖子':'回复'}">帖子</b>,
<a class="text-primary" th:href="@{|/discuss/detail/${map.postId}|}">点击查看</a> !
</span>
<span th:if="${topic.equals('follow')}">
用户
<i th:utext="${map.user.username}">nowcoder</i>
关注了你,
<a class="text-primary" th:href="@{|/user/profile/${map.user.id}|}">点击查看</a> !
</span>
</div>
</div>
</li>
</ul>
_<!-- 分页 -->_
_ _<nav class="mt-5" th:replace="index::pagination">
</nav>
</div>
</div>
_<!-- 尾部 -->_
_ _<footer class="bg-dark" th:replace="index::footer">
</footer>
</div>
<script src="https://code.jquery.com/jquery-3.3.1.min.js" crossorigin="anonymous"></script>
<script src="https://cdnjs.cloudflare.com/ajax/libs/popper.js/1.14.7/umd/popper.min.js" crossorigin="anonymous"></script>
<script src="https://stackpath.bootstrapcdn.com/bootstrap/4.3.1/js/bootstrap.min.js" crossorigin="anonymous"></script>
<script th:src="@{/js/global.js}"></script>
<script th:src="@{/js/letter.js}"></script>
<script>
function _back_() {
location.href = CONTEXT_PATH + "/notice/list";
}
</script>
</body>
</html>显示未读消息总数量
因为每一个请求中都需要显示未读消息的总数量,因此使用拦截器实现
**创建拦截器 **
src/main/java/com/nowcoder/community/controller/interceptor/MessageInterceptor.java
@Component
public class MessageInterceptor implements HandlerInterceptor {

    @Autowired
    private HostHolder hostHolder;

    @Autowired
    private MessageService messageService;

    @Override
    public void postHandle(HttpServletRequest request, HttpServletResponse response, Object handler, ModelAndView modelAndView) throws Exception {
        User user = hostHolder.getUser();
        if (user != null && modelAndView != null) {
            int letterUnreadCount = messageService.findLetterUnreadCount(user.getId(), null);
            int noticeUnreadCount = messageService.findNoticeUnreadCount(user.getId(), null);
            modelAndView.addObject("allUnreadCount", letterUnreadCount + noticeUnreadCount);
        }
    }
}
配置拦截器
src/main/java/com/nowcoder/community/config/WebMvcConfig.java
@Configuration
public class WebMvcConfig implements WebMvcConfigurer {

    @Autowired
    private AlphaInterceptor alphaInterceptor;

    @Autowired
    private LoginTicketInterceptor loginTicketInterceptor;

    @Autowired
    private LoginRequiredInterceptor loginRequiredInterceptor;

    @Autowired
    private MessageInterceptor messageInterceptor;

    @Override
    public void addInterceptors(InterceptorRegistry registry) {
        registry.addInterceptor(alphaInterceptor)
                .excludePathPatterns("/**/*.css", "/**/*.js", "/**/*.png", "/**/*.jpg", "/**/*.jpeg")
                .addPathPatterns("/register", "/login");

        registry.addInterceptor(loginTicketInterceptor)
                .excludePathPatterns("/**/*.css", "/**/*.js", "/**/*.png", "/**/*.jpg", "/**/*.jpeg");

        registry.addInterceptor(loginRequiredInterceptor)
                .excludePathPatterns("/**/*.css", "/**/*.js", "/**/*.png", "/**/*.jpg", "/**/*.jpeg");
        registry.addInterceptor(messageInterceptor)
                .excludePathPatterns("/**/*.css", "/**/*.js", "/**/*.png", "/**/*.jpg", "/**/*.jpeg");
    }

}
前端页面
index.html
<li class="nav-item ml-3 btn-group-vertical" th:if="${loginUser!=null}">
    <a class="nav-link position-relative" th:href="@{/letter/list}">消息<span class="badge badge-danger" th:text="${loginUser!=null?allUnreadCount:''}">12</span></a>
</li>
Elasticsearch 分布式搜索引擎
6.1 Elasticsearch 入门
理论基础
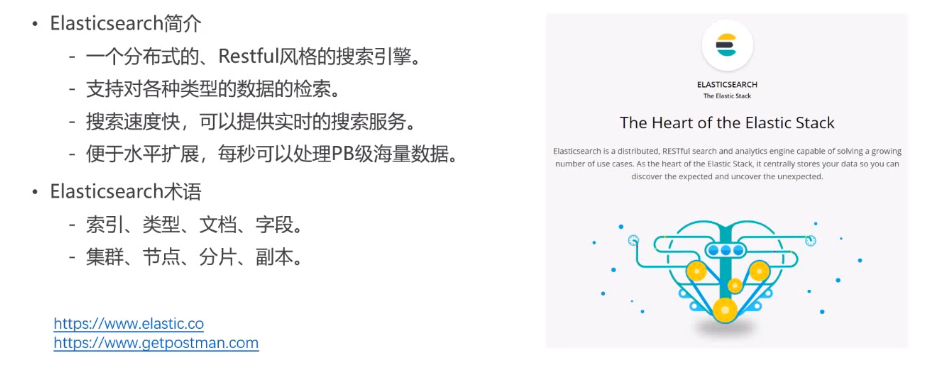
Elasticsearch 和 Mysql 对应关系:
索引 类型 文档(通常是 json 格式) 字段
数据库 表 记录 (一行记录) 属性
最新的已经废弃 类型,因此最新的对应关系:
索引 文档(通常是 json 格式) 字段
表 记录 (一行记录) 属性
多个 es 服务器组成集群,集群中的每一台服务器称为一个节点
一个索引对应一个表,这个索引中的数据可能非常多,分片 指对索引进行进一步划分
副本:对分片的备份,一个分片可能有多个副本
安装
elasticsearch 的安装
因为本项目中 pom.xml 是直接继承 parent 中的版本, 因此使用 4.6.3 版本
下载链接:https://www.elastic.co/cn/downloads/past-releases/elasticsearch-6-4-3
进行相关配置:
配置文件 elasticsearch.yml , 修改数据和日志的存储路径
中文分词插件安装
地址:https://github.com/infinilabs/analysis-ik/releases?page=1
安装命令:
bin/elasticsearch-plugin install https://get.infini.cloud/elasticsearch/analysis-ik/6.4.3postman 安装
ES 使用
启动 elasticsearch
./bin/elasticsearch一些常用命令
# 查看 elasticsearch 状态
curl -X GET "localhost:9200/_cat/health?v"

# 查看 elasticsearch 节点
curl -X GET "localhost:9200/_cat/nodes?v"

# 查看 elasticsearch 索引
curl -X GET "localhost:9200/_cat/indices?v"

# 创建索引 test
curl -X PUT "localhost:9200/test"

# 删除索引 test
curl -X DELETE "localhost:9200/test"
6.2 Spring 集成 Elasticsearch
理论分析
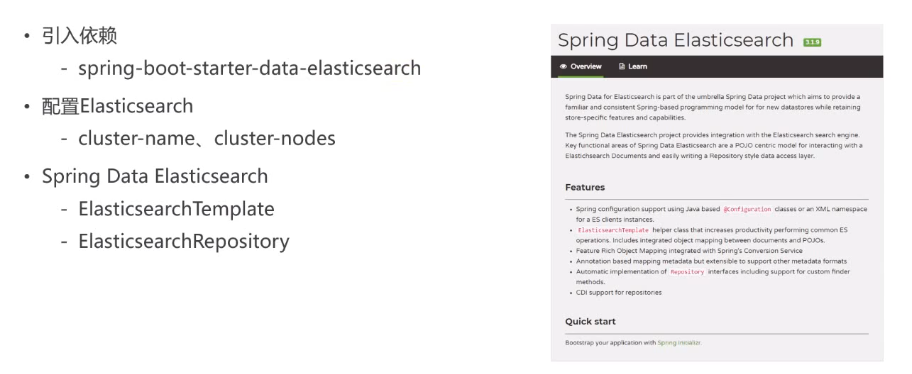
依赖引入
pom.xml
<dependency>
    <groupId>org.springframework.boot</groupId>
    <artifactId>spring-boot-starter-data-elasticsearch</artifactId>
</dependency>
进行配置
application.properties
_# ElasticsearchProperties elasticsearch 相关配置_
spring.data.elasticsearch.cluster-name=nowcoder
spring.data.elasticsearch.cluster-nodes=127.0.0.1:9300
其中 cluster-name 的值与 elasticsearch 的 config/elasticsearch.yml 的配置相同
解决冲突
因为 elasticsearch 和 kafka 同时启动都会调用 NettyRuntime 的 setAvailableProcessors 方法进行设置 availableProcessors;但是启动 kafka 设置之后,再启动 elasticsearch 的时候又会尝试进行设置,但是因为已经设置好了,因此会报错。
为了解决上面的冲突,在程序入口添加以下代码:
com/nowcoder/community/CommunityApplication.java
@SpringBootApplication
public class CommunityApplication {

    @PostConstruct
    public void init() {
       _// 解决netty启动冲突问题_
_       // see Netty4Utils.setAvailableProcessors()_
_       _System._setProperty_("es.set.netty.runtime.available.processors", "false");
    }

    public static void main(String[] args) {
       SpringApplication._run_(CommunityApplication.class, args);
    }

}
配置实体类
因为需要将数据库中存储的内容与 elasticsearch 的索引进行对应,因此需要配置对应的实体
本项目中是搜索所有发布的帖子,因此需要将配置 DiscussPost.java
_// shards: 分片_
_// replicas: 备份_
@Document(indexName = "discusspost", type = "_doc", shards = 6, replicas = 3)
public class DiscussPost {

    @Id
    private int id;

    @Field(type = FieldType._Integer_)
    private int userId;

    _// 搜索帖子,主要是搜索帖子的标题和内容_
_    // analyzer: 存储时的解析器(ik_max_word: 尽可能拆分出更多的关键词)_
_    // searchAnalyzer: 搜索时的解析器(智能拆分关键词)_
_    // 互联网校招_
_    _@Field(type = FieldType._Text_, analyzer = "ik_max_word", searchAnalyzer = "ik_smart")
    private String title;

    @Field(type = FieldType._Text_, analyzer = "ik_max_word", searchAnalyzer = "ik_smart")
    private String content;

    @Field(type = FieldType._Integer_)
    private int type;

    @Field(type = FieldType._Integer_)
    private int status;

    @Field(type = FieldType._Date_)
    private Date createTime;

    @Field(type = FieldType._Integer_)
    private int commentCount;

    @Field(type = FieldType._Double_)
    private double score;

    public int getId() {
        return id;
    }

    public void setId(int id) {
        this.id = id;
    }

    public int getUserId() {
        return userId;
    }

    public void setUserId(int userId) {
        this.userId = userId;
    }

    public String getTitle() {
        return title;
    }

    public void setTitle(String title) {
        this.title = title;
    }

    public String getContent() {
        return content;
    }

    public void setContent(String content) {
        this.content = content;
    }

    public int getType() {
        return type;
    }

    public void setType(int type) {
        this.type = type;
    }

    public int getStatus() {
        return status;
    }

    public void setStatus(int status) {
        this.status = status;
    }

    public Date getCreateTime() {
        return createTime;
    }

    public void setCreateTime(Date createTime) {
        this.createTime = createTime;
    }

    public int getCommentCount() {
        return commentCount;
    }

    public void setCommentCount(int commentCount) {
        this.commentCount = commentCount;
    }

    public double getScore() {
        return score;
    }

    public void setScore(double score) {
        this.score = score;
    }

    @Override
    public String toString() {
        return "DiscussPost{" +
                "id=" + id +
                ", userId=" + userId +
                ", title='" + title + '\'' +
                ", content='" + content + '\'' +
                ", type=" + type +
                ", status=" + status +
                ", createTime=" + createTime +
                ", commentCount=" + commentCount +
                ", score=" + score +
                '}';
    }
}
定义搜索接口
需要定义 实体 对应的搜索接口
src/main/java/com/nowcoder/community/dao/elasticsearch/DiscussPostRepository.java
@Repository
// DiscussPost表示对应的实体类
// INteger: 表示实体类的主键类型
public interface DiscussPostRepository extends ElasticsearchRepository<DiscussPost, Integer> {

}
测试
src/test/java/com/nowcoder/community/ElasticsearchTests.java
插入单条数据:
@Test
_// 测试将 MYSQL 中的一行记录 插入到 elasticsearch 中_
public void testInsert() {
    discussRepository.save(discussMapper.selectDiscussPostById(241));
    discussRepository.save(discussMapper.selectDiscussPostById(242));
    discussRepository.save(discussMapper.selectDiscussPostById(243));
}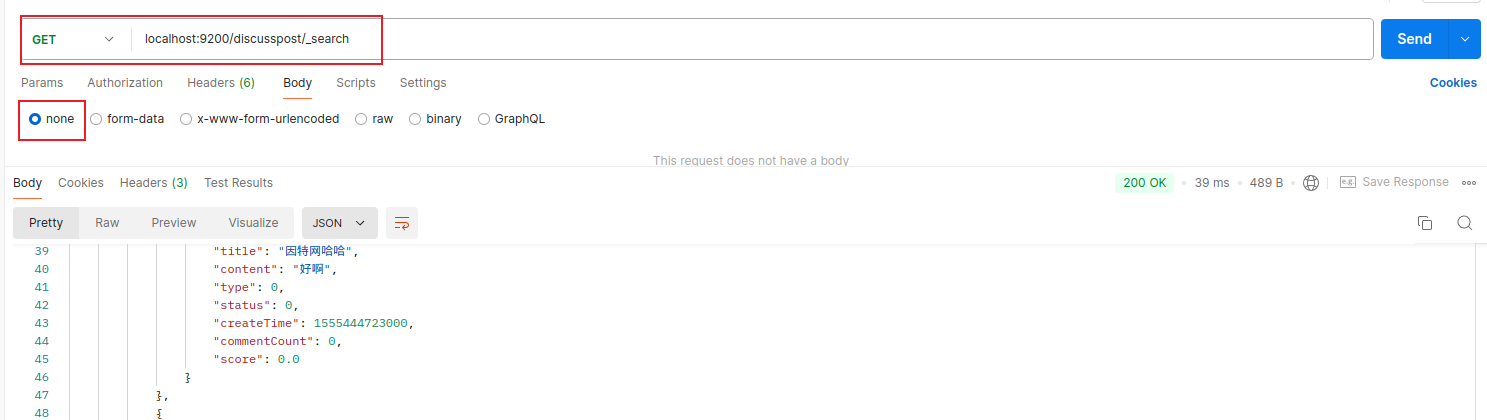
插入多条数据:
@Test
public void testInsertList() {
    discussRepository.saveAll(discussMapper.selectDiscussPosts(101, 0, 100));
    discussRepository.saveAll(discussMapper.selectDiscussPosts(102, 0, 100));
    discussRepository.saveAll(discussMapper.selectDiscussPosts(103, 0, 100));
    discussRepository.saveAll(discussMapper.selectDiscussPosts(111, 0, 100));
    discussRepository.saveAll(discussMapper.selectDiscussPosts(112, 0, 100));
    discussRepository.saveAll(discussMapper.selectDiscussPosts(131, 0, 100));
    discussRepository.saveAll(discussMapper.selectDiscussPosts(132, 0, 100));
    discussRepository.saveAll(discussMapper.selectDiscussPosts(133, 0, 100));
    discussRepository.saveAll(discussMapper.selectDiscussPosts(134, 0, 100));
}
修改、删除数据:
@Test
_// 更新数据, 但是mysql数据库中并没有更新_
public void testUpdate() {
    DiscussPost post = discussMapper.selectDiscussPostById(231);
    post.setContent("我是新人,使劲灌水.");
    discussRepository.save(post);
}

@Test
public void testDelete() {
    _// discussRepository.deleteById(231);_
_    _discussRepository.deleteAll();
}
搜索:
@Test
public void testSearchByRepository() {
    SearchQuery searchQuery = new NativeSearchQueryBuilder()
            .withQuery(QueryBuilders._multiMatchQuery_("互联网寒冬", "title", "content"))
            .withSort(SortBuilders._fieldSort_("type").order(SortOrder._DESC_))
            .withSort(SortBuilders._fieldSort_("score").order(SortOrder._DESC_))
            .withSort(SortBuilders._fieldSort_("createTime").order(SortOrder._DESC_))
            .withPageable(PageRequest._of_(0, 10))
            .withHighlightFields(
                    new HighlightBuilder.Field("title").preTags("<em>").postTags("</em>"),
                    new HighlightBuilder.Field("content").preTags("<em>").postTags("</em>")
            ).build();

    _// elasticTemplate.queryForPage(searchQuery, class, SearchResultMapper)_
_    // 底层获取得到了高亮显示的值, 但是没有返回._

_    // 进行查询, 底层封装查询结果_
_    _Page<DiscussPost> page = discussRepository.search(searchQuery);
    _// 多少条数据匹配_
_    _System._out_.println(page.getTotalElements());
    _// 多少页_
_    _System._out_.println(page.getTotalPages());
    _// 当前在第几页_
_    _System._out_.println(page.getNumber());
    _// 每一页存储多少条数据_
_    _System._out_.println(page.getSize());
    for (DiscussPost post : page) {
        System._out_.println(post);
    }
}
搜索结果高亮显示:
@Test
_// 将高亮数据进行整合_
public void testSearchByTemplate() {
    SearchQuery searchQuery = new NativeSearchQueryBuilder()
            .withQuery(QueryBuilders._multiMatchQuery_("互联网寒冬", "title", "content"))
            .withSort(SortBuilders._fieldSort_("type").order(SortOrder._DESC_))
            .withSort(SortBuilders._fieldSort_("score").order(SortOrder._DESC_))
            .withSort(SortBuilders._fieldSort_("createTime").order(SortOrder._DESC_))
            .withPageable(PageRequest._of_(0, 10))
            .withHighlightFields(
                    new HighlightBuilder.Field("title").preTags("<em>").postTags("</em>"),
                    new HighlightBuilder.Field("content").preTags("<em>").postTags("</em>")
            ).build();

    Page<DiscussPost> page = elasticTemplate.queryForPage(searchQuery, DiscussPost.class, new SearchResultMapper() {
        @Override
        public <T> AggregatedPage<T> mapResults(SearchResponse response, Class<T> aClass, Pageable pageable) {
            _// 获取搜索到的数据_
_            _SearchHits hits = response.getHits();
            if (hits.getTotalHits() <= 0) {
                return null;
            }

            _// 如果搜索到的数据数量大于0, 将搜索到的数据封装到集合中_
_            _List<DiscussPost> list = new ArrayList<>();
            for (SearchHit hit : hits) {
                DiscussPost post = new DiscussPost();

                _// hit 是封装成了map类型_
_                _String id = hit.getSourceAsMap().get("id").toString();
                post.setId(Integer._valueOf_(id));

                String userId = hit.getSourceAsMap().get("userId").toString();
                post.setUserId(Integer._valueOf_(userId));

                _// 此时获取的是原始的title,并不是高亮显示的title_
_                _String title = hit.getSourceAsMap().get("title").toString();
                post.setTitle(title);

                String content = hit.getSourceAsMap().get("content").toString();
                post.setContent(content);

                String status = hit.getSourceAsMap().get("status").toString();
                post.setStatus(Integer._valueOf_(status));

                String createTime = hit.getSourceAsMap().get("createTime").toString();
                post.setCreateTime(new Date(Long._valueOf_(createTime)));

                String commentCount = hit.getSourceAsMap().get("commentCount").toString();
                post.setCommentCount(Integer._valueOf_(commentCount));

                _// 处理高亮显示的结果_
_                // 如果有title中有高亮显示的内容, 则覆盖原始的title_
_                _HighlightField titleField = hit.getHighlightFields().get("title");
                if (titleField != null) {
                    post.setTitle(titleField.getFragments()[0].toString());
                }

                HighlightField contentField = hit.getHighlightFields().get("content");
                if (contentField != null) {
                    post.setContent(contentField.getFragments()[0].toString());
                }

                list.add(post);
            }

            return new AggregatedPageImpl(list, pageable,
                    hits.getTotalHits(), response.getAggregations(), response.getScrollId(), hits.getMaxScore());
        }
    });

    System._out_.println(page.getTotalElements());
    System._out_.println(page.getTotalPages());
    System._out_.println(page.getNumber());
    System._out_.println(page.getSize());
    for (DiscussPost post : page) {
        System._out_.println(post);
    }
}
6.3 实现社区搜索功能
理论分析
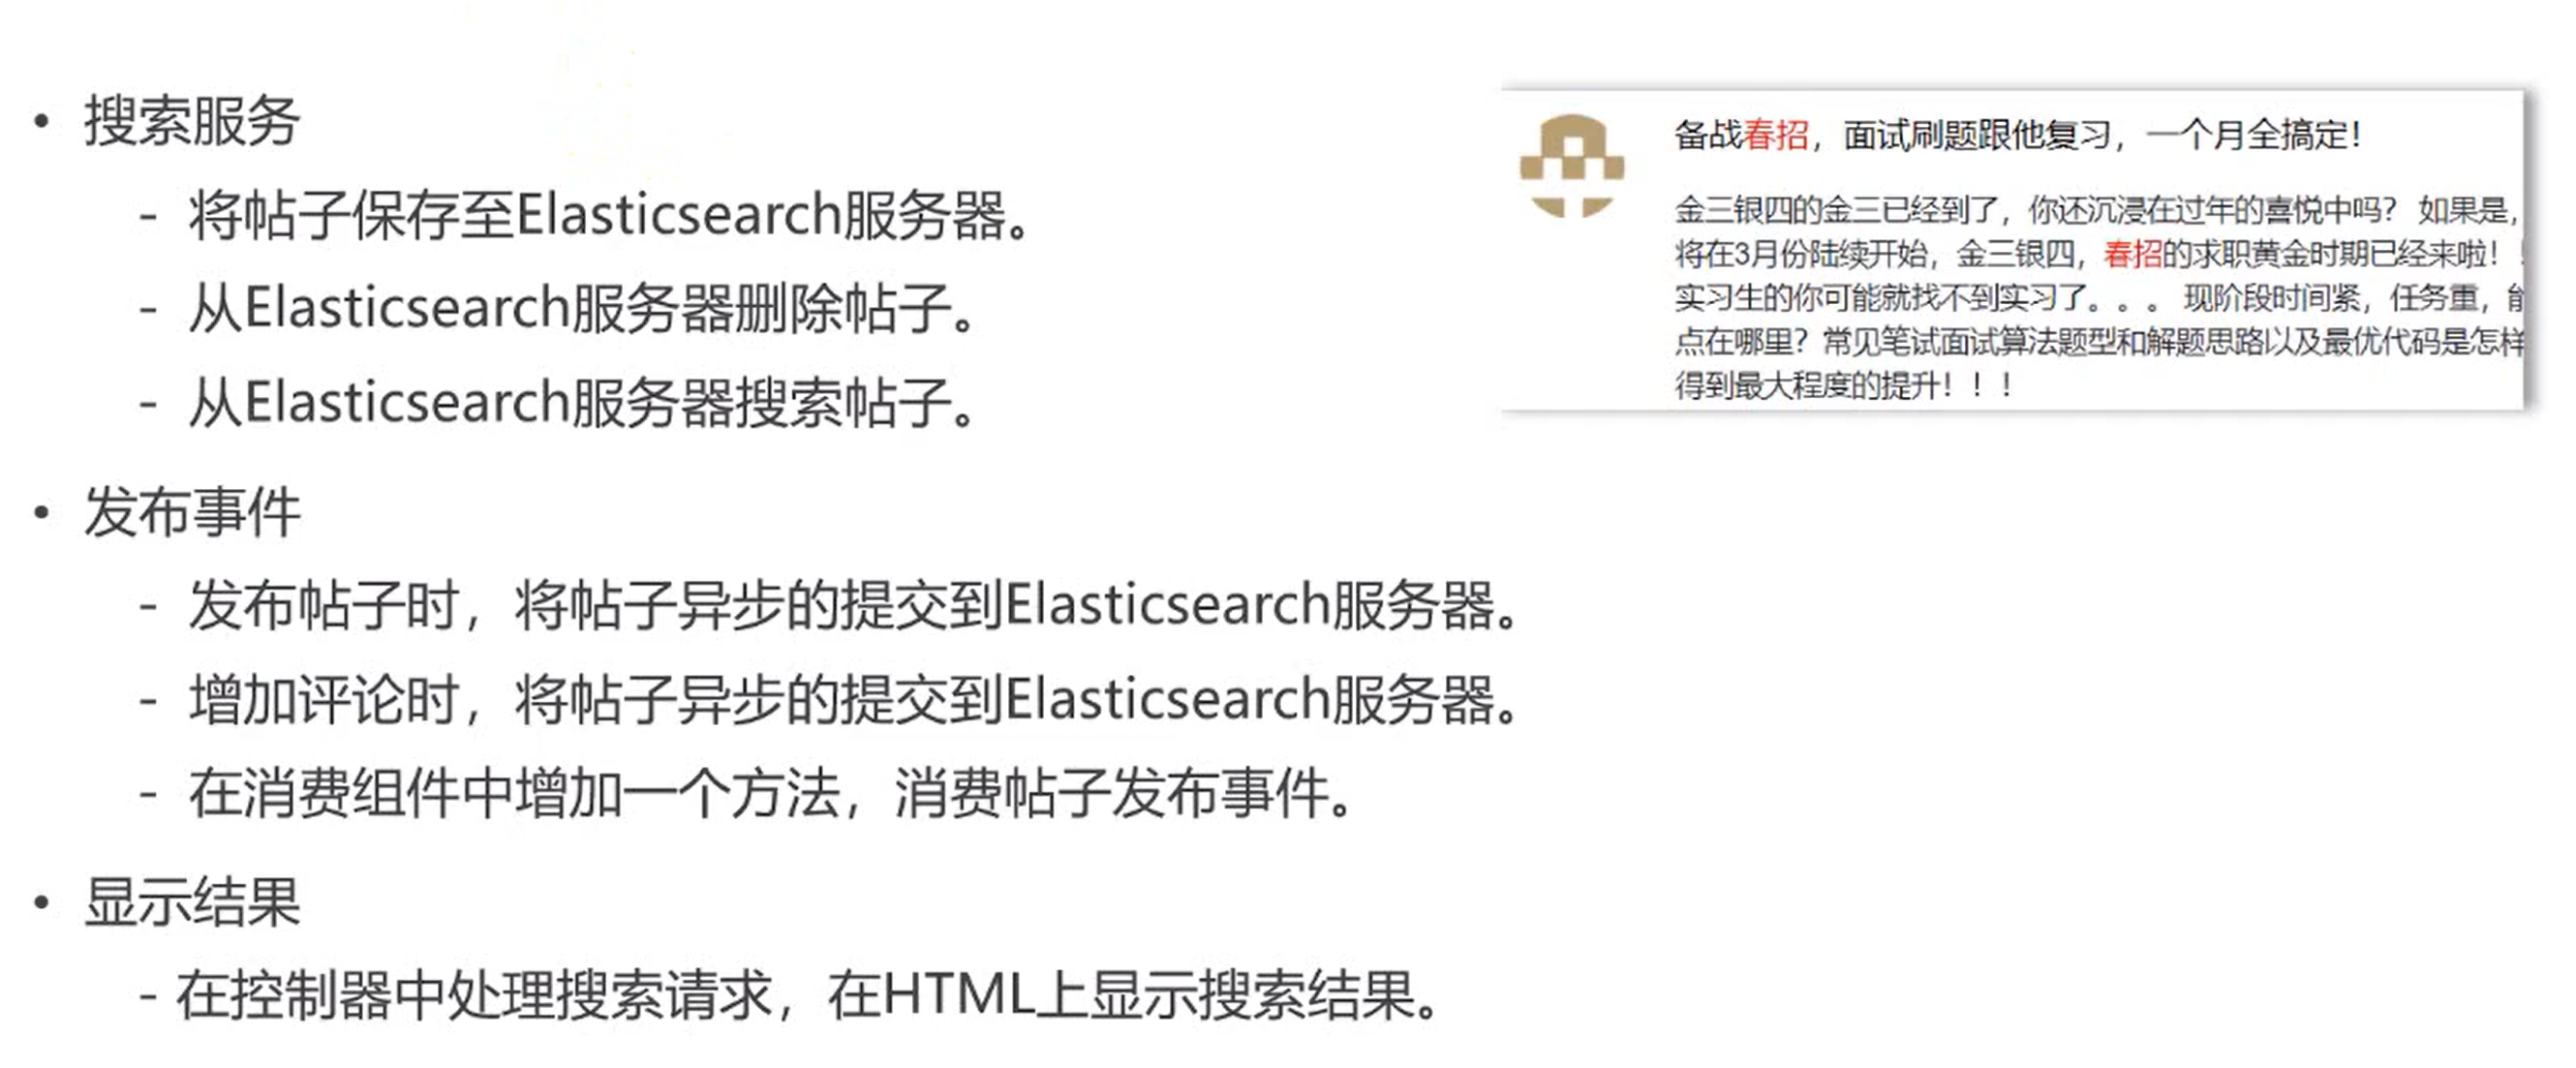
实现对帖子的搜索
业务层
关于帖子在 Elasticsearch 服务器中 帖子的保存、删除、搜索
其中搜索中 置顶、以及热度高的帖子优先显示
src/main/java/com/nowcoder/community/service/ElasticsearchService.java
@Service
public class ElasticsearchService {

    @Autowired
    private DiscussPostRepository discussRepository;

    @Autowired
    private ElasticsearchTemplate elasticTemplate;

    public void saveDiscussPost(DiscussPost post) {
        discussRepository.save(post);
    }

    public void deleteDiscussPost(int id) {
        discussRepository.deleteById(id);
    }

    _// current:当前第几页_
_    // limit: 每一页多少条数据_
_    _public Page<DiscussPost> searchDiscussPost(String keyword, int current, int limit) {
        SearchQuery searchQuery = new NativeSearchQueryBuilder()
                .withQuery(QueryBuilders._multiMatchQuery_(keyword, "title", "content"))
                .withSort(SortBuilders._fieldSort_("type").order(SortOrder._DESC_))
                .withSort(SortBuilders._fieldSort_("score").order(SortOrder._DESC_))
                .withSort(SortBuilders._fieldSort_("createTime").order(SortOrder._DESC_))
                .withPageable(PageRequest._of_(current, limit))
                .withHighlightFields(
                        new HighlightBuilder.Field("title").preTags("<em>").postTags("</em>"),
                        new HighlightBuilder.Field("content").preTags("<em>").postTags("</em>")
                ).build();

        return elasticTemplate.queryForPage(searchQuery, DiscussPost.class, new SearchResultMapper() {
            @Override
            public <T> AggregatedPage<T> mapResults(SearchResponse response, Class<T> aClass, Pageable pageable) {
                SearchHits hits = response.getHits();
                if (hits.getTotalHits() <= 0) {
                    return null;
                }

                List<DiscussPost> list = new ArrayList<>();
                for (SearchHit hit : hits) {
                    DiscussPost post = new DiscussPost();

                    String id = hit.getSourceAsMap().get("id").toString();
                    post.setId(Integer._valueOf_(id));

                    String userId = hit.getSourceAsMap().get("userId").toString();
                    post.setUserId(Integer._valueOf_(userId));

                    String title = hit.getSourceAsMap().get("title").toString();
                    post.setTitle(title);

                    String content = hit.getSourceAsMap().get("content").toString();
                    post.setContent(content);

                    String status = hit.getSourceAsMap().get("status").toString();
                    post.setStatus(Integer._valueOf_(status));

                    String createTime = hit.getSourceAsMap().get("createTime").toString();
                    post.setCreateTime(new Date(Long._valueOf_(createTime)));

                    String commentCount = hit.getSourceAsMap().get("commentCount").toString();
                    post.setCommentCount(Integer._valueOf_(commentCount));

                    _// 处理高亮显示的结果_
_                    _HighlightField titleField = hit.getHighlightFields().get("title");
                    if (titleField != null) {
                        post.setTitle(titleField.getFragments()[0].toString());
                    }

                    HighlightField contentField = hit.getHighlightFields().get("content");
                    if (contentField != null) {
                        post.setContent(contentField.getFragments()[0].toString());
                    }

                    list.add(post);
                }

                return new AggregatedPageImpl(list, pageable,
                        hits.getTotalHits(), response.getAggregations(), response.getScrollId(), hits.getMaxScore());
            }
        });
    }

}
事件触发
使用 Kafka 实现异步的事件处理
发布帖子,帖子异步提交到 Elasticsearch 服务器
帖子发布和 src/main/java/com/nowcoder/community/controller/DiscussPostController.java 的 addDiscussPost 方法有关
@RequestMapping(path = "/add", method = RequestMethod._POST_)
@ResponseBody
public String addDiscussPost(String title, String content) {
    User user = hostHolder.getUser();
    if (user == null) {
        return CommunityUtil._getJSONString_(403, "你还没有登录哦!");
    }

    DiscussPost post = new DiscussPost();
    post.setUserId(user.getId());
    post.setTitle(title);
    post.setContent(content);
    post.setCreateTime(new Date());
    discussPostService.addDiscussPost(post);

    _// 触发发布帖子事件_
_    _Event event = new Event()
            .setTopic(_TOPIC_PUBLISH_)
            .setUserId(user.getId())
            .setEntityType(_ENTITY_TYPE_POST_)
            .setEntityId(post.getId());
    eventProducer.fireEvent(event);

    _// 报错的情况,将来统一处理._
_    _return CommunityUtil._getJSONString_(0, "发布成功!");
}
增加评论,帖子的评论数量增加,异步提交到 E;Elasticsearch 服务器
src/main/java/com/nowcoder/community/controller/CommentController.java
@RequestMapping(path = "/add/{discussPostId}", method = RequestMethod._POST_)
public String addComment(@PathVariable("discussPostId") int discussPostId, Comment comment) {
    comment.setUserId(hostHolder.getUser().getId());
    comment.setStatus(0);
    comment.setCreateTime(new Date());
    commentService.addComment(comment);
    _// 添加评论, 触发评论事件, 由系统通知该实体的作者_

_    // 触发评论事件_
_    _Event event = new Event()
            .setTopic(_TOPIC_COMMENT_)
            .setUserId(hostHolder.getUser().getId())
            .setEntityType(comment.getEntityType())  _// 得到实体类型 因为可能是给帖子评论, 也可能是给 评论评论_
_            _.setEntityId(comment.getEntityId())
            .setData("postId", discussPostId); _// 得到帖子详情页的帖子id_
_    // 如果是给帖子评论_
_    _if (comment.getEntityType() == _ENTITY_TYPE_POST_) {
        _// 根据帖子的id获取该帖子的作者_
_        _DiscussPost target = discussPostService.findDiscussPostById(comment.getEntityId());
        event.setEntityUserId(target.getUserId());
    } else if (comment.getEntityType() == _ENTITY_TYPE_COMMENT_) {
        _// 如果是给评论 添加评论_
_        // 根据评论的id获取该评论的作者_
_        _Comment target = commentService.findCommentById(comment.getEntityId());
        event.setEntityUserId(target.getUserId());
    }
    _// 生产者处理事件, 将对应内容添加到 topic 中_
_    _eventProducer.fireEvent(event);
    _// 生产者会自动监听topic_
_    _
_    _
_    // 增加帖子的评论 将帖子的修改异步同步到Elasticsearch服务器中_
_    _if (comment.getEntityType() == _ENTITY_TYPE_POST_) {
        _// 触发发帖事件_
_        _event = new Event()
                .setTopic(_TOPIC_PUBLISH_)
                .setUserId(comment.getUserId())
                .setEntityType(_ENTITY_TYPE_POST_)
                .setEntityId(discussPostId);
        eventProducer.fireEvent(event);

    }

    return "redirect:/discuss/detail/" + discussPostId;
}
消费者监听 topic 对事件进行异步处理
EventConsumer.java
_// 消费者 发帖事件_
@KafkaListener(topics = {_TOPIC_PUBLISH_})
public void handlePublishMessage(ConsumerRecord record) {
    if (record == null || record.value() == null) {
        _logger_.error("消息的内容为空!");
        return;
    }

    Event event = JSONObject._parseObject_(record.value().toString(), Event.class);
    if (event == null) {
        _logger_.error("消息格式错误!");
        return;
    }

    DiscussPost post = discussPostService.findDiscussPostById(event.getEntityId());
    discussPostRepository.save(post);
}
视图层
前端根据关键字发送搜索请求,后端对请求进行处理
SearchController
@Controller
public class SearchController implements CommunityConstant {

    @Autowired
    private ElasticsearchService elasticsearchService;

    @Autowired
    private UserService userService;

    @Autowired
    private LikeService likeService;

    _// search?keyword=xxx_
_    _@RequestMapping(path = "/search", method = RequestMethod._GET_)
    public String search(String keyword, Page page, Model model) {
        _// 搜索帖子_
_        _org.springframework.data.domain.Page<DiscussPost> searchResult =
                elasticsearchService.searchDiscussPost(keyword, page.getCurrent() - 1, page.getLimit());
        _// 聚合数据_
_        _List<Map<String, Object>> discussPosts = new ArrayList<>();
        if (searchResult != null) {
            for (DiscussPost post : searchResult) {
                Map<String, Object> map = new HashMap<>();
                _// 帖子_
_                _map.put("post", post);
                _// 作者_
_                _map.put("user", userService.findUserById(post.getUserId()));
                _// 点赞数量_
_                _map.put("likeCount", likeService.findEntityLikeCount(_ENTITY_TYPE_POST_, post.getId()));

                discussPosts.add(map);
            }
        }
        model.addAttribute("discussPosts", discussPosts);
        model.addAttribute("keyword", keyword);

        _// 分页信息_
_        _page.setPath("/search?keyword=" + keyword);
        page.setRows(searchResult == null ? 0 : (int) searchResult.getTotalElements());

        return "/site/search";
    }

}
前端页面
index.html
<form class="form-inline my-2 my-lg-0" th:action="@{/search}" method="get">
    <input class="form-control mr-sm-2" type="search" aria-label="Search" name="keyword" th:value="${keyword}"/>
    <button class="btn btn-outline-light my-2 my-sm-0" type="submit">搜索</button>
</form>
search.html
<!doctype html>
<html lang="en" xmlns:th="http://www.thymeleaf.org">
<head>
    <meta charset="utf-8">
    <meta name="viewport" content="width=device-width, initial-scale=1, shrink-to-fit=no">
    <link rel="icon" href="https://static.nowcoder.com/images/logo_87_87.png"/>
    <link rel="stylesheet" href="https://stackpath.bootstrapcdn.com/bootstrap/4.3.1/css/bootstrap.min.css" crossorigin="anonymous">
    <link rel="stylesheet" th:href="@{/css/global.css}" />
    <title>牛客网-搜索结果</title>
</head>
<body>
<div class="nk-container">
    _<!-- 头部 -->_
_    _<header class="bg-dark sticky-top" th:replace="index::header">
    </header>

    _<!-- 内容 -->_
_    _<div class="main">
       <div class="container">
          <h6><b class="square"></b> 相关帖子</h6>
          _<!-- 帖子列表 -->_
_          _<ul class="list-unstyled mt-4">
             <li class="media pb-3 pt-3 mb-3 border-bottom" th:each="map:${discussPosts}">
                <img th:src="${map.user.headerUrl}" class="mr-4 rounded-circle" alt="用户头像" style="width:50px;height:50px;">
                <div class="media-body">
                   <h6 class="mt-0 mb-3">
                      <a th:href="@{|/discuss/detail/${map.post.id}|}" th:utext="${map.post.title}">备战<em>春招</em>,面试刷题跟他复习,一个月全搞定!</a>
                   </h6>
                   <div class="mb-3" th:utext="${map.post.content}">
                      金三银四的金三已经到了,你还沉浸在过年的喜悦中吗? 如果是,那我要让你清醒一下了:目前大部分公司已经开启了内推,正式网申也将在3月份陆续开始,金三银四,<em>春招</em>的求职黄金时期已经来啦!!! 再不准备,作为19应届生的你可能就找不到工作了。。。作为20届实习生的你可能就找不到实习了。。。 现阶段时间紧,任务重,能做到短时间内快速提升的也就只有算法了, 那么算法要怎么复习?重点在哪里?常见笔试面试算法题型和解题思路以及最优代码是怎样的? 跟左程云老师学算法,不仅能解决以上所有问题,还能在短时间内得到最大程度的提升!!!
                   </div>
                   <div class="text-muted font-size-12">
                      <u class="mr-3" th:utext="${map.user.username}">寒江雪</u>
                      发布于 <b th:text="${#dates.format(map.post.createTime,'yyyy-MM-dd HH:mm:ss')}">2019-04-15 15:32:18</b>
                      <ul class="d-inline float-right">
                         <li class="d-inline ml-2">赞 <i th:text="${map.likeCount}">11</i></li>
                         <li class="d-inline ml-2">|</li>
                         <li class="d-inline ml-2">回复 <i th:text="${map.post.commentCount}">7</i></li>
                      </ul>
                   </div>
                </div>
             </li>
          </ul>
          _<!-- 分页 -->_
_          _<nav class="mt-5" th:replace="index::pagination">
          </nav>
       </div>
    </div>

    _<!-- 尾部 -->_
_    _<footer class="bg-dark" th:replace="index::footer">

    </footer>
</div>

<script src="https://code.jquery.com/jquery-3.3.1.min.js" crossorigin="anonymous"></script>
<script src="https://cdnjs.cloudflare.com/ajax/libs/popper.js/1.14.7/umd/popper.min.js" crossorigin="anonymous"></script>
<script src="https://stackpath.bootstrapcdn.com/bootstrap/4.3.1/js/bootstrap.min.js" crossorigin="anonymous"></script>
<script th:src="@{/js/global.js}"></script>
</body>
</html>
权限控制
7.1 Spring Security
理论分析
DispatcherServlet、Interceptor、COntroller 都是属于 SpringMVC 的组建,其中 DispatcherServlet 是实现了 JavaEE 提供的 Servlet 接口,因此符合 JavaEE 的规范
Filter 是 JavaEE 提供的,对请求进行过滤,然后将符合条件的请求传递给 DispatcherServlet
SpringSecurity 利用 Filter 对整个请求拦截,进行统一的权限管理,每一个 filter 对应一种操作(登陆、查看等)
SpringSecurity 底层原理学习:
依赖引入
pom.xml
<dependency>
            <groupId>org.springframework.boot</groupId>
            <artifactId>spring-boot-starter-security</artifactId>
</dependency>
实体类配置
因为是需要通过 SpringSecurity 对用户的权限进行控制,因此需要修改 User.java 实体类
_// 实现UserDetails接口, 这个是SpringSecurity进行权限控制封装的_
public class User implements UserDetails {

    private int id;
    private String username;
    private String password;
    private String salt;
    private String email;
    private int type;
    private int status;
    private String activationCode;
    private String headerUrl;
    private Date createTime;

    public int getId() {
        return id;
    }

    public void setId(int id) {
        this.id = id;
    }

    public String getUsername() {
        return username;
    }

    public void setUsername(String username) {
        this.username = username;
    }

    public String getPassword() {
        return password;
    }

    public void setPassword(String password) {
        this.password = password;
    }

    public String getSalt() {
        return salt;
    }

    public void setSalt(String salt) {
        this.salt = salt;
    }

    public String getEmail() {
        return email;
    }

    public void setEmail(String email) {
        this.email = email;
    }

    public int getType() {
        return type;
    }

    public void setType(int type) {
        this.type = type;
    }

    public int getStatus() {
        return status;
    }

    public void setStatus(int status) {
        this.status = status;
    }

    public String getActivationCode() {
        return activationCode;
    }

    public void setActivationCode(String activationCode) {
        this.activationCode = activationCode;
    }

    public String getHeaderUrl() {
        return headerUrl;
    }

    public void setHeaderUrl(String headerUrl) {
        this.headerUrl = headerUrl;
    }

    public Date getCreateTime() {
        return createTime;
    }

    public void setCreateTime(Date createTime) {
        this.createTime = createTime;
    }

    @Override
    public String toString() {
        return "User{" +
                "id=" + id +
                ", username='" + username + '\'' +
                ", password='" + password + '\'' +
                ", salt='" + salt + '\'' +
                ", email='" + email + '\'' +
                ", type=" + type +
                ", status=" + status +
                ", activationCode='" + activationCode + '\'' +
                ", headerUrl='" + headerUrl + '\'' +
                ", createTime=" + createTime +
                '}';
    }

    _// true: 账号未过期._
_    _@Override
    public boolean isAccountNonExpired() {
        return true;
    }

    _// true: 账号未锁定._
_    _@Override
    public boolean isAccountNonLocked() {
        return true;
    }

    _// true: 凭证未过期._
_    _@Override
    public boolean isCredentialsNonExpired() {
        return true;
    }

    _// true: 账号可用._
_    _@Override
    public boolean isEnabled() {
        return true;
    }


    _// 返回用户具备的所有权限_
_    // 使用字符串表示用户具备的 具体权限_
_    _@Override
    public Collection<? extends GrantedAuthority> getAuthorities() {
        List<GrantedAuthority> list = new ArrayList<>();
        list.add(new GrantedAuthority() {
            @Override
            public String getAuthority() {
                switch (type) {
                    case 1:
                        return "ADMIN";
                    default:
                        return "USER";
                }
            }
        });
        return list;
    }

}
业务层
使用 SpringSecurity 对用户的权限进行控制,需要修改 UserService.java
@Service
public class UserService implements UserDetailsService {

    @Autowired
    private UserMapper userMapper;

    public User findUserByName(String username) {
        return userMapper.selectByName(username);
    }

    _// SpringSecurity 自动判断账号密码是否正确_
_    _@Override
    public UserDetails loadUserByUsername(String username) throws UsernameNotFoundException {
        return this.findUserByName(username);
    }
}
SpringSecurity 配置类
权限管理:分为 认证 和 授权 两部分
src/main/java/com/nowcoder/community/config/SecurityConfig.java
@Configuration
public class SecurityConfig extends WebSecurityConfigurerAdapter {

    @Autowired
    private UserService userService;

    @Override
    public void configure(WebSecurity web) throws Exception {
        _// 忽略静态资源的访问_
_        _web.ignoring().antMatchers("/resources/**");
    }

    _// AuthenticationManager: 认证的核心接口._
_    // AuthenticationManagerBuilder: 用于构建AuthenticationManager对象的工具._
_    // ProviderManager: AuthenticationManager接口的默认实现类._
_    _@Override
    protected void configure(AuthenticationManagerBuilder auth) throws Exception {
        _// 该方法主要是进行认证_

_        // 内置的认证规则_
_        // auth.userDetailsService(userService).passwordEncoder(new Pbkdf2PasswordEncoder("12345"));_
_        // 但是我们进行密码加密的规则 和内置认证规则的方式不匹配, 不是Pbkdf2PasswordEncoder_
_        // 因此需要自定义认证规则_

_        // 自定义认证规则_
_        // AuthenticationProvider: ProviderManager持有一组AuthenticationProvider,每个AuthenticationProvider负责一种认证._
_        // 委托模式: ProviderManager将认证委托给AuthenticationProvider._
_        _auth.authenticationProvider(new AuthenticationProvider() {
            _// Authentication: 用于封装认证信息的接口,不同的实现类代表不同类型的认证信息._
_            _@Override
            public Authentication authenticate(Authentication authentication) throws AuthenticationException {
                String username = authentication.getName();
                String password = (String) authentication.getCredentials();

                User user = userService.findUserByName(username);
                if (user == null) {
                    throw new UsernameNotFoundException("账号不存在!");
                }

                password = CommunityUtil._md5_(password + user.getSalt());
                if (!user.getPassword().equals(password)) {
                    throw new BadCredentialsException("密码不正确!");
                }

                _// principal: 主要信息; 通常存user_
_                // credentials: 证书; 通常是密码_
_                // authorities: 权限;_
_                _return new UsernamePasswordAuthenticationToken(user, user.getPassword(), user.getAuthorities());
            }

            _// 当前的AuthenticationProvider支持哪种类型的认证._
_            _@Override
            public boolean supports(Class<?> aClass) {
                _// UsernamePasswordAuthenticationToken: Authentication接口的常用的实现类._
_                _return UsernamePasswordAuthenticationToken.class.equals(aClass);
            }
        });
    }

    @Override
    protected void configure(HttpSecurity http) throws Exception {
        _// 该方法主要进行授权_
_        // 登录相关配置_
_        _http.formLogin()
                .loginPage("/loginpage")  _// 跳转到登录页面_
_                _.loginProcessingUrl("/login") _// 处理登陆请求_
_                _.successHandler(new AuthenticationSuccessHandler() {
                    @Override
                    public void onAuthenticationSuccess(HttpServletRequest request, HttpServletResponse response, Authentication authentication) throws IOException, ServletException {
                        _// 重定向到首页_
_                        _response.sendRedirect(request.getContextPath() + "/index");
                    }
                })
                _// 登陆失败_
_                _.failureHandler(new AuthenticationFailureHandler() {
                    @Override
                    public void onAuthenticationFailure(HttpServletRequest request, HttpServletResponse response, AuthenticationException e) throws IOException, ServletException {
                        request.setAttribute("error", e.getMessage());
                        _// 转发到登录页面_
_                        _request.getRequestDispatcher(request.getContextPath() + "/loginpage").forward(request, response);
                    }
                });


        _// 退出相关配置_
_        _http.logout()
                .logoutUrl("/logout")
                .logoutSuccessHandler(new LogoutSuccessHandler() {
                    @Override
                    public void onLogoutSuccess(HttpServletRequest request, HttpServletResponse response, Authentication authentication) throws IOException, ServletException {
                        response.sendRedirect(request.getContextPath() + "/index");
                    }
                });

        _// 授权配置_
_        _http.authorizeRequests()
                .antMatchers("/letter").hasAnyAuthority("USER", "ADMIN")
                .antMatchers("/admin").hasAnyAuthority("ADMIN")
                _// 处理权限不匹配_
_                _.and().exceptionHandling().accessDeniedPage("/denied");

        _// 增加Filter,处理验证码_
_        _http.addFilterBefore(new Filter() {
            @Override
            public void doFilter(ServletRequest servletRequest, ServletResponse servletResponse, FilterChain filterChain) throws IOException, ServletException {
                HttpServletRequest request = (HttpServletRequest) servletRequest;
                HttpServletResponse response = (HttpServletResponse) servletResponse;
                if (request.getServletPath().equals("/login")) {
                    String verifyCode = request.getParameter("verifyCode");
                    if (verifyCode == null || !verifyCode.equalsIgnoreCase("1234")) {
                        request.setAttribute("error", "验证码错误!");
                        request.getRequestDispatcher("/loginpage").forward(request, response);
                        return;
                    }
                }
                _// 让请求继续向下执行._
_                _filterChain.doFilter(request, response);
            }
        }, UsernamePasswordAuthenticationFilter.class);

        _// 记住我_
_        _http.rememberMe()
                .tokenRepository(new InMemoryTokenRepositoryImpl())
                .tokenValiditySeconds(3600 * 24)
                .userDetailsService(userService);

    }
}
前端页面
login.html
<!DOCTYPE html>
<html lang="en" xmlns:th="http://www.thymeleaf.org">
<head>
    <meta charset="UTF-8">
    <title>登录</title>
</head>
<body>

<h1>登录社区</h1>

<form method="post" th:action="@{/login}">
    <p style="color:red;" th:text="${error}">
        _<!--提示信息-->_
_    _</p>
    <p>
        账号:<input type="text" name="username" th:value="${param.username}">
    </p>
    <p>
        密码:<input type="password" name="password" th:value="${param.password}">
    </p>
    <p>
        验证码:<input type="text" name="verifyCode"> <i>1234</i>
    </p>
    <p>
        <input type="checkbox" name="remember-me"> 记住我
    </p>
    <p>
        <input type="submit" value="登录">
    </p>
</form>

</body>
</html>
index.html
<!DOCTYPE html>
<html lang="en" xmlns:th="http://www.thymeleaf.org">
<head>
    <meta charset="UTF-8">
    <title>首页</title>
</head>
<body>

<h1>社区首页</h1>
_<!--欢迎信息-->_
<p th:if="${loginUser!=null}">
    欢迎你, <span th:text="${loginUser.username}"></span>!
</p>

<ul>
    <li><a th:href="@{/discuss}">帖子详情</a></li>
    <li><a th:href="@{/letter}">私信列表</a></li>
    <li><a th:href="@{/loginpage}">登录</a></li>
    _<!--<li><a th:href="@{/loginpage}">退出</a></li>-->_
_<!--  Spring Security 要求退出提交的是表单  -->_
_    _<li>
        <form method="post" th:action="@{/logout}">
            <a href="javascript:document.forms[0].submit();">退出</a>
        </form>
    </li>
</ul>

</body>
</html>
7.2 权限控制
理论分析
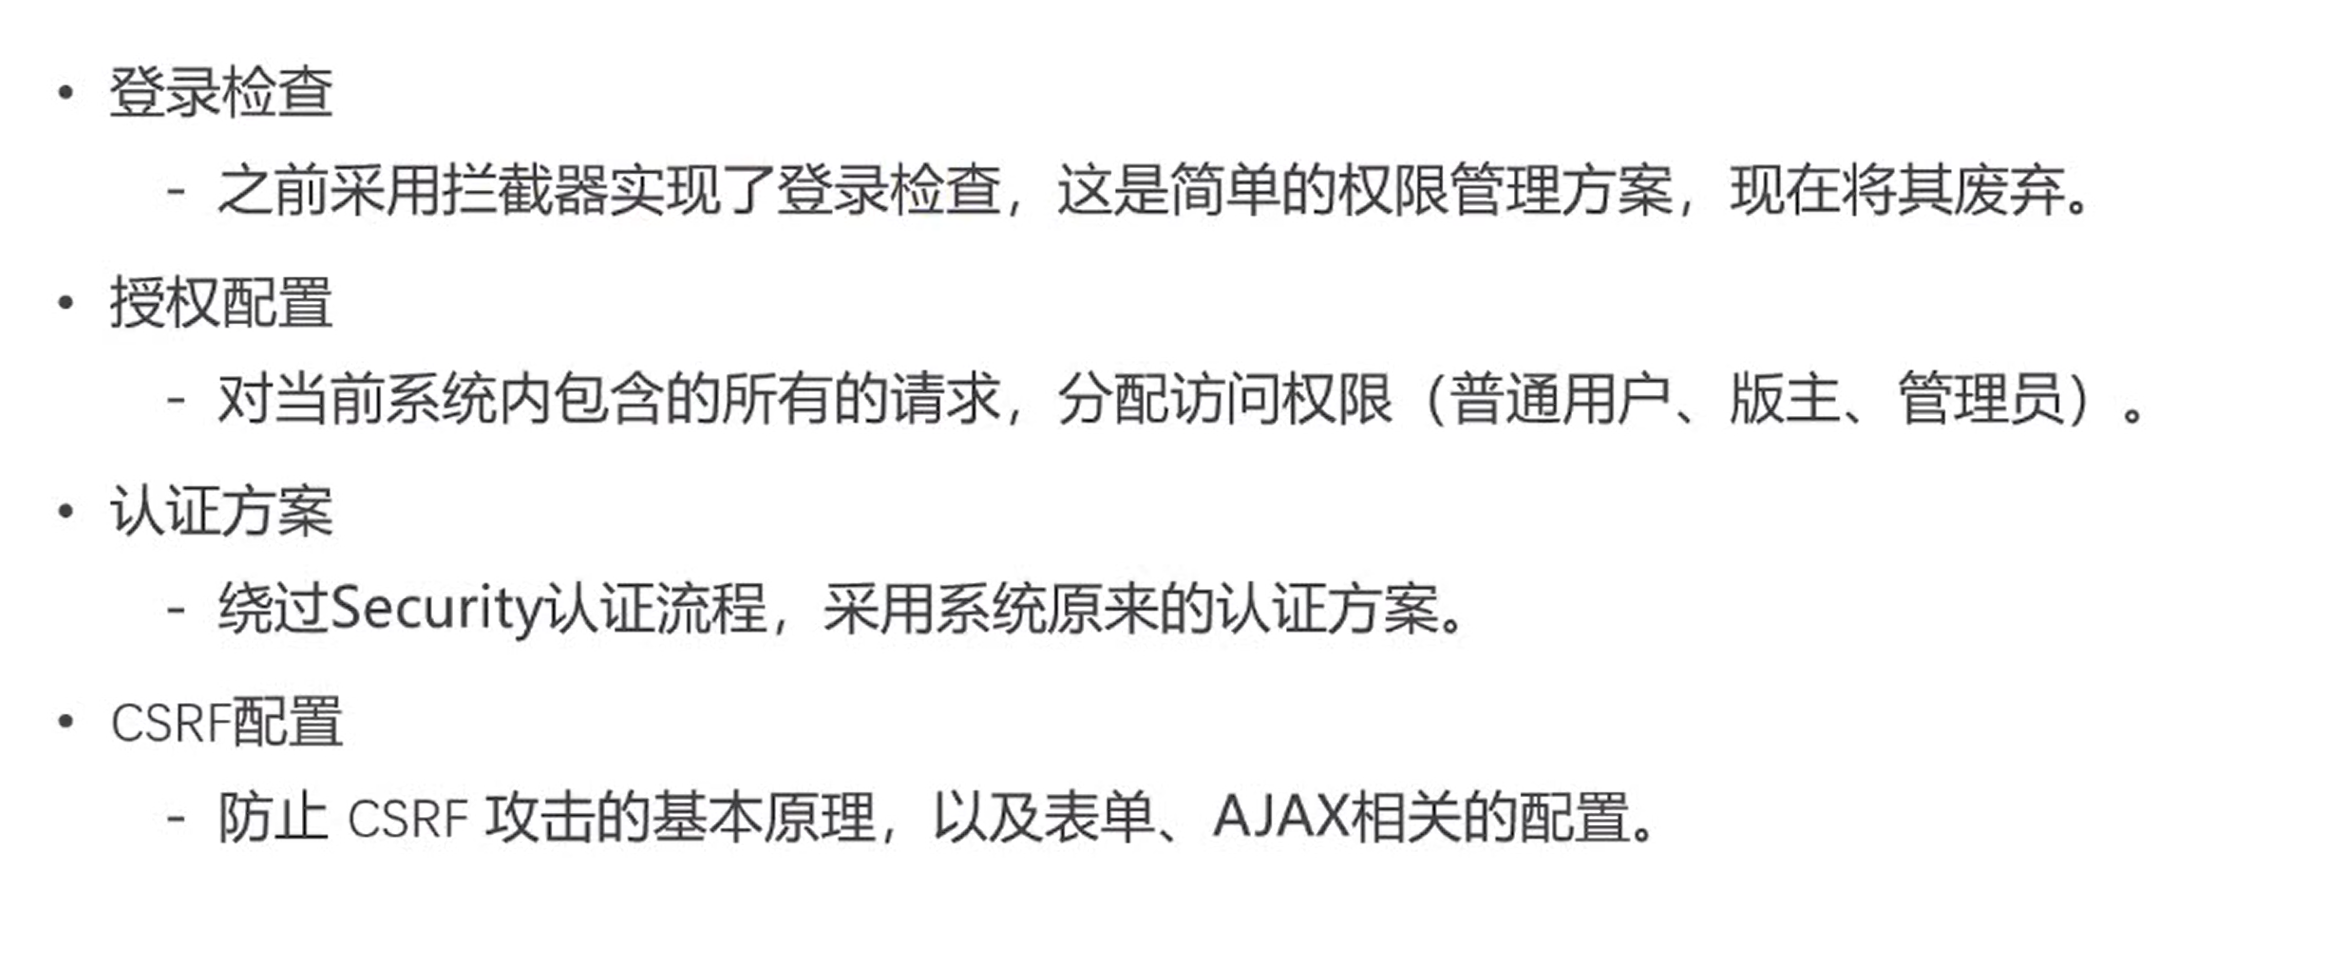
原先的拦截器
废弃原先的拦截器进行的登陆检查
src/main/java/com/nowcoder/community/config/WebMvcConfig.java
@Configuration
public class WebMvcConfig implements WebMvcConfigurer {

    @Autowired
    private AlphaInterceptor alphaInterceptor;

    @Autowired
    private LoginTicketInterceptor loginTicketInterceptor;

    @Autowired
    private LoginRequiredInterceptor loginRequiredInterceptor;

    @Autowired
    private MessageInterceptor messageInterceptor;

    @Override
    public void addInterceptors(InterceptorRegistry registry) {
        registry.addInterceptor(alphaInterceptor)
                .excludePathPatterns("/**/*.css", "/**/*.js", "/**/*.png", "/**/*.jpg", "/**/*.jpeg")
                .addPathPatterns("/register", "/login");

        registry.addInterceptor(loginTicketInterceptor)
                .excludePathPatterns("/**/*.css", "/**/*.js", "/**/*.png", "/**/*.jpg", "/**/*.jpeg");

_//        registry.addInterceptor(loginRequiredInterceptor)_
_//                .excludePathPatterns("/**/*.css", "/**/*.js", "/**/*.png", "/**/*.jpg", "/**/*.jpeg");_

_        _registry.addInterceptor(messageInterceptor)
                .excludePathPatterns("/**/*.css", "/**/*.js", "/**/*.png", "/**/*.jpg", "/**/*.jpeg");
    }

}
SpringSecurity 配置类
src/main/java/com/nowcoder/community/config/SecurityConfig.java
@Configuration
public class SecurityConfig extends WebSecurityConfigurerAdapter implements CommunityConstant {

    @Override
    public void configure(WebSecurity web) throws Exception {
        web.ignoring().antMatchers("/resources/**");
    }
    protected void configure(HttpSecurity http) throws Exception {
        _// 授权_
_        _http.authorizeRequests()
                .antMatchers(
                        "/user/setting",
                        "/user/upload",
                        "/discuss/add",
                        "/comment/add/**",
                        "/letter/**",
                        "/notice/**",
                        "/like",
                        "/follow",
                        "/unfollow"
                )
                .hasAnyAuthority(
                        _AUTHORITY_USER_,
                        _AUTHORITY_ADMIN_,
                        _AUTHORITY_MODERATOR_
_                _)
                .antMatchers(
                        "/discuss/top",
                        "/discuss/wonderful"
                )
                .hasAnyAuthority(
                        _AUTHORITY_MODERATOR_
_                _)
                .antMatchers(
                        "/discuss/delete",
                        "/data/**"
                )
                .hasAnyAuthority(
                        _AUTHORITY_ADMIN_
_                _)
                .anyRequest().permitAll()
                .and().csrf().disable();

        _// 权限不够时的处理_
_        _http.exceptionHandling()
                .authenticationEntryPoint(new AuthenticationEntryPoint() {
                    _// 没有登录_
_                    _@Override
                    public void commence(HttpServletRequest request, HttpServletResponse response, AuthenticationException e) throws IOException, ServletException {
                        String xRequestedWith = request.getHeader("x-requested-with");
                        _// 通过获取得到的 xRequestedWith 判断是同步请求还是异步请求_
_                        _if ("XMLHttpRequest".equals(xRequestedWith)) {
                            _// 如果是异步请求_
_                            _response.setContentType("application/plain;charset=utf-8");
                            PrintWriter writer = response.getWriter();
                            writer.write(CommunityUtil._getJSONString_(403, "你还没有登录哦!"));
                        } else {
                            response.sendRedirect(request.getContextPath() + "/login");
                        }
                    }
                })
                .accessDeniedHandler(new AccessDeniedHandler() {
                    _// 权限不足_
_                    _@Override
                    public void handle(HttpServletRequest request, HttpServletResponse response, AccessDeniedException e) throws IOException, ServletException {
                        String xRequestedWith = request.getHeader("x-requested-with");
                        if ("XMLHttpRequest".equals(xRequestedWith)) {
                            response.setContentType("application/plain;charset=utf-8");
                            PrintWriter writer = response.getWriter();
                            writer.write(CommunityUtil._getJSONString_(403, "你没有访问此功能的权限!"));
                        } else {
                            response.sendRedirect(request.getContextPath() + "/denied");
                        }
                    }
                });

        _// Security底层默认会拦截/logout请求,进行退出处理._
_        // 覆盖它默认的逻辑,才能执行我们自己的退出代码._
_        _http.logout().logoutUrl("/securitylogout");
    }

}
因为当前是只使用 SpringSecurity 的授权操作,在 SecurityConfig.java 中并没有实现
@Override
protected void configure(AuthenticationManagerBuilder auth) throws Exception{
    _// 自定义认证规则_
_// AuthenticationProvider: ProviderManager持有一组AuthenticationProvider,每个AuthenticationProvider负责一种认证._
_// 委托模式: ProviderManager将认证委托给AuthenticationProvider._
auth.authenticationProvider(new AuthenticationProvider() {
    _// Authentication: 用于封装认证信息的接口,不同的实现类代表不同类型的认证信息._
_    _@Override
    public Authentication authenticate(Authentication authentication) throws AuthenticationException {
        String username = authentication.getName();
        String password = (String) authentication.getCredentials();

        User user = userService.findUserByName(username);
        if (user == null) {
            throw new UsernameNotFoundException("账号不存在!");
        }

        password = CommunityUtil._md5_(password + user.getSalt());
        if (!user.getPassword().equals(password)) {
            throw new BadCredentialsException("密码不正确!");
        }

        _// principal: 主要信息; 通常存user_
_        // credentials: 证书; 通常是密码_
_        // authorities: 权限;_
_        _return new UsernamePasswordAuthenticationToken(user, user.getPassword(), user.getAuthorities());
    }

    _// 当前的AuthenticationProvider支持哪种类型的认证._
_    _@Override
    public boolean supports(Class<?> aClass) {
        _// UsernamePasswordAuthenticationToken: Authentication接口的常用的实现类._
_        _return UsernamePasswordAuthenticationToken.class.equals(aClass);
    }
});

}
认证方法,因此我们绕过 SpringSecurity 的认证操作,使用我们自己的认证方式
但是因为我们使用了 SpringSecurity,仍然需要将认证结果存入到 UsernamePasswordAuthenticationToken 中,因此需要修改 UserService.java
_// 获取用户所具备的权限_
public Collection<? extends GrantedAuthority> getAuthorities(int userId) {
    User user = this.findUserById(userId);

    List<GrantedAuthority> list = new ArrayList<>();
    list.add(new GrantedAuthority() {

        @Override
        public String getAuthority() {
            switch (user.getType()) {
                case 1:
                    return _AUTHORITY_ADMIN_;
                case 2:
                    return _AUTHORITY_MODERATOR_;
                default:
                    return _AUTHORITY_USER_;
            }
        }
    });
    return list;
}
但是什么时候需要获取用户的权限,并将这个结论(token)存入到 context 中?
之前是通过前端 cookie 携带的 ticket 判断用户是否登陆
即登陆成功之后会产生一个 ticket,客户端将这个 ticket 存入到 cookie 中,每次访问服务器都会携带这个 ticket
因此当验证用户登陆有效后,查询用户所具备的权限,并将这个结论存入到 context 中,因此需要修改登陆验证的拦截器 controller/interceptor/LoginTicketInterceptor.java
@Override
public boolean preHandle(HttpServletRequest request, HttpServletResponse response, Object handler) throws Exception {
    _// 从cookie中获取凭证_
_    _String ticket = CookieUtil._getValue_(request, "ticket");

    if (ticket != null) {
        _// 查询凭证_
_        _LoginTicket loginTicket = userService.findLoginTicket(ticket);
        _// 检查凭证是否有效_
_        _if (loginTicket != null && loginTicket.getStatus() == 0 && loginTicket.getExpired().after(new Date())) {
            _// 根据凭证查询用户_
_            _User user = userService.findUserById(loginTicket.getUserId());
            _// 在本次请求中持有用户_
_            _hostHolder.setUser(user);

            _// 构建用户认证的结果,并存入SecurityContext,以便于Security进行授权._
_            _Authentication authentication = new UsernamePasswordAuthenticationToken(
                    user, user.getPassword(), userService.getAuthorities(user.getId()));
            SecurityContextHolder._setContext_(new SecurityContextImpl(authentication));
        }
    }

    return true;
}

@Override
public void afterCompletion(HttpServletRequest request, HttpServletResponse response, Object handler, Exception ex) throws Exception {
    hostHolder.clear();
    SecurityContextHolder._clearContext_();
}
防止 CSRF 攻击
CSRF 攻击:恶意请求模拟表单提交数据
Spring Security 默认会防止 CSRF 攻击,原理是服务器返回 html 的时候对于 form 表单会添加一个 随机的 token ,当浏览器提交的表单中没有该 token,则认为是恶意的提交(但是此种情况只适用于同步请求)
对于异步请求,比如 发帖, 需要强制要求生成 token,因此修改 index.html
通过使用 meta 标签,要求服务器把预防 csrf 的凭证(token)生成到 header 中
<head>
    <meta charset="utf-8">
    <meta name="viewport" content="width=device-width, initial-scale=1, shrink-to-fit=no">

    _<!--访问该页面时,在此处生成CSRF令牌.-->_
_    <!--   <meta name="_csrf" th:content="${_csrf.token}">-->_
_    <!--   <meta name="_csrf_header" th:content="${_csrf.headerName}">-->_

_    _<link rel="icon" href="https://static.nowcoder.com/images/logo_87_87.png"/>
    <link rel="stylesheet" th:href="@{/css/bootstrap.min.css}" crossorigin="anonymous">
    <link rel="stylesheet" th:href="@{/css/global.css}" />
    <title>牛客网-首页</title>
</head>
index.js
_// 点击 我要发布 按钮后, 调用该函数_
$(function(){
    $("#publishBtn").click(_publish_);
});

function _publish_() {
    $("#publishModal").modal("hide");
    _// 发送AJAX请求之前,将CSRF令牌设置到请求的消息头中._
_//    var token = $("meta[name='_csrf']").attr("content");_
_//    var header = $("meta[name='_csrf_header']").attr("content");_
_//    $(document).ajaxSend(function(e, xhr, options){_
_//        xhr.setRequestHeader(header, token);_
_//    });_


_    // 获取标题和内容_
_    _var title = $("#recipient-name").val();
    var content = $("#message-text").val();
    _// 发送异步请求(POST)_
_    _$.post(
        CONTEXT_PATH + "/discuss/add",
        {"title":title,"content":content},
        function(data) {
            data = $.parseJSON(data);
            _// 在提示框中显示返回消息_
_            _$("#hintBody").text(data.msg);
            _// 显示提示框_
_            _$("#hintModal").modal("show");
            _// 2秒后,自动隐藏提示框_
_            setTimeout_(function(){
                $("#hintModal").modal("hide");
                _// 刷新页面_
_                _if(data.code == 0) {
                    window.location.reload();
                }
            }, 2000);
        }
    );

}
不启用 CSRF
SecurityConfig.java 添加 .and().csrf().disable()
_// 授权_
http.authorizeRequests()
        .antMatchers(
                "/user/setting",
                "/user/upload",
                "/discuss/add",
                "/comment/add/**",
                "/letter/**",
                "/notice/**",
                "/like",
                "/follow",
                "/unfollow"
        )
        .hasAnyAuthority(
                _AUTHORITY_USER_,
                _AUTHORITY_ADMIN_,
                _AUTHORITY_MODERATOR_
_        _)
        .antMatchers(
                "/discuss/top",
                "/discuss/wonderful"
        )
        .hasAnyAuthority(
                _AUTHORITY_MODERATOR_
_        _)
        .antMatchers(
                "/discuss/delete",
                "/data/**"
        )
        .hasAnyAuthority(
                _AUTHORITY_ADMIN_
_        _)
        .anyRequest().permitAll()
        .and().csrf().disable();
置顶、加精、删除
理论分析
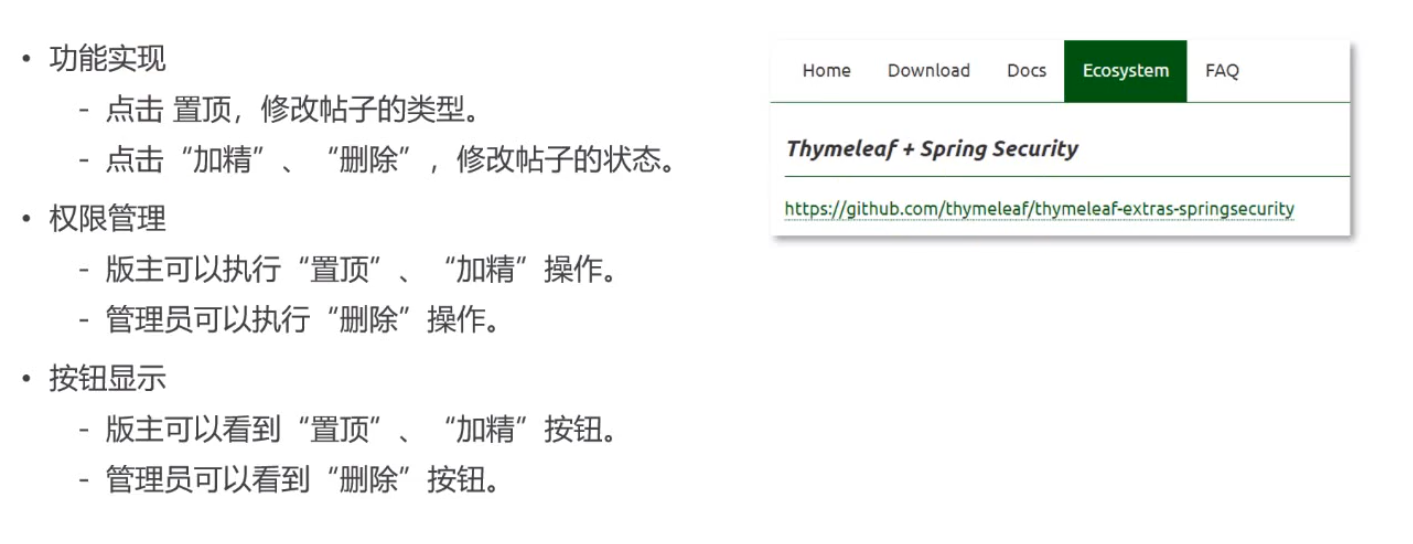
依赖导入
pom.xml
_<!--使用thymeleaf标签进行 security的操作 -->_
<dependency>
    <groupId>org.thymeleaf.extras</groupId>
    <artifactId>thymeleaf-extras-springsecurity5</artifactId>
</dependency>
持久化层
因为是对帖子进行操作,因此需要修改 DiscussPostMapper.java
_// 更改帖子类型_
int updateType(int id, int type);

_// 更改帖子状态_
int updateStatus(int id, int status);
对应配置文件 discusspost-mapper.xml
<update id="updateType">
    update discuss_post set type = #{type} where id = #{id}
</update>

<update id="updateStatus">
    update discuss_post set status = #{status} where id = #{id}
</update>
业务层
UserService.java
public int updateType(int id, int type) {
        return discussPostMapper.updateType(id, type);
    }

public int updateStatus(int id, int status) {
    return discussPostMapper.updateStatus(id, status);
}

public int updateScore(int id, double score) {
    return discussPostMapper.updateScore(id, score);
}
视图层
DiscussPostController.java
_// 置顶_
_    _@RequestMapping(path = "/top", method = RequestMethod._POST_)
    @ResponseBody
    public String setTop(int id) {
        discussPostService.updateType(id, 1);

        _// 触发发帖事件_
_        _Event event = new Event()
                .setTopic(_TOPIC_PUBLISH_)
                .setUserId(hostHolder.getUser().getId())
                .setEntityType(_ENTITY_TYPE_POST_)
                .setEntityId(id);
        eventProducer.fireEvent(event);

        return CommunityUtil._getJSONString_(0);
    }

    _// 加精_
_    _@RequestMapping(path = "/wonderful", method = RequestMethod._POST_)
    @ResponseBody
    public String setWonderful(int id) {
        discussPostService.updateStatus(id, 1);

        _// 触发发帖事件_
_        _Event event = new Event()
                .setTopic(_TOPIC_PUBLISH_)
                .setUserId(hostHolder.getUser().getId())
                .setEntityType(_ENTITY_TYPE_POST_)
                .setEntityId(id);
        eventProducer.fireEvent(event);
_        _return CommunityUtil._getJSONString_(0);
    }

    _// 删除_
_    _@RequestMapping(path = "/delete", method = RequestMethod._POST_)
    @ResponseBody
    public String setDelete(int id) {
        discussPostService.updateStatus(id, 2);

        _// 触发删帖事件_
_        _Event event = new Event()
                .setTopic(_TOPIC_DELETE_)
                .setUserId(hostHolder.getUser().getId())
                .setEntityType(_ENTITY_TYPE_POST_)
                .setEntityId(id);
        eventProducer.fireEvent(event);

        return CommunityUtil._getJSONString_(0);
    }
对于删帖事件,需要将帖子在 elasticsearch 中删除,因为需要定义新的 topic 和 消费者方法
EventConsumer.java
_// 消费删帖事件_
@KafkaListener(topics = {_TOPIC_DELETE_})
public void handleDeleteMessage(ConsumerRecord record) {
    if (record == null || record.value() == null) {
        _logger_.error("消息的内容为空!");
        return;
    }

    Event event = JSONObject._parseObject_(record.value().toString(), Event.class);
    if (event == null) {
        _logger_.error("消息格式错误!");
        return;
    }

    elasticsearchService.deleteDiscussPost(event.getEntityId());
}
前端页面
discuss-detail.html
异步提交 置顶、加精、删除的请求
<div class="float-right">
    <input type="hidden" id="postId" th:value="${post.id}">
    <button type="button" class="btn btn-danger btn-sm" id="topBtn"
          th:disabled="${post.type==1}">置顶</button>
    <button type="button" class="btn btn-danger btn-sm" id="wonderfulBtn"
          th:disabled="${post.status==1}">加精</button>
    <button type="button" class="btn btn-danger btn-sm" id="deleteBtn"
          th:disabled="${post.status==2}">删除</button>
</div>
discuss.js
$(function(){
    $("#topBtn").click(setTop);
    $("#wonderfulBtn").click(setWonderful);
    $("#deleteBtn").click(setDelete);
});

function like(btn, entityType, entityId, entityUserId, postId) {
    $.post(
        CONTEXT_PATH + "/like",
        {"entityType":entityType,"entityId":entityId,"entityUserId":entityUserId,"postId":postId},
        function(data) {
            data = $.parseJSON(data);
            if(data.code == 0) {
                $(btn).children("i").text(data.likeCount);
                $(btn).children("b").text(data.likeStatus==1?'已赞':"赞");
            } else {
                alert(data.msg);
            }
        }
    );
}

// 置顶
function setTop() {
    $.post(
        CONTEXT_PATH + "/discuss/top",
        {"id":$("#postId").val()},
        function(data) {
            data = $.parseJSON(data);
            if(data.code == 0) {
                $("#topBtn").attr("disabled", "disabled");
            } else {
                alert(data.msg);
            }
        }
    );
}

// 加精
function setWonderful() {
    $.post(
        CONTEXT_PATH + "/discuss/wonderful",
        {"id":$("#postId").val()},
        function(data) {
            data = $.parseJSON(data);
            if(data.code == 0) {
                $("#wonderfulBtn").attr("disabled", "disabled");
            } else {
                alert(data.msg);
            }
        }
    );
}

// 删除
function setDelete() {
    $.post(
        CONTEXT_PATH + "/discuss/delete",
        {"id":$("#postId").val()},
        function(data) {
            data = $.parseJSON(data);
            if(data.code == 0) {
                location.href = CONTEXT_PATH + "/index";
            } else {
                alert(data.msg);
            }
        }
    );
}
配置权限
为 置顶、加精、删除操作配置权限
SecurityConfig.java
.antMatchers(
        "/discuss/top",
        "/discuss/wonderful"
)
.hasAnyAuthority(
        _AUTHORITY_MODERATOR_
)
.antMatchers(
        "/discuss/delete",
        "/data/**"
)
.hasAnyAuthority(
        _AUTHORITY_ADMIN_
)
按钮显示
有权限的用户可以看到按钮,没有权限的看不到,需要在 discuss-detail.html 下进行下面的修改:
<!--引入 thymeleaf security配置, 从而可以使用相关标签直接判断当前登陆用户是否具有某种权限-->
<html lang="en" xmlns:th="http://www.thymeleaf.org" xmlns:sec="http://www.thymeleaf.org/extras/spring-security">

<div class="float-right">
    <input type="hidden" id="postId" th:value="${post.id}">
    <button type="button" class="btn btn-danger btn-sm" id="topBtn"
          th:disabled="${post.type==1}" sec:authorize="hasAnyAuthority('moderator')">置顶</button>
    <button type="button" class="btn btn-danger btn-sm" id="wonderfulBtn"
          th:disabled="${post.status==1}" sec:authorize="hasAnyAuthority('moderator')">加精</button>
    <button type="button" class="btn btn-danger btn-sm" id="deleteBtn"
          th:disabled="${post.status==2}" sec:authorize="hasAnyAuthority('admin')">删除</button>
</div>
按钮显示有问题
统计网站数据
9.1 Redis 高级数据类型
理论分析
测试
src/test/java/com/nowcoder/community/RedisTests.java
_// 统计20万个重复数据的独立总数 (即统计20万个数据中 不重复的数据的个数)_
@Test
public void testHyperLogLog() {
    String redisKey = "test:hll:01";

    for (int i = 1; i <= 100000; i++) {
        redisTemplate.opsForHyperLogLog().add(redisKey, i);
    }

    for (int i = 1; i <= 100000; i++) {
        int r = (int) (Math._random_() * 100000 + 1);
        redisTemplate.opsForHyperLogLog().add(redisKey, r);
    }

    long size = redisTemplate.opsForHyperLogLog().size(redisKey);
    System._out_.println(size);
}

_// 将3组数据合并, 再统计合并后的重复数据的独立总数(即统计不重复的数据的个数)_
@Test
public void testHyperLogLogUnion() {
    String redisKey2 = "test:hll:02";
    for (int i = 1; i <= 10000; i++) {
        redisTemplate.opsForHyperLogLog().add(redisKey2, i);
    }

    String redisKey3 = "test:hll:03";
    for (int i = 5001; i <= 15000; i++) {
        redisTemplate.opsForHyperLogLog().add(redisKey3, i);
    }

    String redisKey4 = "test:hll:04";
    for (int i = 10001; i <= 20000; i++) {
        redisTemplate.opsForHyperLogLog().add(redisKey4, i);
    }

    String unionKey = "test:hll:union";
    redisTemplate.opsForHyperLogLog().union(unionKey, redisKey2, redisKey3, redisKey4);

    long size = redisTemplate.opsForHyperLogLog().size(unionKey);
    System._out_.println(size);
}

_// 统计一组数据的布尔值_
@Test
public void testBitMap() {
    String redisKey = "test:bm:01";

    _// 记录_
_    _redisTemplate.opsForValue().setBit(redisKey, 1, true);
    redisTemplate.opsForValue().setBit(redisKey, 4, true);
    redisTemplate.opsForValue().setBit(redisKey, 7, true);

    _// 查询_
_    _System._out_.println(redisTemplate.opsForValue().getBit(redisKey, 0));
    System._out_.println(redisTemplate.opsForValue().getBit(redisKey, 1));
    System._out_.println(redisTemplate.opsForValue().getBit(redisKey, 2));


    _// 统计 存储的内容中为 true (或者1) 的个数_
_    _Object obj = redisTemplate.execute(new RedisCallback() {
        @Override
        public Object doInRedis(RedisConnection connection) throws DataAccessException {
            return connection.bitCount(redisKey.getBytes());
        }
    });

    System._out_.println(obj);
}

_// 统计3组数据的布尔值, 并对这3组数据做OR运算._
@Test
public void testBitMapOperation() {
    String redisKey2 = "test:bm:02";
    redisTemplate.opsForValue().setBit(redisKey2, 0, true);
    redisTemplate.opsForValue().setBit(redisKey2, 1, true);
    redisTemplate.opsForValue().setBit(redisKey2, 2, true);

    String redisKey3 = "test:bm:03";
    redisTemplate.opsForValue().setBit(redisKey3, 2, true);
    redisTemplate.opsForValue().setBit(redisKey3, 3, true);
    redisTemplate.opsForValue().setBit(redisKey3, 4, true);

    String redisKey4 = "test:bm:04";
    redisTemplate.opsForValue().setBit(redisKey4, 4, true);
    redisTemplate.opsForValue().setBit(redisKey4, 5, true);
    redisTemplate.opsForValue().setBit(redisKey4, 6, true);

    _// 运算结果是存储的 key 为 "test:bm:or" _
_    _String redisKey = "test:bm:or";

    Object obj = redisTemplate.execute(new RedisCallback() {
        @Override
        public Object doInRedis(RedisConnection connection) throws DataAccessException {
            connection.bitOp(RedisStringCommands.BitOperation._OR_,
                    redisKey.getBytes(), redisKey2.getBytes(), redisKey3.getBytes(), redisKey4.getBytes());
            return connection.bitCount(redisKey.getBytes());
        }
    });

    System._out_.println(obj);

    System._out_.println(redisTemplate.opsForValue().getBit(redisKey, 0));
    System._out_.println(redisTemplate.opsForValue().getBit(redisKey, 1));
    System._out_.println(redisTemplate.opsForValue().getBit(redisKey, 2));
    System._out_.println(redisTemplate.opsForValue().getBit(redisKey, 3));
    System._out_.println(redisTemplate.opsForValue().getBit(redisKey, 4));
    System._out_.println(redisTemplate.opsForValue().getBit(redisKey, 5));
    System._out_.println(redisTemplate.opsForValue().getBit(redisKey, 6));
}
9.2 网站数据统计
理论分析
Redis 工具类
RedisKeyUtil.java
_// 网站数据统计_
_// uv: 独立访客_
private static final String _PREFIX_UV _= "uv";
_// dau: 活跃用户_
private static final String _PREFIX_DAU _= "dau";

_// 单日活跃用户_
public static String getDAUKey(String date) {
    return _PREFIX_DAU _+ _SPLIT _+ date;
}

_// 区间活跃用户_
public static String getDAUKey(String startDate, String endDate) {
    return _PREFIX_DAU _+ _SPLIT _+ startDate + _SPLIT _+ endDate;
}
业务层
DataService.java
@Service
public class DataService {

    @Autowired
    private RedisTemplate redisTemplate;

    _// 定义数据转换 Date 转 String_
_    _private SimpleDateFormat df = new SimpleDateFormat("yyyyMMdd");

    _// 将指定的IP计入UV_
_    _public void recordUV(String ip) {
        String redisKey = RedisKeyUtil._getUVKey_(df.format(new Date()));
        redisTemplate.opsForHyperLogLog().add(redisKey, ip);
    }

    _// 统计指定日期范围内的UV_
_    _public long calculateUV(Date start, Date end) {
        if (start == null || end == null) {
            throw new IllegalArgumentException("参数不能为空!");
        }

        _// 整理该日期范围内的key 都加入到keyist中_
_        _List<String> keyList = new ArrayList<>();
        Calendar calendar = Calendar._getInstance_();
        calendar.setTime(start);
        while (!calendar.getTime().after(end)) {
            String key = RedisKeyUtil._getUVKey_(df.format(calendar.getTime()));
            keyList.add(key);
            calendar.add(Calendar._DATE_, 1);
        }

        _// 合并这些数据_
_        _String redisKey = RedisKeyUtil._getUVKey_(df.format(start), df.format(end));
        redisTemplate.opsForHyperLogLog().union(redisKey, keyList.toArray());

        _// 返回统计的结果_
_        _return redisTemplate.opsForHyperLogLog().size(redisKey);
    }

    _// 将指定用户计入DAU_
_    _public void recordDAU(int userId) {
        String redisKey = RedisKeyUtil._getDAUKey_(df.format(new Date()));
        redisTemplate.opsForValue().setBit(redisKey, userId, true);
    }

    _// 统计指定日期范围内的DAU_
_    _public long calculateDAU(Date start, Date end) {
        if (start == null || end == null) {
            throw new IllegalArgumentException("参数不能为空!");
        }

        _// 整理该日期范围内的key 因为进行运算的时候需要传入 redisKey.getBytes(), 因此直接以 byte[] 加入keyList_
_        _List<byte[]> keyList = new ArrayList<>();
        Calendar calendar = Calendar._getInstance_();
        calendar.setTime(start);
        while (!calendar.getTime().after(end)) {
            String key = RedisKeyUtil._getDAUKey_(df.format(calendar.getTime()));
            keyList.add(key.getBytes());
            calendar.add(Calendar._DATE_, 1);
        }

        _// 进行OR运算_
_        _return (long) redisTemplate.execute(new RedisCallback() {
            @Override
            public Object doInRedis(RedisConnection connection) throws DataAccessException {
                String redisKey = RedisKeyUtil._getDAUKey_(df.format(start), df.format(end));
                connection.bitOp(RedisStringCommands.BitOperation._OR_,
                        redisKey.getBytes(), keyList.toArray(new byte[0][0]));
                return connection.bitCount(redisKey.getBytes());
            }
        });
    }

}
拦截器
DataInterceptor.java
每当有用户访问该网站, 则使用拦截器拦截请求进行统计
@Component
public class DataInterceptor implements HandlerInterceptor {

    @Autowired
    private DataService dataService;

    @Autowired
    private HostHolder hostHolder;

    @Override
    public boolean preHandle(HttpServletRequest request, HttpServletResponse response, Object handler) throws Exception {
        _// 统计UV_
_        _String ip = request.getRemoteHost();
        dataService.recordUV(ip);

        _// 统计DAU_
_        _User user = hostHolder.getUser();
        if (user != null) {
            dataService.recordDAU(user.getId());
        }

        return true;
    }
}
在 WebMvcConfig.java 中注册拦截器
registry.addInterceptor(dataInterceptor)
        .excludePathPatterns("/**/*.css", "/**/*.js", "/**/*.png", "/**/*.jpg", "/**/*.jpeg");
视图层
DataController.java
@Controller
public class DataController {

    @Autowired
    private DataService dataService;

    _// 统计页面_
_    _@RequestMapping(path = "/data", method = {RequestMethod._GET_, RequestMethod._POST_})
    public String getDataPage() {
        return "/site/admin/data";
    }

    _// 统计网站UV_
_    _@RequestMapping(path = "/data/uv", method = RequestMethod._POST_)
    public String getUV(@DateTimeFormat(pattern = "yyyy-MM-dd") Date start,
                        @DateTimeFormat(pattern = "yyyy-MM-dd") Date end, Model model) {
        long uv = dataService.calculateUV(start, end);
        model.addAttribute("uvResult", uv);
        model.addAttribute("uvStartDate", start);
        model.addAttribute("uvEndDate", end);
        _// 重定向到 /data 请求, 即该方法中进行了一部分逻辑处理, 在 /data 请求对应的方法进行下一部分逻辑处理_
_        _return "forward:/data";
    }

    _// 统计活跃用户_
_    _@RequestMapping(path = "/data/dau", method = RequestMethod._POST_)
    public String getDAU(@DateTimeFormat(pattern = "yyyy-MM-dd") Date start,
                         @DateTimeFormat(pattern = "yyyy-MM-dd") Date end, Model model) {
        long dau = dataService.calculateDAU(start, end);
        model.addAttribute("dauResult", dau);
        model.addAttribute("dauStartDate", start);
        model.addAttribute("dauEndDate", end);
        return "forward:/data";
    }

}
前端页面
admin/data.html
<!doctype html>
<html lang="en" xmlns:th="http://www.thymeleaf.org">
<head>
    <meta charset="utf-8">
    <meta name="viewport" content="width=device-width, initial-scale=1, shrink-to-fit=no">
    <link rel="icon" href="https://static.nowcoder.com/images/logo_87_87.png"/>
    <link rel="stylesheet" href="https://stackpath.bootstrapcdn.com/bootstrap/4.3.1/css/bootstrap.min.css" crossorigin="anonymous">
    <link rel="stylesheet" th:href="@{/css/global.css}" />
    <title>牛客网-数据统计</title>
</head>
<body>
<div class="nk-container">
    _<!-- 头部 -->_
_    _<header class="bg-dark sticky-top" th:replace="index::header">
    </header>

    _<!-- 内容 -->_
_    _<div class="main">
       _<!-- 网站UV -->_
_       _<div class="container pl-5 pr-5 pt-3 pb-3 mt-3">
          <h6 class="mt-3"><b class="square"></b> 网站 UV</h6>
          <form class="form-inline mt-3" method="post" th:action="@{/data/uv}">
             <input type="date" class="form-control" required name="start" th:value="${#dates.format(uvStartDate,'yyyy-MM-dd')}"/>
             <input type="date" class="form-control ml-3" required name="end" th:value="${#dates.format(uvEndDate,'yyyy-MM-dd')}"/>
             <button type="submit" class="btn btn-primary ml-3">开始统计</button>
          </form>
          <ul class="list-group mt-3 mb-3">
             <li class="list-group-item d-flex justify-content-between align-items-center">
                统计结果
                <span class="badge badge-primary badge-danger font-size-14" th:text="${uvResult}">0</span>
             </li>
          </ul>
       </div>
       _<!-- 活跃用户 -->_
_       _<div class="container pl-5 pr-5 pt-3 pb-3 mt-4">
          <h6 class="mt-3"><b class="square"></b> 活跃用户</h6>
          <form class="form-inline mt-3" method="post" th:action="@{/data/dau}">
             <input type="date" class="form-control" required name="start" th:value="${#dates.format(dauStartDate,'yyyy-MM-dd')}"/>
             <input type="date" class="form-control ml-3" required name="end" th:value="${#dates.format(dauEndDate,'yyyy-MM-dd')}"/>
             <button type="submit" class="btn btn-primary ml-3">开始统计</button>
          </form>
          <ul class="list-group mt-3 mb-3">
             <li class="list-group-item d-flex justify-content-between align-items-center">
                统计结果
                <span class="badge badge-primary badge-danger font-size-14" th:text="${dauResult}">0</span>
             </li>
          </ul>
       </div>
    </div>

    _<!-- 尾部 -->_
_    _<footer class="bg-dark" th:replace="index::footer">
    </footer>
</div>

<script src="https://code.jquery.com/jquery-3.3.1.min.js" crossorigin="anonymous"></script>
<script src="https://cdnjs.cloudflare.com/ajax/libs/popper.js/1.14.7/umd/popper.min.js" crossorigin="anonymous"></script>
<script src="https://stackpath.bootstrapcdn.com/bootstrap/4.3.1/js/bootstrap.min.js" crossorigin="anonymous"></script>
<script th:src="@{/js/global.js}"></script>
</body>
</html>
权限配置
SecurityConfig.java
.antMatchers(
        "/discuss/delete",
        "/data/**"
)
.hasAnyAuthority(
        _AUTHORITY_ADMIN_
)
定时任务与热度分数
10.1 任务执行和调度
理论分析
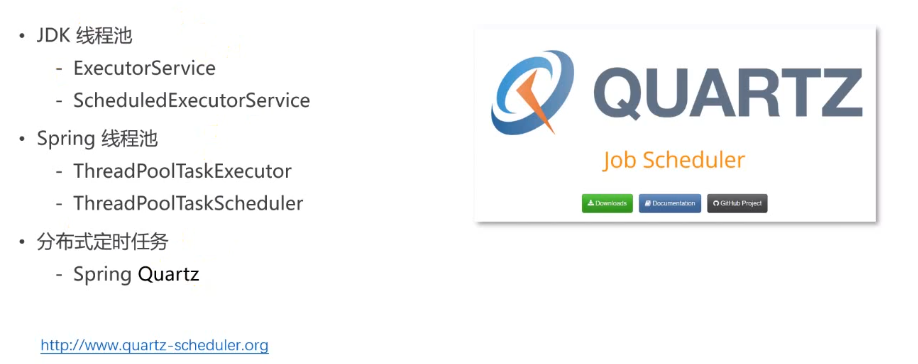
JDK 和 Spring 的定时任务组件是基于内存的,无法处理分布式部署的问题(不同服务器之间的内存不共享,因此执行定时任务可能出现冲突的问题)
Quartz:是基于数据库的,程序运行依赖的参数都是存在数据库中,因此无论有多少服务器,都是访问同一个数据库。
先了解 JDK 和 Spring 线程池
JDK 线程池
ThreadPoolTests.java
public class ThreadPoolTests {

    _// 使用 Logger 进行输出_
_    // 因为 Logger输出的时候会带上线程的id和时间, 信息相对println更完整_
_    _private static final Logger _logger _= LoggerFactory._getLogger_(ThreadPoolTests.class);

    _// JDK普通线程池_
_    _private ExecutorService executorService = Executors._newFixedThreadPool_(5);

    _// JDK可执行定时任务的线程池_
_    _private ScheduledExecutorService scheduledExecutorService = Executors._newScheduledThreadPool_(5);

    _// 因为 junit 的 test方法, 如果启动线程, 不会考虑线程内部的逻辑, 会直接结束_
    _// 为了能够观察线程内部的执行, 需要将 主线程 sleep_
    private void sleep(long m) {
        try {
            Thread._sleep_(m);
        } catch (InterruptedException e) {
            e.printStackTrace();
        }
    }

    _// 1.JDK普通线程池_
    @Test
    public void testExecutorService() {
        Runnable task = new Runnable() {
            @Override
            public void run() {
                _logger_.debug("Hello ExecutorService");
            }
        };

        for (int i = 0; i < 10; i++) {
            executorService.submit(task);
        }

        sleep(10000);
    }

    _// 2.JDK定时任务线程池_
    @Test
    public void testScheduledExecutorService() {
        Runnable task = new Runnable() {
            @Override
            public void run() {
                _logger_.debug("Hello ScheduledExecutorService");
            }
        };

        scheduledExecutorService.scheduleAtFixedRate(task, 10000, 1000, TimeUnit.MILLISECONDS);

        sleep(30000);
    }
Spring 线程池
首先在 application.properties 中进行配置:
_# TaskExecutionProperties Spring 普通线程池_
_# 核心线程的数量_
spring.task.execution.pool.core-size=5
_# 最大线程的数量,即如果5个线程不够用,会自动进行扩容_
spring.task.execution.pool.max-size=15
_# 队列的容量,如果15个线程还是不够用,会将新的任务放入队列中,当有空闲的线程再对任务进行处理_
spring.task.execution.pool.queue-capacity=100

_# TaskSchedulingProperties Spring 可执行定时任务的线程池_
_# 线程池的数量_
spring.task.scheduling.pool.size=5
其次创建配置类 ThreadPoolConfig.java
@Configuration
@EnableScheduling
@EnableAsync
public class ThreadPoolConfig {
}
配置需要在线程中异步执行的任务和 定时任务 AlphaService.java
_// 让该方法在多线程环境下,被异步的调用._
@Async
public void execute1() {
    _logger_.debug("execute1");
}

_// 定时任务 程序启动后会被调用_
_// initialDelay: 从程序启动到执行该任务延迟的时间_
_// fixedRate: 多长时间执行一次_
@Scheduled(initialDelay = 10000, fixedRate = 1000)
public void execute2() {
    _logger_.debug("execute2");
}
ThreadPoolTests.java 测试:
_// Spring普通线程池_
@Autowired
private ThreadPoolTaskExecutor taskExecutor;

_// Spring可执行定时任务的线程池_
@Autowired
private ThreadPoolTaskScheduler taskScheduler;

@Autowired
private AlphaService alphaService;

_// 3.Spring普通线程池_
@Test
public void testThreadPoolTaskExecutor() {
    Runnable task = new Runnable() {
        @Override
        public void run() {
            _logger_.debug("Hello ThreadPoolTaskExecutor");
        }
    };

    for (int i = 0; i < 10; i++) {
        taskExecutor.submit(task);
    }

    sleep(10000);
}

_// 4.Spring定时任务线程池_
@Test
public void testThreadPoolTaskScheduler() {
    Runnable task = new Runnable() {
        @Override
        public void run() {
            _logger_.debug("Hello ThreadPoolTaskScheduler");
        }
    };

    Date startTime = new Date(System._currentTimeMillis_() + 10000);
    taskScheduler.scheduleAtFixedRate(task, startTime, 1000);

    sleep(30000);
}

_// 5.Spring普通线程池(简化)_
@Test
public void testThreadPoolTaskExecutorSimple() {
    for (int i = 0; i < 10; i++) {
        // 异步调用相关任务
        alphaService.execute1();
    }

    sleep(10000);
}

_// 6.Spring定时任务线程池(简化)_
@Test
public void testThreadPoolTaskSchedulerSimple() {
    sleep(30000);
}
Quartz
首先配置 quartz 依赖的数据库表
其次引入相关包
pom.xml
<dependency>
    <groupId>org.springframework.boot</groupId>
    <artifactId>spring-boot-starter-quartz</artifactId>
</dependency>
相关概念
public interface Scheduler {} : Quartz 的核心调度工具,所有由 quartz 调度的任务,都是通过这个接口去调用;
public interface Job { void execute(JobExecutionContext context); }: 通过 Job 接口定义任务, 在 execute 方法中写明 要做的事情,要执行的任务(即通过 job 声明要做什么)
public interface JobDetail extends Serializable, Cloneable{}: Job 详情,用来配置 Job
public interface Trigger extends Serializable, Cloneable, Comparable<Trigger> {}: 触发器,用来配置 Job 什么时候运行,以什么频率反复运行
Quartz 编程的三个方面:
- 通过
Job接口定义任务 - 通过
JobDetail接口配置Job - 通过
Trigger接口配置Job
配置完以后,当程序启动的时候,Quartz 会自动读取配置信息,并把读取到的配置信息存储到数据库中,以后读取数据库中的表执行任务,即只要在数据库中初始化数据后,上面的配置其实不会再使用了
测试
第一步,通过 Job 接口定义任务
quartz/AlphaJob.java
public class AlphaJob implements Job {
    @Override
    public void execute(JobExecutionContext context) throws JobExecutionException {
        System.out.println(Thread.currentThread().getName() + ": execute a quartz job.");
    }
}
第二步,Quartz 配置类 config/QuartzConfig:
// 配置 -> 数据库 -> 调用
@Configuration
public class QuartzConfig {

    // FactoryBean可简化Bean的实例化过程:
    // 1.通过FactoryBean封装Bean的实例化过程.
    // 2.将FactoryBean装配到Spring容器里.
    // 3.将FactoryBean注入给其他的Bean.
    // 4.该Bean得到的是FactoryBean所管理的对象实例.

    // 配置JobDetail
    // @Bean
    public JobDetailFactoryBean alphaJobDetail() {
        JobDetailFactoryBean factoryBean = new JobDetailFactoryBean();
        factoryBean.setJobClass(AlphaJob.class);
        factoryBean.setName("alphaJob");
        factoryBean.setGroup("alphaJobGroup");
        // 任务是否长久有效
        factoryBean.setDurability(true);
        // 任务是否可恢复
        factoryBean.setRequestsRecovery(true);
        return factoryBean;
    }

    // 配置Trigger(SimpleTriggerFactoryBean, CronTriggerFactoryBean)
    // @Bean
    public SimpleTriggerFactoryBean alphaTrigger(JobDetail alphaJobDetail) {
        SimpleTriggerFactoryBean factoryBean = new SimpleTriggerFactoryBean();
        factoryBean.setJobDetail(alphaJobDetail);
        factoryBean.setName("alphaTrigger");
        factoryBean.setGroup("alphaTriggerGroup");
        // 多长时间执行一次任务
        factoryBean.setRepeatInterval(3000);
        // 存储Job的状态
        factoryBean.setJobDataMap(new JobDataMap());
        return factoryBean;
    }
}
修改 Quartz 底层依赖的线程池
application.properties
# QuartzProperties
spring.quartz.job-store-type=jdbc
spring.quartz.scheduler-name=communityScheduler
spring.quartz.properties.org.quartz.scheduler.instanceId=AUTO
spring.quartz.properties.org.quartz.jobStore.class=org.quartz.impl.jdbcjobstore.JobStoreTX
spring.quartz.properties.org.quartz.jobStore.driverDelegateClass=org.quartz.impl.jdbcjobstore.StdJDBCDelegate
spring.quartz.properties.org.quartz.jobStore.isClustered=true
spring.quartz.properties.org.quartz.threadPool.class=org.quartz.simpl.SimpleThreadPool
spring.quartz.properties.org.quartz.threadPool.threadCount=5
取消运行上面配置的定时任务
因为数据库中已经初始化了数据,因此如果取消运行,需要删除初始化的数据,下面使用代码实现:
QuartzTests.java
@RunWith(SpringRunner.class)
@SpringBootTest
@ContextConfiguration(classes = CommunityApplication.class)
public class QuartzTests {

    @Autowired
    private Scheduler scheduler;

    // 删除数据库中初始化的数据, 从而使得之前配置的Quartz定时任务的程序运行的时候不再执行
    @Test
    public void testQuartee() throws SchedulerException {
        // name: job的名词
        // group: job的组
        boolean b = scheduler.deleteJob(new JobKey("alphaJob", "alphaJobGroup"));
        System.out.println(b);
    }
}
10.2 实现热贴排行
帖子热度分数
设置一个定时任务,定时计算帖子的分数
但是每次计算所有帖子的分数会影响性能,因此将 加精、评论等事件导致分数变化的帖子 id 放入 Redis 缓存中,
然后执行定时任务的时候从 Redis 缓存中获取帖子 id,计算帖子对应的热度分数
Redis 工具类
RedisKeyUtil.java
_// 帖子分数 其实更多是记录产生变化的帖子, value 为产生变化的帖子的id_
public static String getPostScoreKey() {
    return _PREFIX_POST _+ _SPLIT _+ "score";
}
使热度分数改变的事件
DiscussPostController.java
添加帖子需要为帖子初始化一个热度分数,加精帖子需要修改帖子的热度分数
@RequestMapping(path = "/add", method = RequestMethod._POST_)
@ResponseBody
public String addDiscussPost(String title, String content) {
    User user = hostHolder.getUser();
    if (user == null) {
        return CommunityUtil._getJSONString_(403, "你还没有登录哦!");
    }

    DiscussPost post = new DiscussPost();
    post.setUserId(user.getId());
    post.setTitle(title);
    post.setContent(content);
    post.setCreateTime(new Date());
    discussPostService.addDiscussPost(post);

    _// 触发发布帖子事件_
_    _Event event = new Event()
            .setTopic(_TOPIC_PUBLISH_)
            .setUserId(user.getId())
            .setEntityType(_ENTITY_TYPE_POST_)
            .setEntityId(post.getId());
    eventProducer.fireEvent(event);

    _// 发布帖子后需要为帖子初始化一个热度分数,也可以理解为这个帖子的热度分数需要改变, 因此将这个帖子的id存储 Redis 缓存中, 然后定时任务统一进行热度分数的修改_
_    _String redisKey = RedisKeyUtil._getPostScoreKey_();
    redisTemplate.opsForSet().add(redisKey, post.getId());

    _// 报错的情况,将来统一处理._
_    _return CommunityUtil._getJSONString_(0, "发布成功!");
}

_// 加精_
@RequestMapping(path = "/wonderful", method = RequestMethod._POST_)
@ResponseBody
public String setWonderful(int id) {
    discussPostService.updateStatus(id, 1);

    _// 触发发帖事件_
_    _Event event = new Event()
            .setTopic(_TOPIC_PUBLISH_)
            .setUserId(hostHolder.getUser().getId())
            .setEntityType(_ENTITY_TYPE_POST_)
            .setEntityId(id);
    eventProducer.fireEvent(event);

    _// 加精后 这个帖子的热度分数需要改变, 因此将这个帖子的id存储 Redis 缓存中, 然后定时任务统一进行热度分数的修改_
_    _String redisKey = RedisKeyUtil._getPostScoreKey_();
    redisTemplate.opsForSet().add(redisKey, id);


    return CommunityUtil._getJSONString_(0);
}
CommentController.java
评论帖子 需要修改帖子的热度分数
@RequestMapping(path = "/add/{discussPostId}", method = RequestMethod._POST_)
public String addComment(@PathVariable("discussPostId") int discussPostId, Comment comment) {
    comment.setUserId(hostHolder.getUser().getId());
    comment.setStatus(0);
    comment.setCreateTime(new Date());
    commentService.addComment(comment);
    _// 添加评论, 触发评论事件, 由系统通知该实体的作者_

_    // 触发评论事件_
_    _Event event = new Event()
            .setTopic(_TOPIC_COMMENT_)
            .setUserId(hostHolder.getUser().getId())
            .setEntityType(comment.getEntityType())  _// 得到实体类型 因为可能是给帖子评论, 也可能是给 评论评论_
_            _.setEntityId(comment.getEntityId())
            .setData("postId", discussPostId); _// 得到帖子详情页的帖子id_
_    // 如果是给帖子评论_
_    _if (comment.getEntityType() == _ENTITY_TYPE_POST_) {
        _// 根据帖子的id获取该帖子的作者_
_        _DiscussPost target = discussPostService.findDiscussPostById(comment.getEntityId());
        event.setEntityUserId(target.getUserId());
    } else if (comment.getEntityType() == _ENTITY_TYPE_COMMENT_) {
        _// 如果是给评论 添加评论_
_        // 根据评论的id获取该评论的作者_
_        _Comment target = commentService.findCommentById(comment.getEntityId());
        event.setEntityUserId(target.getUserId());
    }
    _// 生产者处理事件, 将对应内容添加到 topic 中_
_    _eventProducer.fireEvent(event);
    _// 生产者会自动监听topic_


_    // 增加帖子的评论 将帖子的修改异步同步到Elasticsearch服务器中_
_    _if (comment.getEntityType() == _ENTITY_TYPE_POST_) {
        _// 触发发帖事件_
_        _event = new Event()
                .setTopic(_TOPIC_PUBLISH_)
                .setUserId(comment.getUserId())
                .setEntityType(_ENTITY_TYPE_POST_)
                .setEntityId(discussPostId);
        eventProducer.fireEvent(event);

    }

    _// 添加评论 这个帖子的热度分数需要改变, 因此将这个帖子的id存储 Redis 缓存中, 然后定时任务统一进行热度分数的修改_
_    _String redisKey = RedisKeyUtil._getPostScoreKey_();
    redisTemplate.opsForSet().add(redisKey, discussPostId);


    return "redirect:/discuss/detail/" + discussPostId;
}
LikeController.java
点赞和取消点赞 需要修改帖子的热度分数
@RequestMapping(path = "/like", method = RequestMethod._POST_)
@ResponseBody
public String like(int entityType, int entityId, int entityUserId, int postId) {
    User user = hostHolder.getUser();
    _// 点赞_
_    _likeService.like(user.getId(), entityType, entityId, entityUserId);

    _// 获取实体的点赞数量_
_    _long likeCount = likeService.findEntityLikeCount(entityType, entityId);
    _// 获取当前用户对实体点赞的 状态_
_    _int likeStatus = likeService.findEntityLikeStatus(user.getId(), entityType, entityId);
    _// 返回的结果_
_    _Map<String, Object> map = new HashMap<>();
    map.put("likeCount", likeCount);
    map.put("likeStatus", likeStatus);

    _// 点赞触发事件_
_    // 判断是否是点赞行为, 如果是点赞行为, 则触发点赞事件 (如果是取消点赞的行为, 则不触发点赞事件)_
_    _if (likeStatus == 1) {
        Event event = new Event()
                .setTopic(_TOPIC_LIKE_)
                .setUserId(hostHolder.getUser().getId())
                .setEntityType(entityType)
                .setEntityId(entityId)
                .setEntityUserId(entityUserId)
                .setData("postId", postId); _// 帖子id_
_        _eventProducer.fireEvent(event);
    }

    _// 判断是否是对帖子点赞_
_    _if (entityType == _ENTITY_TYPE_POST_){
        _// 给帖子点赞 这个帖子的热度分数需要改变, 因此将这个帖子的id存储 Redis 缓存中, 然后定时任务统一进行热度分数的修改_
_        _String redisKey = RedisKeyUtil._getPostScoreKey_();
        redisTemplate.opsForSet().add(redisKey, postId);
    }

    return CommunityUtil._getJSONString_(0, null, map);
}
定时任务统一更新热度分数
quartz/PostScoreRefreshJob.java
定义定时任务
ublic class PostScoreRefreshJob implements Job, CommunityConstant {

    private static final Logger _logger _= LoggerFactory._getLogger_(PostScoreRefreshJob.class);

    @Autowired
    private RedisTemplate redisTemplate;

    @Autowired
    private DiscussPostService discussPostService;

    @Autowired
    private LikeService likeService;

    _// 需要将更新后的 热度分数加入到 elasticsearch 中_
_    _@Autowired
    private ElasticsearchService elasticsearchService;

    _// 牛客纪元_
_    _private static final Date _epoch_;

    static {
        try {
            _// 字符串转为日期_
_            epoch _= new SimpleDateFormat("yyyy-MM-dd HH:mm:ss").parse("2014-08-01 00:00:00");
        } catch (ParseException e) {
            throw new RuntimeException("初始化牛客纪元失败!", e);
        }
    }

    _// 定义定时任务_
_    _@Override
    public void execute(JobExecutionContext context) throws JobExecutionException {
        String redisKey = RedisKeyUtil._getPostScoreKey_();
        BoundSetOperations operations = redisTemplate.boundSetOps(redisKey);
        _// 判断是否有值_
_        _if (operations.size() == 0) {
            _logger_.info("[任务取消] 没有需要刷新的帖子!");
            return;
        }

        _logger_.info("[任务开始] 正在刷新帖子分数: " + operations.size());
        while (operations.size() > 0) {
            this.refresh((Integer) operations.pop());
        }
        _logger_.info("[任务结束] 帖子分数刷新完毕!");
    }

    private void refresh(int postId) {
        DiscussPost post = discussPostService.findDiscussPostById(postId);

        if (post == null) {
            _logger_.error("该帖子不存在: id = " + postId);
            return;
        }

        _// 是否精华_
_        _boolean wonderful = post.getStatus() == 1;
        _// 评论数量_
_        _int commentCount = post.getCommentCount();
        _// 点赞数量_
_        _long likeCount = likeService.findEntityLikeCount(_ENTITY_TYPE_POST_, postId);

        _// 计算权重_
_        _double w = (wonderful ? 75 : 0) + commentCount * 10 + likeCount * 2;
        _// 分数 = 帖子权重 + 距离天数_
_        _double score = Math._log10_(Math._max_(w, 1))
                + (post.getCreateTime().getTime() - _epoch_.getTime()) / (1000 * 3600 * 24);
        _// 更新帖子分数_
_        _discussPostService.updateScore(postId, score);
        _// 同步搜索数据_
_        _post.setScore(score);
        elasticsearchService.saveDiscussPost(post);
    }

}
config/QuartzConfig.java 进行 Job 配置:
_// 配置 -> 数据库 -> 调用_
@Configuration
public class QuartzConfig {

    _// FactoryBean可简化Bean的实例化过程:_
_    // 1.通过FactoryBean封装Bean的实例化过程._
_    // 2.将FactoryBean装配到Spring容器里._
_    // 3.将FactoryBean注入给其他的Bean._
_    // 4.该Bean得到的是FactoryBean所管理的对象实例._

_   _
_//     刷新帖子分数任务_
_    _@Bean
    public JobDetailFactoryBean postScoreRefreshJobDetail() {
        JobDetailFactoryBean factoryBean = new JobDetailFactoryBean();
        factoryBean.setJobClass(PostScoreRefreshJob.class);
        factoryBean.setName("postScoreRefreshJob");
        factoryBean.setGroup("communityJobGroup");
        factoryBean.setDurability(true);
        factoryBean.setRequestsRecovery(true);
        return factoryBean;
    }

    @Bean
    public SimpleTriggerFactoryBean postScoreRefreshTrigger(JobDetail postScoreRefreshJobDetail) {
        SimpleTriggerFactoryBean factoryBean = new SimpleTriggerFactoryBean();
        factoryBean.setJobDetail(postScoreRefreshJobDetail);
        factoryBean.setName("postScoreRefreshTrigger");
        factoryBean.setGroup("communityTriggerGroup");
        factoryBean.setRepeatInterval(1000 * 60 * 5);
        factoryBean.setJobDataMap(new JobDataMap());
        return factoryBean;
    }

}
按热度分数显示
持久化层:DiscussPostMapper
// orderMode 表示排序方式
// 0 按照默认方式排序
// 1 按照热度分数排序
List<DiscussPost> selectDiscussPosts(int userId, int offset, int limit, int orderMode);
对应配置 discusspost-mapper.xml
<select id="selectDiscussPosts" resultType="DiscussPost">
    select <include refid="selectFields"></include>
    from discuss_post
    where status != 2
    <if test="userId!=0">
        and user_id = #{userId}
    </if>
    <if test="orderMode==0">
        order by type desc, create_time desc
    </if>
    <if test="orderMode==1">
        order by type desc, score desc, create_time desc
    </if>
    limit #{offset}, #{limit}
</select>业务层:DiscussPostService.java
public List<DiscussPost> findDiscussPosts(int userId, int offset, int limit, int orderMode) {
        return discussPostMapper.selectDiscussPosts(userId, offset, limit, orderMode);
}视图层:HomeController.java
// orderMode 表示排序方式
// 默认值是0 表示按照时间倒序排列
// 1 表示按照热度分数排序
@RequestMapping(path = "/index", method = RequestMethod.GET)
public String getIndexPage(Model model, Page page, @RequestParam(name = "orderMode", defaultValue = "0") int orderMode) {
    // 方法调用栈,SpringMVC会自动实例化Model和Page,并将Page注入Model.
    // 所以,在thymeleaf中可以直接访问Page对象中的数据.
    page.setRows(discussPostService.findDiscussPostRows(0));
    page.setPath("/index?orderMode=" + orderMode);

    List<DiscussPost> list = discussPostService.findDiscussPosts(0, page.getOffset(), page.getLimit(), orderMode);
    List<Map<String, Object>> discussPosts = new ArrayList<>();
    if (list != null) {
        for (DiscussPost post : list) {
            Map<String, Object> map = new HashMap<>();
            map.put("post", post);
            User user = userService.findUserById(post.getUserId());
            map.put("user", user);
            // 统计帖子对应的点赞数量
            long likeCount = likeService.findEntityLikeCount(ENTITY_TYPE_POST, post.getId());
            map.put("likeCount", likeCount);
            discussPosts.add(map);
        }
    }
    model.addAttribute("discussPosts", discussPosts);
    model.addAttribute("orderMode", orderMode);
    return "/index";
}前端页面:index.html
<!-- 筛选条件 -->
<ul class="nav nav-tabs mb-3">
        <li class="nav-item">
                <a th:class="|nav-link ${orderMode==0?'active':''}|" th:href="@{/index(orderMode=0)}">最新</a>
        </li>
        <li class="nav-item">
                <a th:class="|nav-link ${orderMode==1?'active':''}|" th:href="@{/index(orderMode=1)}">最热</a>
        </li>
</ul>
生成长图
理论分析
wkhtml 下载
官网地址:https://wkhtmltopdf.org/downloads.html
常用命令
官网:https://wkhtmltopdf.org/usage/wkhtmltopdf.txt
将网页转为 pdf
wkhtmltopdf url 存储路径/名称.pdf将网页转为 image
wkhtmltoimage --quality 50 网站地址url 存储路径/名称.png测试使用
src/test/java/com/nowcoder/community/WkTests.java
public class WkTests {

    public static void main(String[] args) {
        String cmd = "wkhtmltoimage --quality 75  https://www.nowcoder.com /home/aug/software/java/wk/3.png";
        try {
            Runtime._getRuntime_().exec(cmd);
            System._out_.println("ok.");
        } catch (IOException e) {
            e.printStackTrace();
        }
    }

}
前提配置
appliaction.properties
_# wkhtml 生成图片或pdf工具所在_
_# command : 使用该工具 实质上还是需要在命令行调用, 因此如果没有将该工具的bin目录添加到环境变量中, 需要在command中指定全部的路径_
_#wk.image.command=d:/work/wkhtmltopdf/bin/wkhtmltoimage_
_# 因为在 linux 中安装 deb是默认添加到环境变量中的, 因此此处不再指定bin目录_
wk.image.command=wkhtmltoimage
_# wkhtml 生成的图片或pdf  保存的路径_
wk.image.storage=/home/aug/software/java/wk
配置类
WkConfig.java
因为 wkhtml 工具不能自动创建文件夹, 因此需要在系统启动后自动进行文件夹的创建
@Configuration
public class WkConfig {

    private static final Logger _logger _= LoggerFactory._getLogger_(WkConfig.class);

    @Value("${wk.image.storage}")
    private String wkImageStorage;

    @PostConstruct
    _// 在系统启动后, 判断文件夹是否已经创建_
_    _public void init() {
        _// 创建WK图片目录_
_        _File file = new File(wkImageStorage);
        if (!file.exists()) {
            file.mkdir();
            _logger_.info("创建WK图片目录: " + wkImageStorage);
        }
    }

}
视图层
ShareController.java
当前端发起生成 长图片 进行分享的请求,我们需要 1. 进行长图片生成并保存到服务器中 2. 将长图片的链接发送给要分享的人
但是生成图片是一个很耗时间的操作,因此使用 Kafka 进行异步实现
@Controller
public class ShareController implements CommunityConstant {

    private static final Logger _logger _= LoggerFactory._getLogger_(ShareController.class);

    @Autowired
    private EventProducer eventProducer;

    @Value("${community.path.domain}")
    private String domain;

    _// 相对路径 这个根据访问地址获取_
_    _@Value("${server.servlet.context-path}")
    private String contextPath;

    _// wkhtmltoimage 生成的长图保存的位置_
_    _@Value("${wk.image.storage}")
    private String wkImageStorage;

    _// 如果使用了qinniuyun, 分享的链接_
_    _@Value("${qiniu.bucket.share.url}")
    private String shareBucketUrl;

    // 前端发起分享的请求
    // 需要传入网页的链接,即需要将那一个网页分享
    @RequestMapping(path = "/share", method = RequestMethod._GET_)
    @ResponseBody
    public String share(String htmlUrl) {
        _// 文件名_
_        _String fileName = CommunityUtil._generateUUID_();

        _// 异步生成长图_
_        _Event event = new Event()
                .setTopic(_TOPIC_SHARE_)
                .setData("htmlUrl", htmlUrl)
                .setData("fileName", fileName)
                .setData("suffix", ".png");
        eventProducer.fireEvent(event);

        _// 返回访问路径_
_        _Map<String, Object> map = new HashMap<>();
        map.put("shareUrl", domain + contextPath + "/share/image/" + fileName);
_//        map.put("shareUrl", shareBucketUrl + "/" + fileName);_

_        _return CommunityUtil._getJSONString_(0, null, map);
    }

    _// 废弃_
_    // 获取长图_
_    _@RequestMapping(path = "/share/image/{fileName}", method = RequestMethod._GET_)
    public void getShareImage(@PathVariable("fileName") String fileName, HttpServletResponse response) {
        if (StringUtils._isBlank_(fileName)) {
            throw new IllegalArgumentException("文件名不能为空!");
        }

        response.setContentType("image/png");
        File file = new File(wkImageStorage + "/" + fileName + ".png");
        try {
            OutputStream os = response.getOutputStream();
            FileInputStream fis = new FileInputStream(file);
            byte[] buffer = new byte[1024];
            int b = 0;
            while ((b = fis.read(buffer)) != -1) {
                os.write(buffer, 0, b);
            }
        } catch (IOException e) {
            _logger_.error("获取长图失败: " + e.getMessage());
        }
    }

}
Kafka 消费者
EventConsumer.java
_// 消费分享事件_
_    _@KafkaListener(topics = _TOPIC_SHARE_)
    public void handleShareMessage(ConsumerRecord record) {
        if (record == null || record.value() == null) {
            _logger_.error("消息的内容为空!");
            return;
        }

        Event event = JSONObject._parseObject_(record.value().toString(), Event.class);
        if (event == null) {
            _logger_.error("消息格式错误!");
            return;
        }

        _// 获取要分享页面的html链接_
_        _String htmlUrl = (String) event.getData().get("htmlUrl");
        String fileName = (String) event.getData().get("fileName");
        String suffix = (String) event.getData().get("suffix");

        String cmd = wkImageCommand + " --quality 75 "
                + htmlUrl + " " + wkImageStorage + "/" + fileName + suffix;
        try {
            Runtime._getRuntime_().exec(cmd);
            _logger_.info("生成长图成功: " + cmd);
        } catch (IOException e) {
            _logger_.error("生成长图失败: " + e.getMessage());
        }

        _// 启用定时器,监视该图片,一旦生成了,则上传至七牛云._
_//        UploadTask task = new UploadTask(fileName, suffix);_
_//        Future future = taskScheduler.scheduleAtFixedRate(task, 500);_
_//        task.setFuture(future);_
_    _}

    class UploadTask implements Runnable {

        _// 文件名称_
_        _private String fileName;
        _// 文件后缀_
_        _private String suffix;
        _// 启动任务的返回值_
_        _private Future future;
        _// 开始时间_
_        _private long startTime;
        _// 上传次数_
_        _private int uploadTimes;

        public UploadTask(String fileName, String suffix) {
            this.fileName = fileName;
            this.suffix = suffix;
            this.startTime = System._currentTimeMillis_();
        }

        public void setFuture(Future future) {
            this.future = future;
        }

        @Override
        public void run() {
            _// 生成失败_
_            _if (System._currentTimeMillis_() - startTime > 30000) {
                _logger_.error("执行时间过长,终止任务:" + fileName);
                future.cancel(true);
                return;
            }
            _// 上传失败_
_            _if (uploadTimes >= 3) {
                _logger_.error("上传次数过多,终止任务:" + fileName);
                future.cancel(true);
                return;
            }

            String path = wkImageStorage + "/" + fileName + suffix;
            File file = new File(path);
            if (file.exists()) {
                _logger_.info(String._format_("开始第%d次上传[%s].", ++uploadTimes, fileName));
                _// 设置响应信息_
_                _StringMap policy = new StringMap();
                policy.put("returnBody", CommunityUtil._getJSONString_(0));
                _// 生成上传凭证_
_                _Auth auth = Auth._create_(accessKey, secretKey);
                String uploadToken = auth.uploadToken(shareBucketName, fileName, 3600, policy);
                _// 指定上传机房_
_                _UploadManager manager = new UploadManager(new Configuration(Zone._zone1_()));
                try {
                    _// 开始上传图片_
_                    _Response response = manager.put(
                            path, fileName, uploadToken, null, "image/" + suffix, false);
                    _// 处理响应结果_
_                    _JSONObject json = JSONObject._parseObject_(response.bodyString());
                    if (json == null || json.get("code") == null || !json.get("code").toString().equals("0")) {
                        _logger_.info(String._format_("第%d次上传失败[%s].", uploadTimes, fileName));
                    } else {
                        _logger_.info(String._format_("第%d次上传成功[%s].", uploadTimes, fileName));
                        future.cancel(true);
                    }
                } catch (QiniuException e) {
                    _logger_.info(String._format_("第%d次上传失败[%s].", uploadTimes, fileName));
                }
            } else {
                _logger_.info("等待图片生成[" + fileName + "].");
            }
        }
    }
文件上传到云服务器
当前项目将文件上传到七牛云进行管理
理论分析
首先进行配置
application.properties
_# qiniu_
qiniu.key.access=5XvL7D1RQ7buwQsEkJKse7AHxqIwy7_SYivC3rG9
qiniu.key.secret=KdqHm_Ro0r7fsoPAC7ZK_qedCPuYwu7YSe0uPkMF
qiniu.bucket.header.name=yzh-community-header
quniu.bucket.header.url=http://yzh-community-header.s3.cn-east-1.qiniucs.com
qiniu.bucket.share.name=yzh-community-share
qiniu.bucket.share.url=http://yzh-community-share.s3.cn-east-1.qiniucs.com
头像文件存储到云服务器
属于客户端上传,因为是前端提交 图像文件 直接到 qiniu 云
首先 需要对 UserController.java 中上传头像的逻辑进行修改:
_// 请求前往用户设置页面_
@LoginRequired
@RequestMapping(path = "/setting", method = RequestMethod._GET_)
public String getSettingPage(Model model) {
    _// 需要在此处生成可以使用qiniu云对象存储的凭证, 并且存储到前端的表单中_
_    // 从而当前端进行上传图片操作, 提交表单的时候,才能提交给qiniu云_

_    // 随即生成 上传文件的 名称_
_    _String fileName = CommunityUtil._generateUUID_();
    _// 设置响应信息_
_    _StringMap policy = new StringMap();
    policy.put("returnBody", CommunityUtil._getJSONString_(0));
    _// 生成上传凭证_
_    _Auth auth = Auth._create_(accessKey, secretKey);
    String uploadToken = auth.uploadToken(headerBucketName, fileName, 3600, policy);

    model.addAttribute("uploadToken", uploadToken);
    model.addAttribute("fileName", fileName);

    return "/site/setting";
}

_// 更新头像路径_
_// 因为前端将会异步将 图片文件提交给qiniu云, 因此需要更新数据库中user表中对应的头像链接, 也是异步更新_
@RequestMapping(path = "/header/url", method = RequestMethod._POST_)
@ResponseBody
public String updateHeaderUrl(String fileName) {
    if (StringUtils._isBlank_(fileName)) {
        return CommunityUtil._getJSONString_(1, "文件名不能为空!");
    }

    String url = headerBucketUrl + "/" + fileName;
    userService.updateHeader(hostHolder.getUser().getId(), url);

    return CommunityUtil._getJSONString_(0);
}
其次需要修改前端页面 setting.html,即需要修改 提交图像 文件的表单,前端**异步提交 **图形文件
_<!--下面的表单是上传图像文件 并 保存到qiniu云, 此时是异步上传-->_
<form class="mt-5" id="uploadForm">
    <div class="form-group row mt-4">
       <label for="head-image" class="col-sm-2 col-form-label text-right">选择头像:</label>
       <div class="col-sm-10">
          <div class="custom-file">
             <input type="hidden" name="token" th:value="${uploadToken}">
             <input type="hidden" name="key" th:value="${fileName}">
             <input type="file" class="custom-file-input"
                   id="head-image" name="file" lang="es" required="">
             <label class="custom-file-label" for="head-image" data-browse="文件">选择一张图片</label>
             <div class="invalid-feedback">
                该账号不存在!
             </div>
          </div>
       </div>
    </div>
    <div class="form-group row mt-4">
       <div class="col-sm-2"></div>
       <div class="col-sm-10 text-center">
          <button type="submit" class="btn btn-info text-white form-control">立即上传</button>
       </div>
    </div>
</form>
对应 setting.js
$(function(){
$("#uploadForm").submit(_upload_);
});
function _upload_() {
$.ajax({
url: "http://up-z0.qiniup.com",
method: "post",
processData: false, _// 不把表单转换为字符串_
_ _contentType: false, _// 不让jquery设置上传类型, 因此此次上传的是文件_
_ _data: new _FormData_($("#uploadForm")[0]),
success: function(data) {
if(data && data.code == 0) {
_// 更新头像访问路径_
_ _$.post(
CONTEXT_PATH + "/user/header/url",
{"fileName":$("input[name='key']").val()},
function(data) {
data = $.parseJSON(data);
if(data.code == 0) {
window.location.reload();
} else {
_alert_(data.msg);
}
}
);
} else {
_alert_("上传失败!");
}
}
});
_// return false 表示 不要再继续进行表单提交, 因为上面已经进行了提交逻辑_
_ _return false;
}分享生成的长图 存储到云服务器
属于服务器直传,应用服务器直接将数据提交给 qiniu 云
**首先修改 视图层 **ShareController.java
@RequestMapping(path = "/share", method = RequestMethod._GET_)
@ResponseBody
public String share(String htmlUrl) {
_// 文件名_
_ _String fileName = CommunityUtil._generateUUID_();
_// 异步生成长图_
_ _Event event = new Event()
.setTopic(_TOPIC_SHARE_)
.setData("htmlUrl", htmlUrl)
.setData("fileName", fileName)
.setData("suffix", ".png");
eventProducer.fireEvent(event);
_// 返回访问路径_
_ _Map<String, Object> map = new HashMap<>();
_// map.put("shareUrl", domain + contextPath + "/share/image/" + fileName);_
_ // 将生成的长图直接传给 qiniu 云, 因此返回给前端的图片路径 应该是 存储到qiniu云中图片 的外部访问链接_
_ _map.put("shareUrl", shareBucketUrl + "/" + fileName);
return CommunityUtil._getJSONString_(0, null, map);
}其次修改 Kafka 消费者对 TOPIC_SHARE 的处理
EventConsumer.java
_// 消费分享事件_
@KafkaListener(topics = _TOPIC_SHARE_)
public void handleShareMessage(ConsumerRecord record) {
if (record == null || record.value() == null) {
_logger_.error("消息的内容为空!");
return;
}
Event event = JSONObject._parseObject_(record.value().toString(), Event.class);
if (event == null) {
_logger_.error("消息格式错误!");
return;
}
_// 获取要分享页面的html链接_
_ _String htmlUrl = (String) event.getData().get("htmlUrl");
String fileName = (String) event.getData().get("fileName");
String suffix = (String) event.getData().get("suffix");
String cmd = wkImageCommand + " --quality 75 "
+ htmlUrl + " " + wkImageStorage + "/" + fileName + suffix;
try {
Runtime._getRuntime_().exec(cmd);
_logger_.info("生成长图成功: " + cmd);
} catch (IOException e) {
_logger_.error("生成长图失败: " + e.getMessage());
}
_// 创建一个上传任务_
_ _UploadTask task = new UploadTask(fileName, suffix);
_// 启用定时器,监视该图片,一旦生成了,则上传至七牛云._
_ _Future future = taskScheduler.scheduleAtFixedRate(task, 500);
task.setFuture(future);
}
class UploadTask implements Runnable {
_// 文件名称_
_ _private String fileName;
_// 文件后缀_
_ _private String suffix;
_// 启动任务的返回值_
_ _private Future future;
_// 开始时间_
_ _private long startTime;
_// 上传次数_
_ _private int uploadTimes;
public UploadTask(String fileName, String suffix) {
this.fileName = fileName;
this.suffix = suffix;
this.startTime = System._currentTimeMillis_();
}
public void setFuture(Future future) {
this.future = future;
}
@Override
public void run() {
_// 生成失败_
_ _if (System._currentTimeMillis_() - startTime > 30000) {
_logger_.error("执行时间过长,终止任务:" + fileName);
future.cancel(true);
return;
}
_// 上传失败_
_ _if (uploadTimes >= 3) {
_logger_.error("上传次数过多,终止任务:" + fileName);
future.cancel(true);
return;
}
String path = wkImageStorage + "/" + fileName + suffix;
File file = new File(path);
if (file.exists()) {
_logger_.info(String._format_("开始第%d次上传[%s].", ++uploadTimes, fileName));
_// 设置响应信息_
_ _StringMap policy = new StringMap();
policy.put("returnBody", CommunityUtil._getJSONString_(0));
_// 生成上传凭证_
_ _Auth auth = Auth._create_(accessKey, secretKey);
String uploadToken = auth.uploadToken(shareBucketName, fileName, 3600, policy);
_// 指定上传机房_
_ _UploadManager manager = new UploadManager(new Configuration(Zone._zone0_()));
try {
_// 开始上传图片_
_ _Response response = manager.put(
path, fileName, uploadToken, null, "image/" + suffix, false);
_// 处理响应结果_
_ _JSONObject json = JSONObject._parseObject_(response.bodyString());
if (json == null || json.get("code") == null || !json.get("code").toString().equals("0")) {
_logger_.info(String._format_("第%d次上传失败[%s].", uploadTimes, fileName));
} else {
_logger_.info(String._format_("第%d次上传成功[%s].", uploadTimes, fileName));
future.cancel(true);
}
} catch (QiniuException e) {
_logger_.info(String._format_("第%d次上传失败[%s].", uploadTimes, fileName));
}
} else {
_logger_.info("等待图片生成[" + fileName + "].");
}
}
}优化网站性能
理论分析
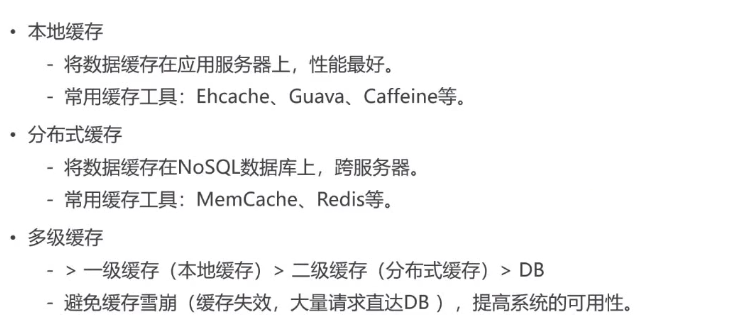
目标:优化热门帖子的访问
本地缓存:一般用来缓存不经常改变的数据
使用 Caffeine 进行本地缓存
前提配置
application.properties
_# caffeine 实现本地缓存_
_# 缓存热点帖子的列表_
_# max-size: 可以存储多少个对象_
caffeine.posts.max-size=15
_# 设置过期时间_
caffeine.posts.expire-seconds=180业务层
DiscussPostService.java
优化查询
@Service
public class DiscussPostService {
private static final Logger _logger _= LoggerFactory._getLogger_(DiscussPostService.class);
@Autowired
private DiscussPostMapper discussPostMapper;
@Autowired
private SensitiveFilter sensitiveFilter;
@Value("${caffeine.posts.max-size}")
private int maxSize;
@Value("${caffeine.posts.expire-seconds}")
private int expireSeconds;
_// Caffeine核心接口: Cache,_
_ // 子接口:LoadingCache(同步缓存), AsyncLoadingCache(异步缓存)_
_ // 帖子列表缓存_
_ // 也是通过 key:value 存储_
_ _private LoadingCache<String, List<DiscussPost>> postListCache;
_// 帖子总数缓存_
_ _private LoadingCache<Integer, Integer> postRowsCache;
@PostConstruct
public void init() {
_// 初始化帖子列表缓存_
_ _postListCache = Caffeine._newBuilder_()
.maximumSize(maxSize)
.expireAfterWrite(expireSeconds, TimeUnit._SECONDS_)
.build(new CacheLoader<String, List<DiscussPost>>() {
@Nullable
@Override
public List<DiscussPost> load(@NonNull String key) throws Exception {
if (key == null || key.length() == 0) {
throw new IllegalArgumentException("参数错误!");
}
String[] params = key.split(":");
if (params == null || params.length != 2) {
throw new IllegalArgumentException("参数错误!");
}
int offset = Integer._valueOf_(params[0]);
int limit = Integer._valueOf_(params[1]);
_// 二级缓存: Redis -> mysql_
_ logger_.debug("load post list from DB.");
return discussPostMapper.selectDiscussPosts(0, offset, limit, 1);
}
});
_// 初始化帖子总数缓存_
_ _postRowsCache = Caffeine._newBuilder_()
.maximumSize(maxSize)
.expireAfterWrite(expireSeconds, TimeUnit._SECONDS_)
.build(new CacheLoader<Integer, Integer>() {
@Nullable
@Override
public Integer load(@NonNull Integer key) throws Exception {
_logger_.debug("load post rows from DB.");
return discussPostMapper.selectDiscussPostRows(key);
}
});
}
public List<DiscussPost> findDiscussPosts(int userId, int offset, int limit, int orderMode) {
if (userId == 0 && orderMode == 1) {
_// 先查询本地缓存_
_ _return postListCache.get(offset + ":" + limit);
}
_logger_.debug("load post list from DB.");
return discussPostMapper.selectDiscussPosts(userId, offset, limit, orderMode);
}
public int findDiscussPostRows(int userId) {
if (userId == 0) {
return postRowsCache.get(userId);
}
_logger_.debug("load post rows from DB.");
return discussPostMapper.selectDiscussPostRows(userId);
}
public int addDiscussPost(DiscussPost post) {
if (post == null) {
throw new IllegalArgumentException("参数不能为空!");
}
_// 转义HTML标记_
_ _post.setTitle(HtmlUtils._htmlEscape_(post.getTitle()));
post.setContent(HtmlUtils._htmlEscape_(post.getContent()));
_// 过滤敏感词_
_ _post.setTitle(sensitiveFilter.filter(post.getTitle()));
post.setContent(sensitiveFilter.filter(post.getContent()));
return discussPostMapper.insertDiscussPost(post);
}
public DiscussPost findDiscussPostById(int id) {
return discussPostMapper.selectDiscussPostById(id);
}
public int updateCommentCount(int id, int commentCount) {
return discussPostMapper.updateCommentCount(id, commentCount);
}
public int updateType(int id, int type) {
return discussPostMapper.updateType(id, type);
}
public int updateStatus(int id, int status) {
return discussPostMapper.updateStatus(id, status);
}
public int updateScore(int id, double score) {
return discussPostMapper.updateScore(id, score);
}
}测试
测试缓存是否有效 CaffeineTests.java
@RunWith(SpringRunner.class)
@SpringBootTest
@ContextConfiguration(classes = CommunityApplication.class)
public class CaffeineTests {
@Autowired
private DiscussPostService postService;
@Test
public void initDataForTest() {
for (int i = 0; i < 300000; i++) {
DiscussPost post = new DiscussPost();
post.setUserId(111);
post.setTitle("互联网求职暖春计划");
post.setContent("今年的就业形势,确实不容乐观。过了个年,仿佛跳水一般,整个讨论区哀鸿遍野!19届真的没人要了吗?!18届被优化真的没有出路了吗?!大家的“哀嚎”与“悲惨遭遇”牵动了每日潜伏于讨论区的牛客小哥哥小姐姐们的心,于是牛客决定:是时候为大家做点什么了!为了帮助大家度过“寒冬”,牛客网特别联合60+家企业,开启互联网求职暖春计划,面向18届&19届,拯救0 offer!");
post.setCreateTime(new Date());
post.setScore(Math._random_() * 2000);
postService.addDiscussPost(post);
}
}
@Test
public void testCache() {
System._out_.println(postService.findDiscussPosts(0, 0, 10, 1));
System._out_.println(postService.findDiscussPosts(0, 0, 10, 1));
System._out_.println(postService.findDiscussPosts(0, 0, 10, 1));
System._out_.println(postService.findDiscussPosts(0, 0, 10, 0));
}
}压力测试
使用压力测试工具 jmeter 进行测试
下载地址:****https://jmeter.apache.org/download_jmeter.cgi
ubuntu 下启动: bin/jmeter.sh
测试计划:
首先添加 线程组
右键 添加-> 线程-> 线程组
线程数:100
循环次数:永远(一直循环执行)
调度器-> 持续时间:60(一共执行 60s)
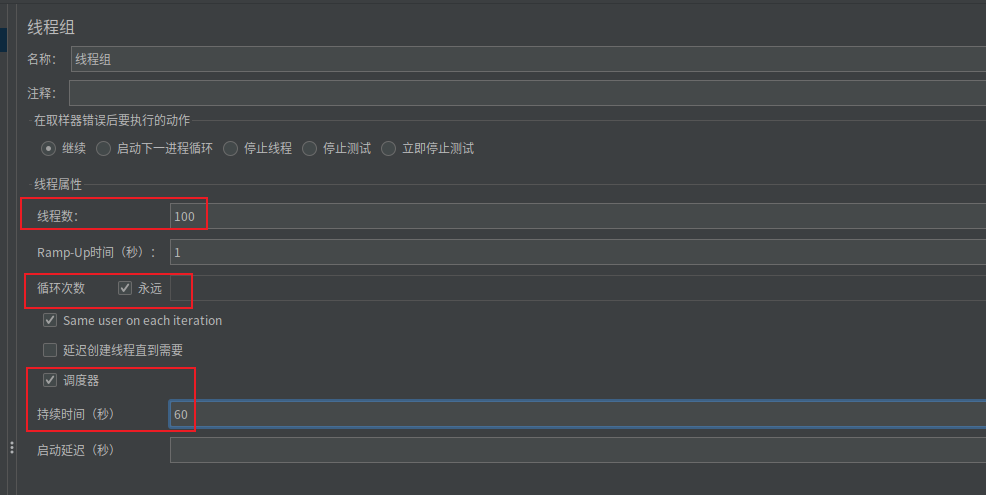
其次添加 HTTP 请求
右键线程组 添加-> 取样器->HTTP 请求

然后添加 定时器
右键线程组 添加-> 定时器-> 统一随机定时器
从而保证是模拟随即间隔 访问服务器
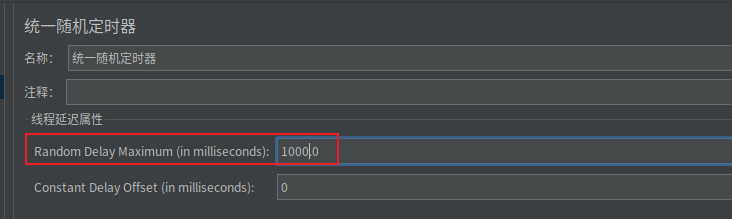
最后添加 聚合报告
右键 线程组 添加-> 监听器-> 聚合报告
启动进行测试
不使用缓存
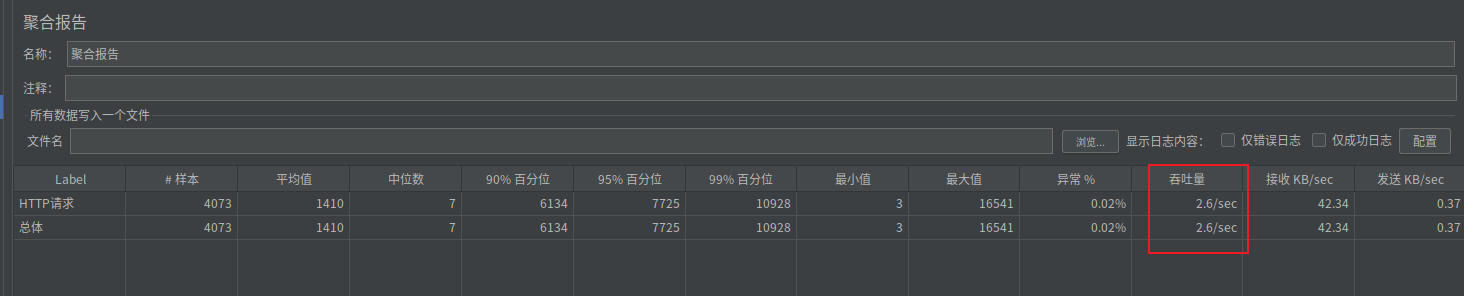
使用缓存

项目发布与总结
14.1 单元测试
理论分析
测试类
SpringBootTests.java
@RunWith(SpringRunner.class)
@SpringBootTest
@ContextConfiguration(classes = CommunityApplication.class)
public class SpringBootTests {
@Autowired
private DiscussPostService discussPostService;
private DiscussPost data;
_// 类初始化之前执行, 因为和类有关,因此必须是静态(static)的_
_ _@BeforeClass
public static void beforeClass() {
System._out_.println("beforeClass");
}
_// 类销毁之后执行一次_
_ _@AfterClass
public static void afterClass() {
System._out_.println("afterClass");
}
_// 每次调用测试方法之前都会被执行_
_ _@Before
public void before() {
System._out_.println("before");
_// 初始化测试数据_
_ _data = new DiscussPost();
data.setUserId(111);
data.setTitle("Test Title");
data.setContent("Test Content");
data.setCreateTime(new Date());
discussPostService.addDiscussPost(data);
}
_// 测试方法执行结束之后执行_
_ _@After
public void after() {
System._out_.println("after");
_// 删除测试数据_
_ _discussPostService.updateStatus(data.getId(), 2);
}
_/**_
_ * @Before, @After 等带有注解的方法往往是用来初始化数据和销毁数据的_
_ */_
_ _@Test
public void test1() {
System._out_.println("test1");
}
@Test
public void test2() {
System._out_.println("test2");
}
@Test
public void testFindById() {
DiscussPost post = discussPostService.findDiscussPostById(data.getId());
Assert._assertNotNull_(post);
Assert._assertEquals_(data.getTitle(), post.getTitle());
Assert._assertEquals_(data.getContent(), post.getContent());
}
@Test
public void testUpdateScore() {
int rows = discussPostService.updateScore(data.getId(), 2000.00);
Assert._assertEquals_(1, rows);
DiscussPost post = discussPostService.findDiscussPostById(data.getId());
Assert._assertEquals_(2000.00, post.getScore(), 2);
}
}14.2 项目监控
理论分析
如果使用 Autchor 进行项目监控, 需要先引入依赖
依赖引入
pom.xml
<dependency>
<groupId>org.springframework.boot</groupId>
<artifactId>spring-boot-starter-actuator</artifactId>
</dependency>前提配置
application.properties
_# actuator_
_# 暴露所有端点_
management.endpoints.web.exposure.include=*
_# 不暴露某些端点_
management.endpoints.web.exposure.exclude=info,caches自定义 端点
自定义端点 监控数据库连接是否正常
actuator/DatabaseEndpoint.java
_/**_
_ * 自定义端点, 用于监控数据库(比如监控数据库连接是否正常)_
_ */_
@Component
@Endpoint(id = "database") _// 之后前端可以通过id访问_
public class DatabaseEndpoint {
private static final Logger _logger _= LoggerFactory._getLogger_(DatabaseEndpoint.class);
@Autowired
private DataSource dataSource;
_// @ReadOperation: 这个端点只能通过get的请求方式访问_
_ _@ReadOperation
public String checkConnection() {
try (
Connection conn = dataSource.getConnection();
) {
return CommunityUtil._getJSONString_(0, "获取连接成功!");
} catch (SQLException e) {
_logger_.error("获取连接失败:" + e.getMessage());
return CommunityUtil._getJSONString_(1, "获取连接失败!");
}
}
}对端点访问进行权限管理
SecurityConfig.java
.antMatchers(
"/discuss/delete",
"/data/**",
"/actuator/**"
)
.hasAnyAuthority(
_AUTHORITY_ADMIN_
)14.3 项目部署
部署流程
需要安装 ngnix、jdk、maven、mysql、redis、kafaka、elasticsearch、wkhtmltopdf
然后项目打包为 war
14.4 项目总结
常见面试题
15.1 MySQL
存储引擎
InnoDB
事务
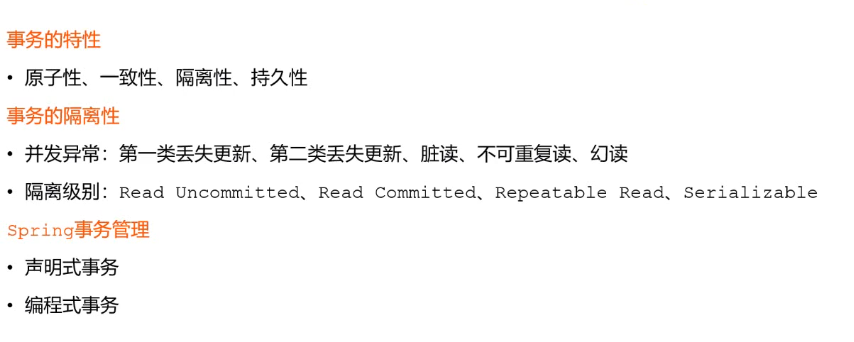
锁
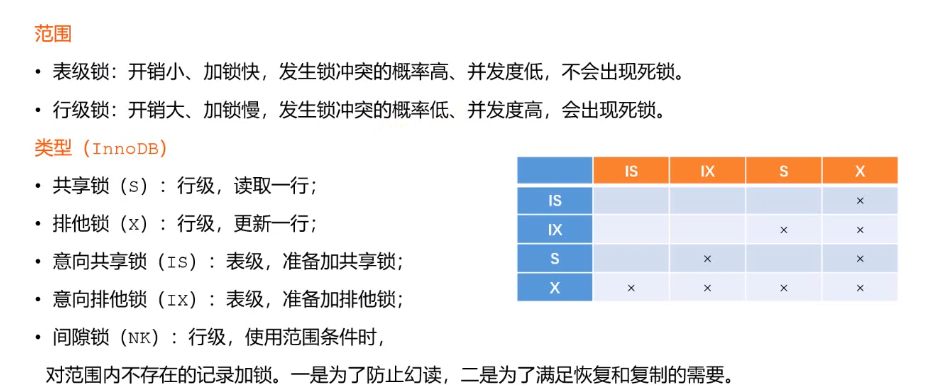
加锁
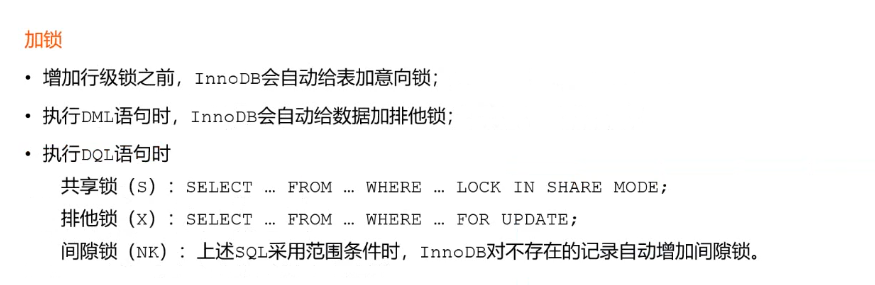
死锁
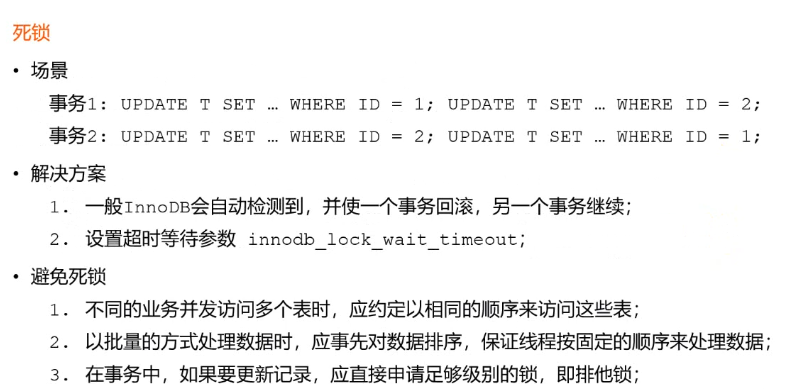
悲观锁与乐观锁
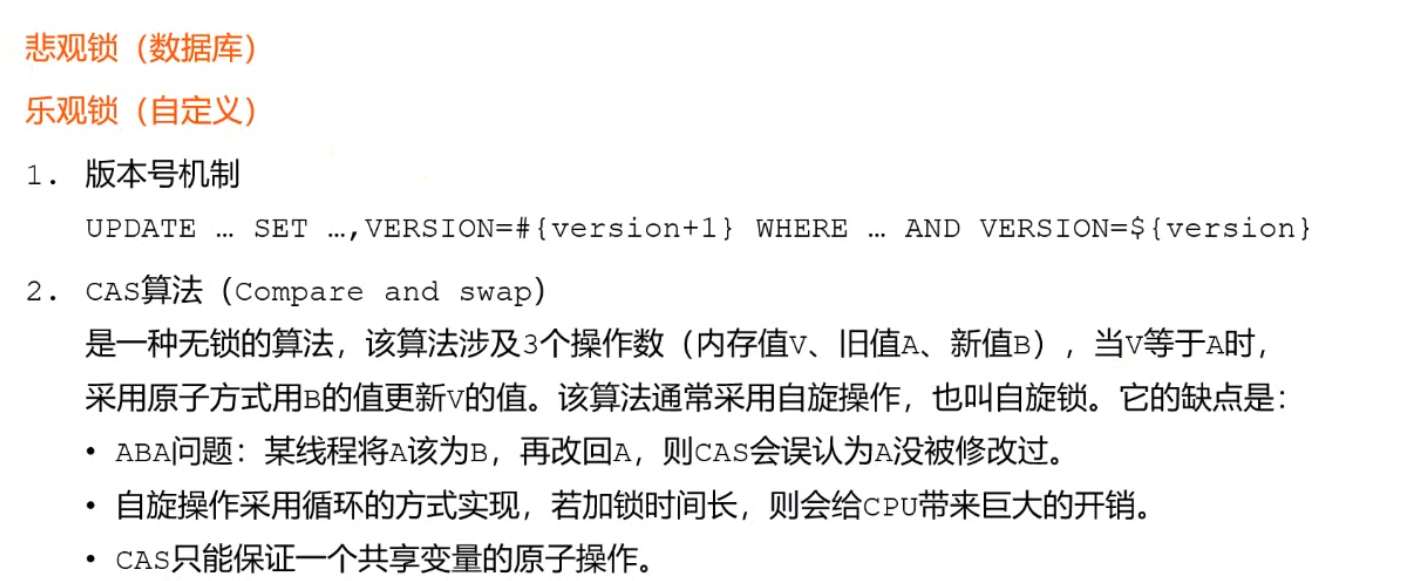
索引
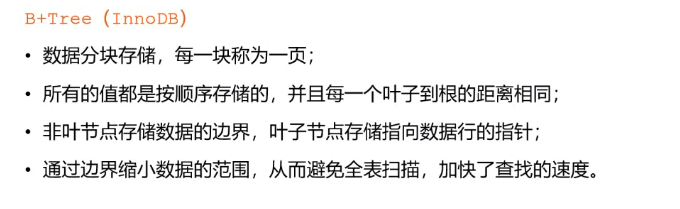
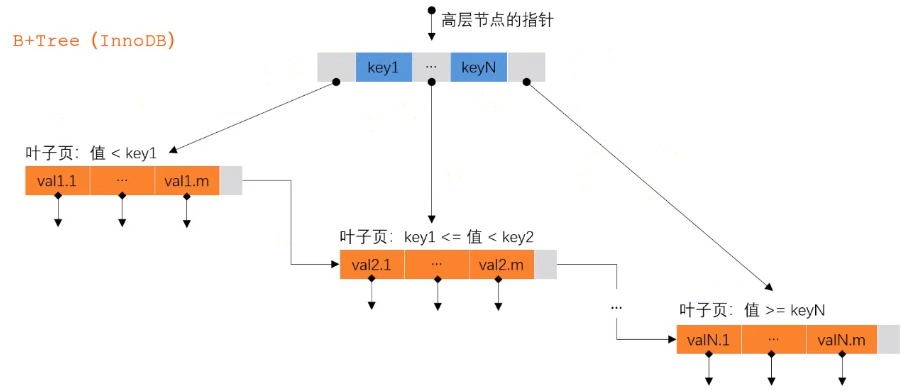
15.2 Redis
数据类型
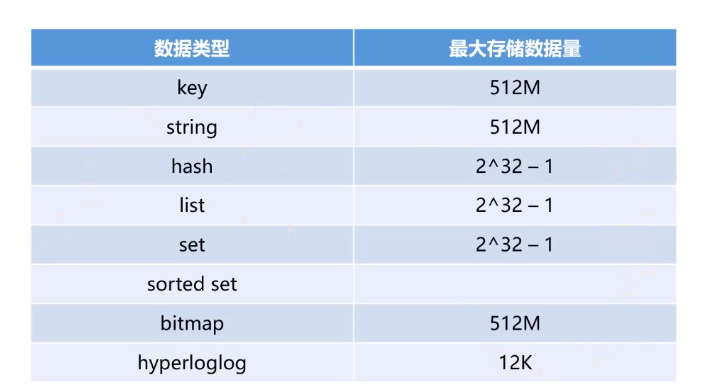
过期策略
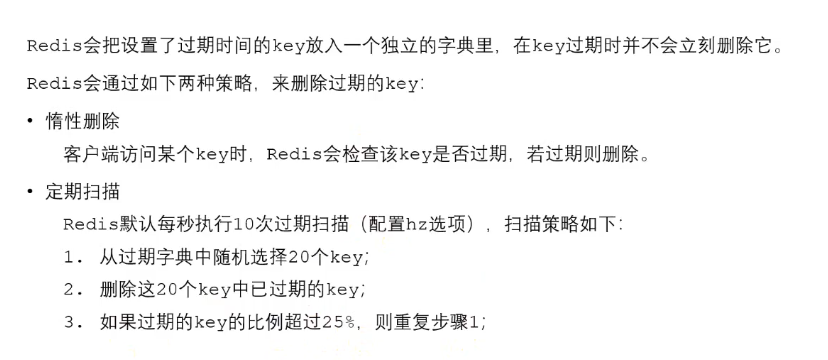
淘汰策略

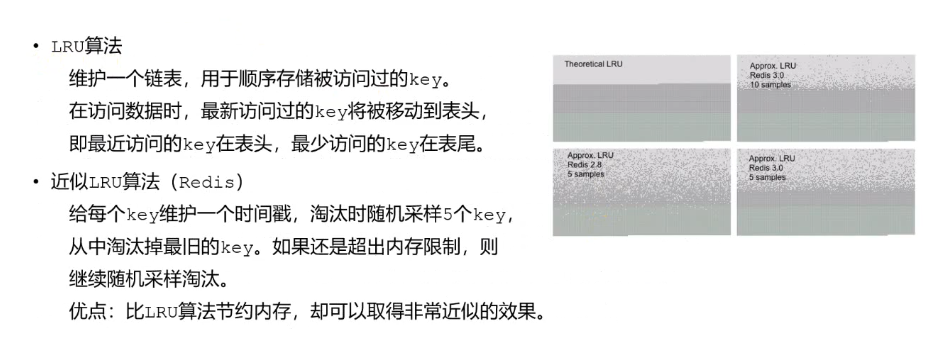
缓存穿透
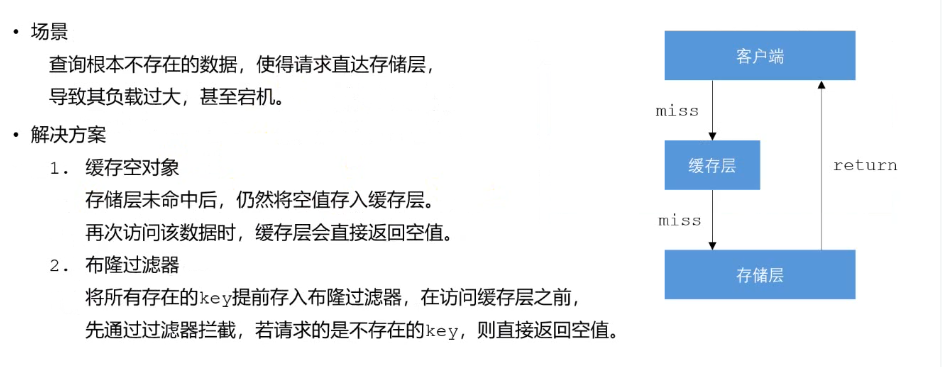
缓存击穿
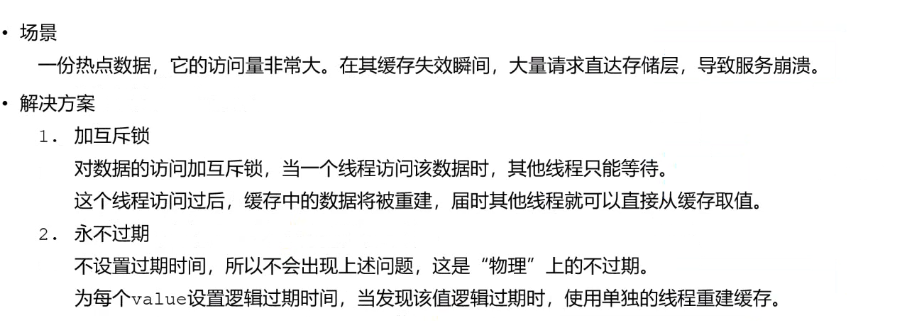
缓存雪崩
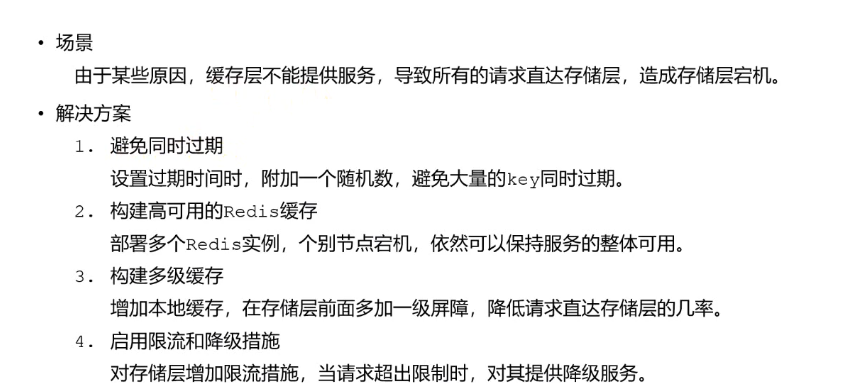
分布式锁 重要

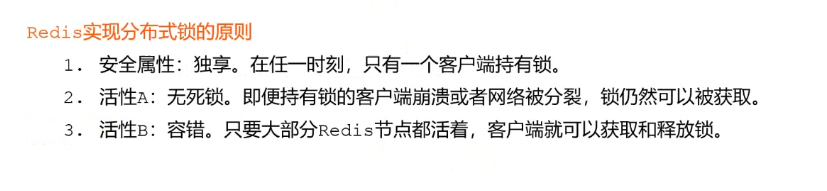
实现分布式锁
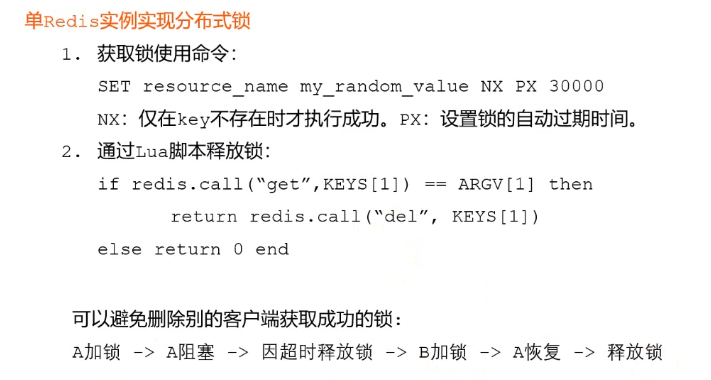
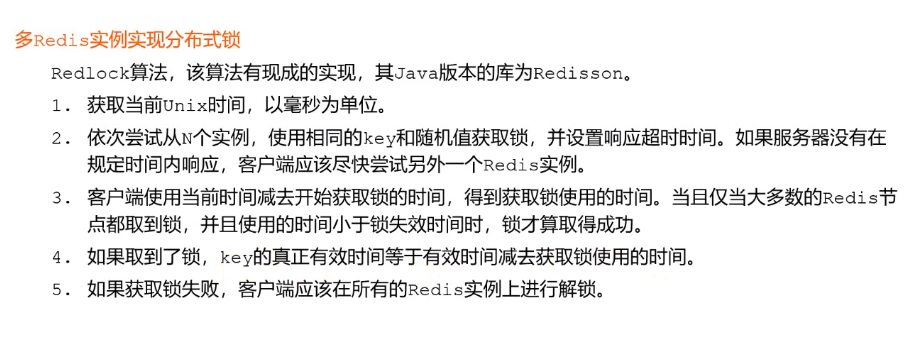
15.3 Spring
IOC
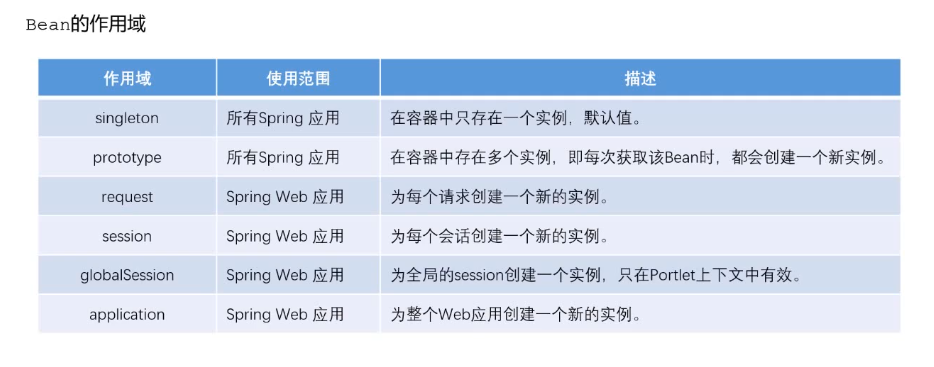
AOP
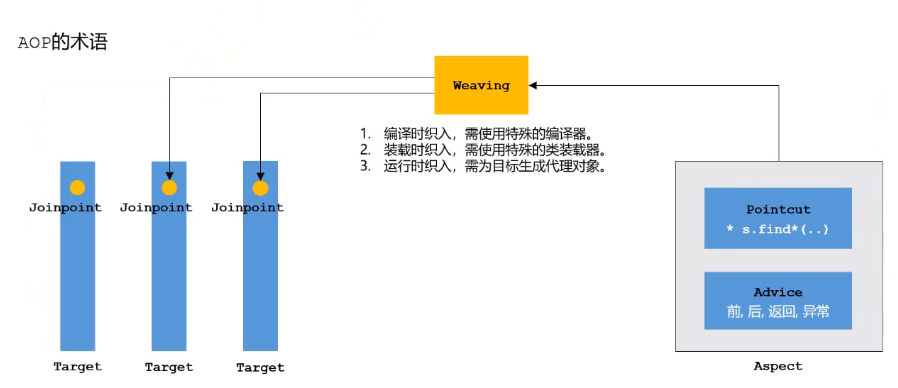
SpringMVC